Why do you think you need host networking enabled for NPM?
1 Like
Why do you think you need host networking enabled for NPM?
It lets you run the container as if it’s directly connected to your LAN which gives it the capability of having it’s own IP and hostname.
Then you can target it at port 443 and not conflict with TrueNAS.
My goal is to provide separate URLs for the apps running on different ports. Using Nginx-Proxy-Manager on TrueNAS itself, it also increases security because HTTP commands become HTTPS without any unencrypted traffic flowing on my network which would happen if I used another machine to host the proxy.
…which is not necessary.
…which you can accomplish by setting TrueNAS to use a different port.
Of course. But there’s no need for host networking to do that. You’ve already seen this link in the other thread, but it documents how to do this without host networking:
Hi,Thank you very much for the guide, I followed your method to get here but don’t quite understand what updating the DNS records means, the
I should have added to the local /etc/hosts
127.0.0.1 subdomain.example.com
Or do I need to add subdomain.example.com -> NAS ip to the DNS in cloudflare?
Understood. Let me explain my use case to help answer your question.
My goal was to allow certain applications (AudioBookShelf, Kavita, SFTP, Linkding) to be accessible from the Internet using a fully qualified domain name (e.g. example.com) using subdomains (e.g. kavita.example.com) in a secure manner rather than by IP address and port number. I’m on a residential internet provider, so the public IP address can change, thus Dynamic DNS (DDNS) is needed for the DNS records.
The first part is automatically updating the DDNS record. After registering my domain name and setting up a Cloudflare (or equivelent) account, I’m using the TrueNAS App “DDNS Updater” which gets my current IP address then updates the DNS record at Cloudflare every five minutes so that it knows what IP address “subdomain.example.com” goes to. No modification of the hosts files is needed.
The second part is setting up the Nginx Reverse proxy so that when a requests comes in for subdomain.example.com , it knows where to go with that request. So, as far as the outside world knows, my audiobook server is at abs.example.com with a SSL certificate from Let’s Encrypt and a force redirect from HTTP to HTTPS, but internal to my network, it’s going to http://192.168.1.2:10223.
Let me see if I can find a guide on this.
1 Like
OK, here we go. These instructions were written up to set up audiobookshelf as an initial configuration.
Part One: Set up Cloudflare account:
In order to make sure
- Sign up for a free Cloudflare account.
- Transfer DNS control of your domain records to Cloudflare.
- Note the following values:
- Zone ID
- Account ID
- User API Token - You will have to generate one using the “Edit Zone DNS” with the Permissions being Zone → DNS → Edit and Zone Resources being Include → Specific Zone → The domain (e.g. example.com). Once it is generated, put it in a safe place.
Part Two: Setting up DDNS Updater
Since I’m allowing access to my ABS instance through a home internet connection, I cannot guarantee that my IP address won’t change. So, I use DDNS updater to automatically update the DNS record on Cloudflare
- Install DDNS Updater with the following settings in the DDNS Updater Configuration → Config section:
- Provider: Cloudflare
- Domain: abs.example.com (additional domains can be comma separated)
- Host (Deprecated): Leave blank
- IP Version: IPv4
- Zone ID: Use Cloudflare Zone ID above
- TTL: Leave at 1
- Token: Use Cloudflare User API Token
- User Service Key: Leave blank
- Email: Your Cloudflare email account
- API Key: Use the Cloudflare Account ID
- Once DDNS updater is running, verify that the DNS record has been updated on Cloudflare.
Part Three: Settings up a reverse proxy
ABS only offers a http connection, and the ABS developer strongly recommends using a reverse proxy to provide a HTTPS connection and to provide additional security. Only Nginx Proxy Manager is offered through TrueNAS Scale’s app store, and fortunately, it is easy to set up.
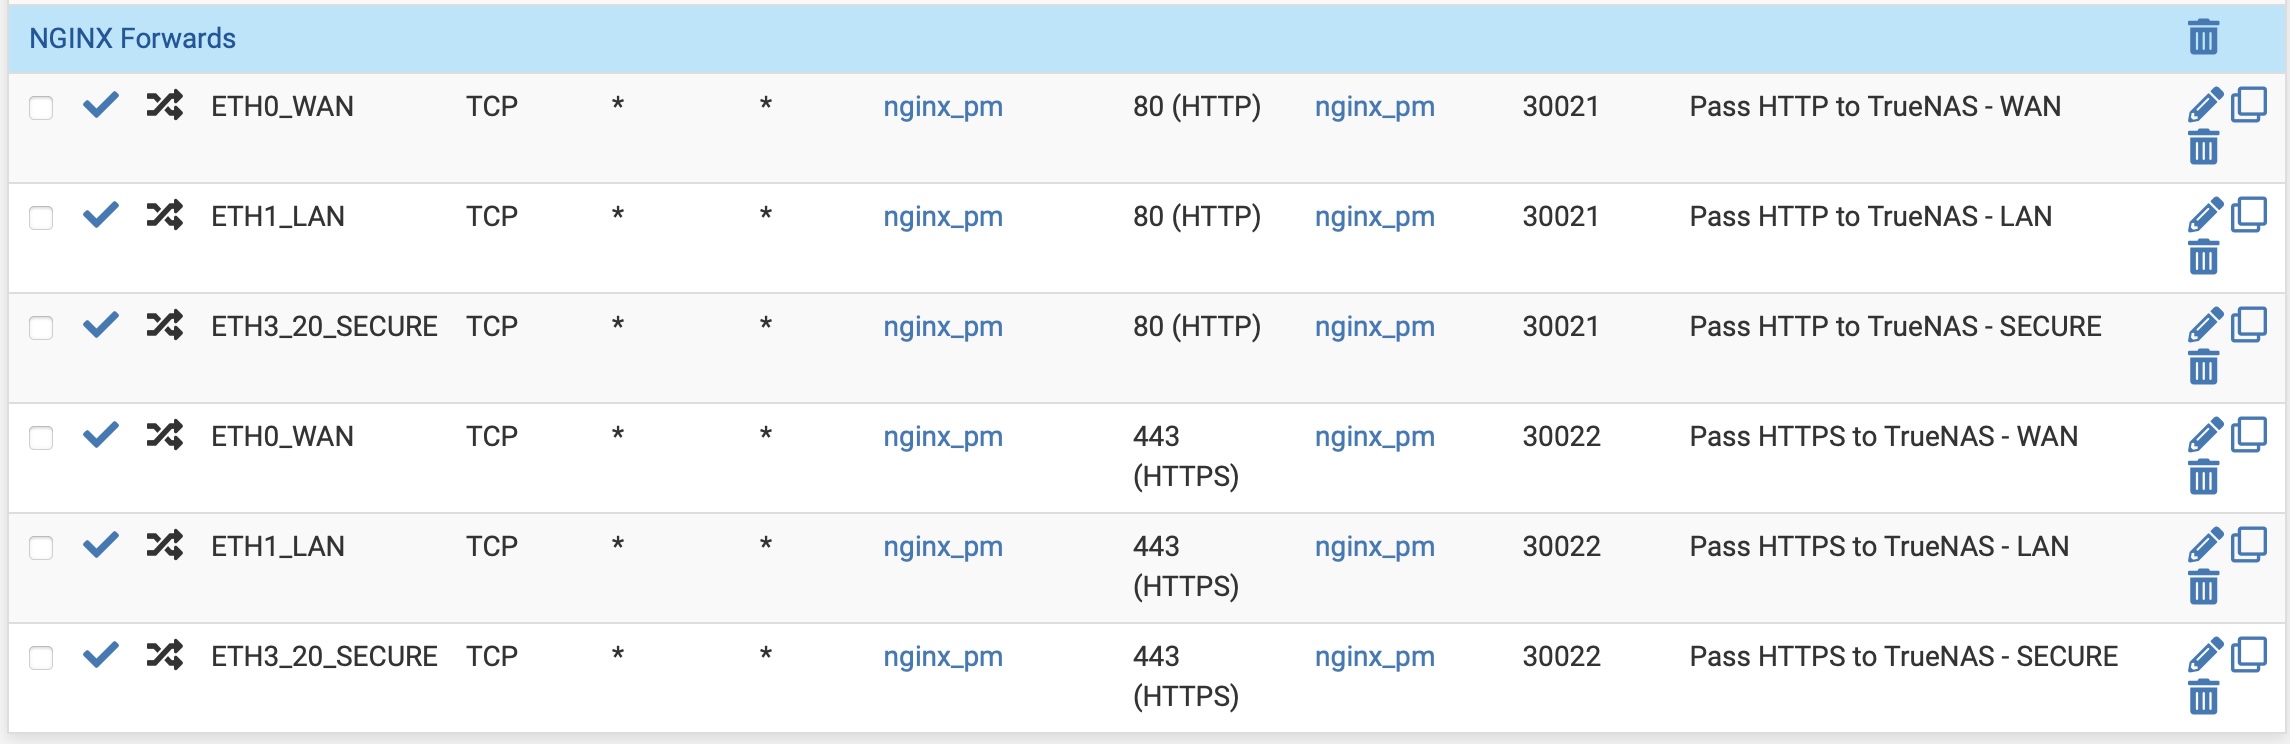
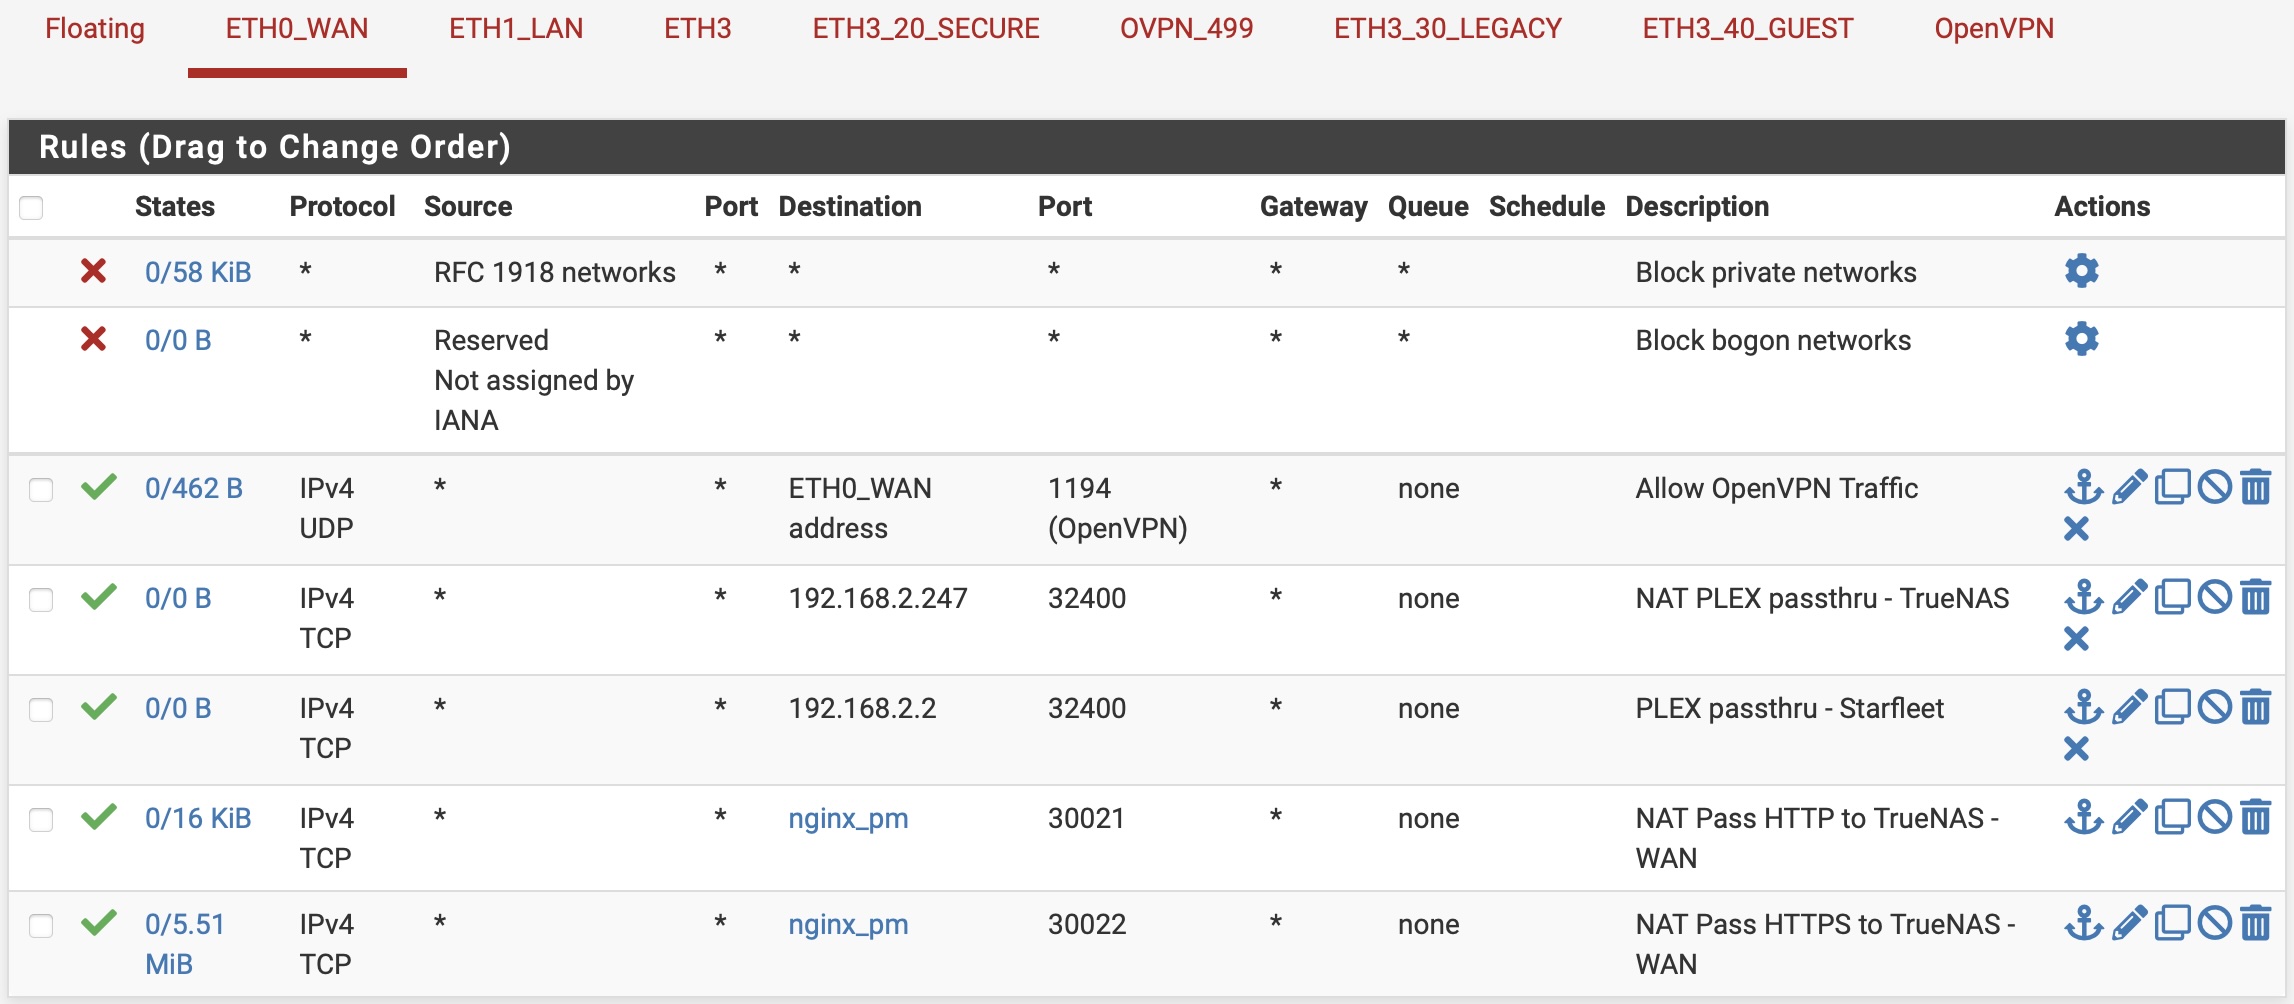
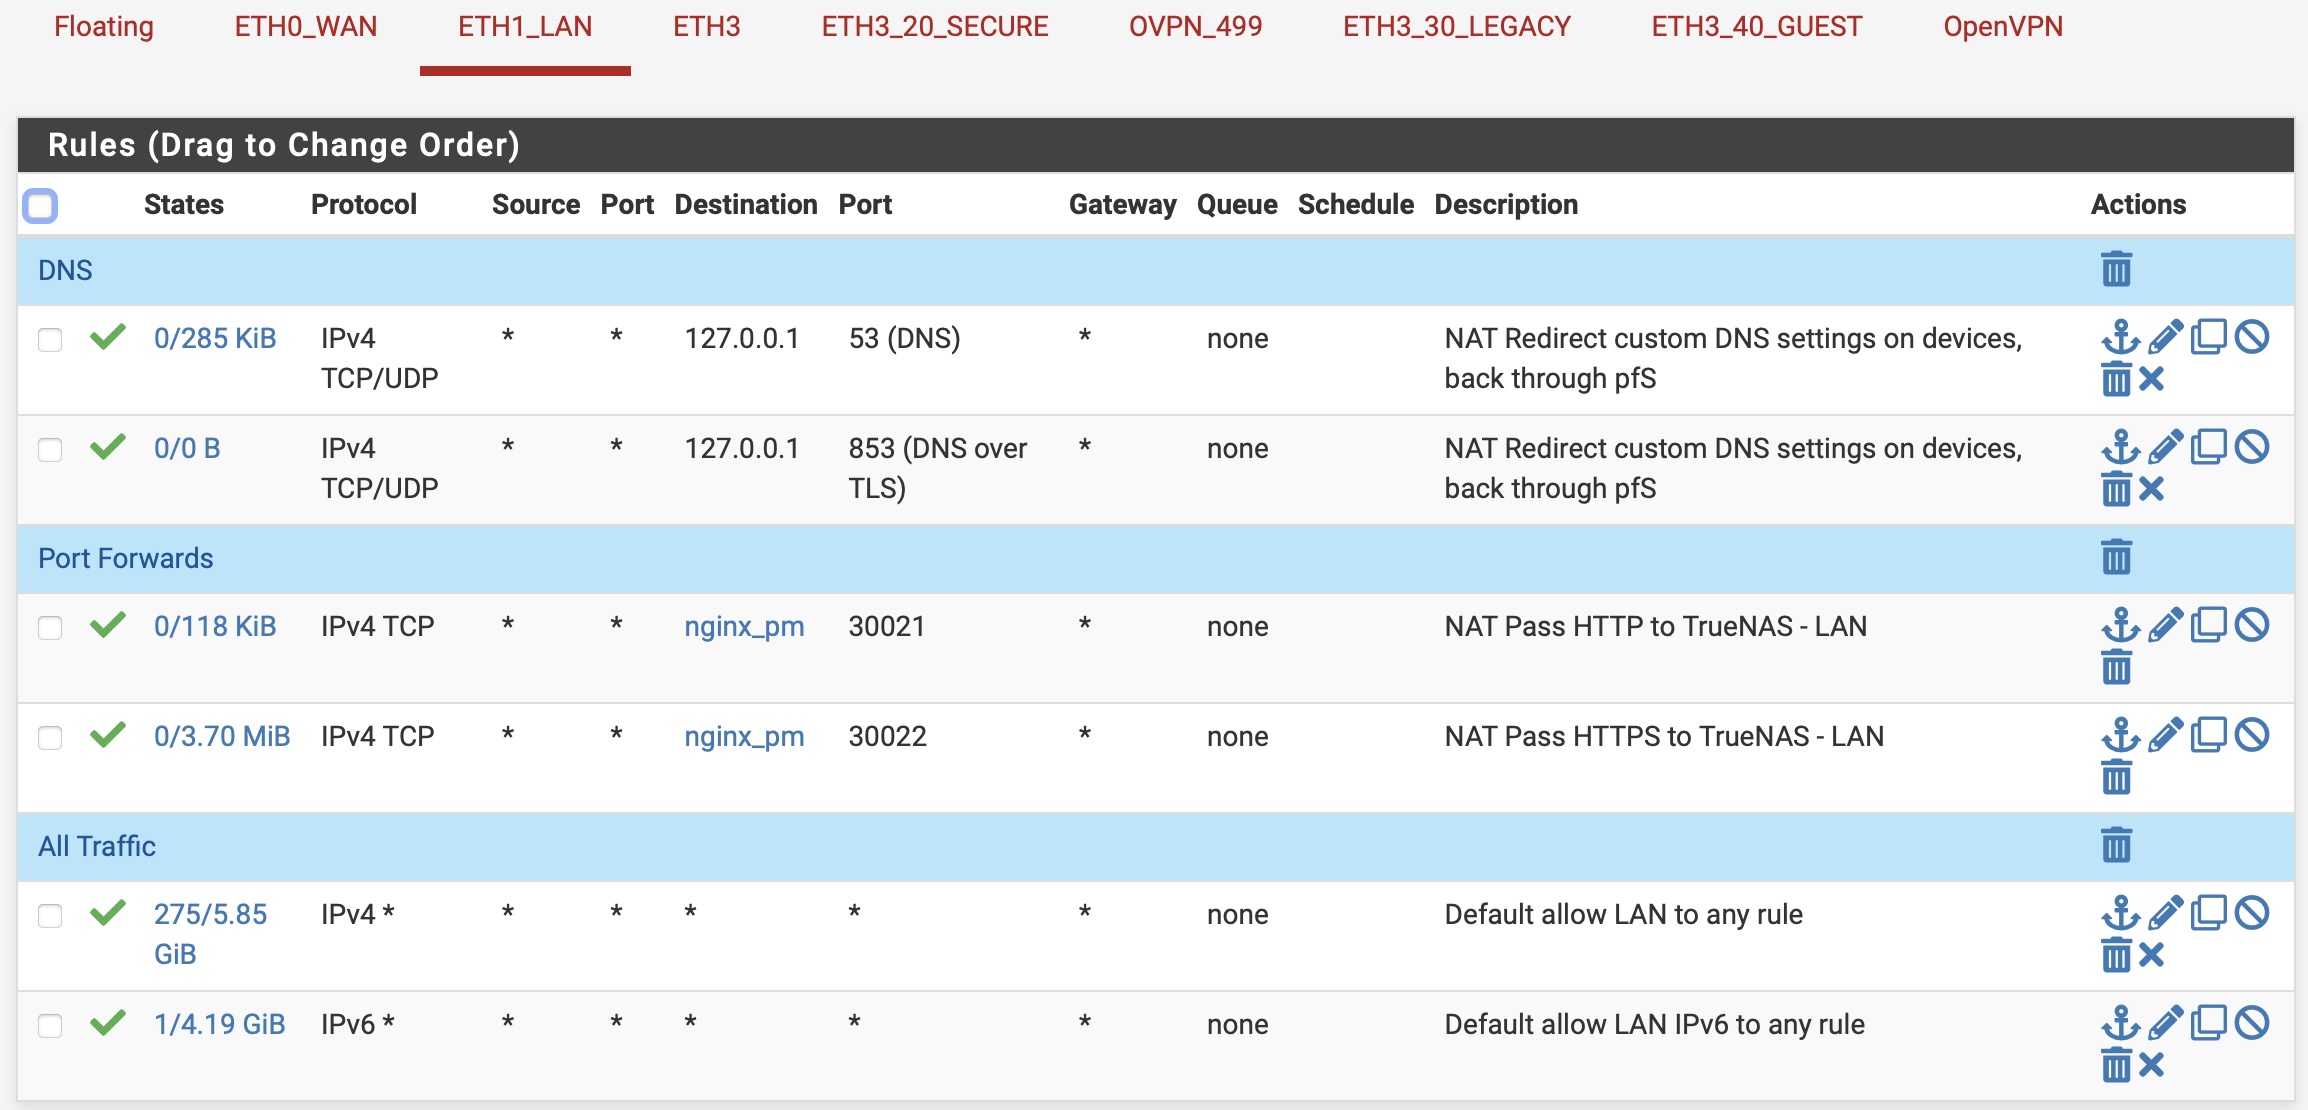
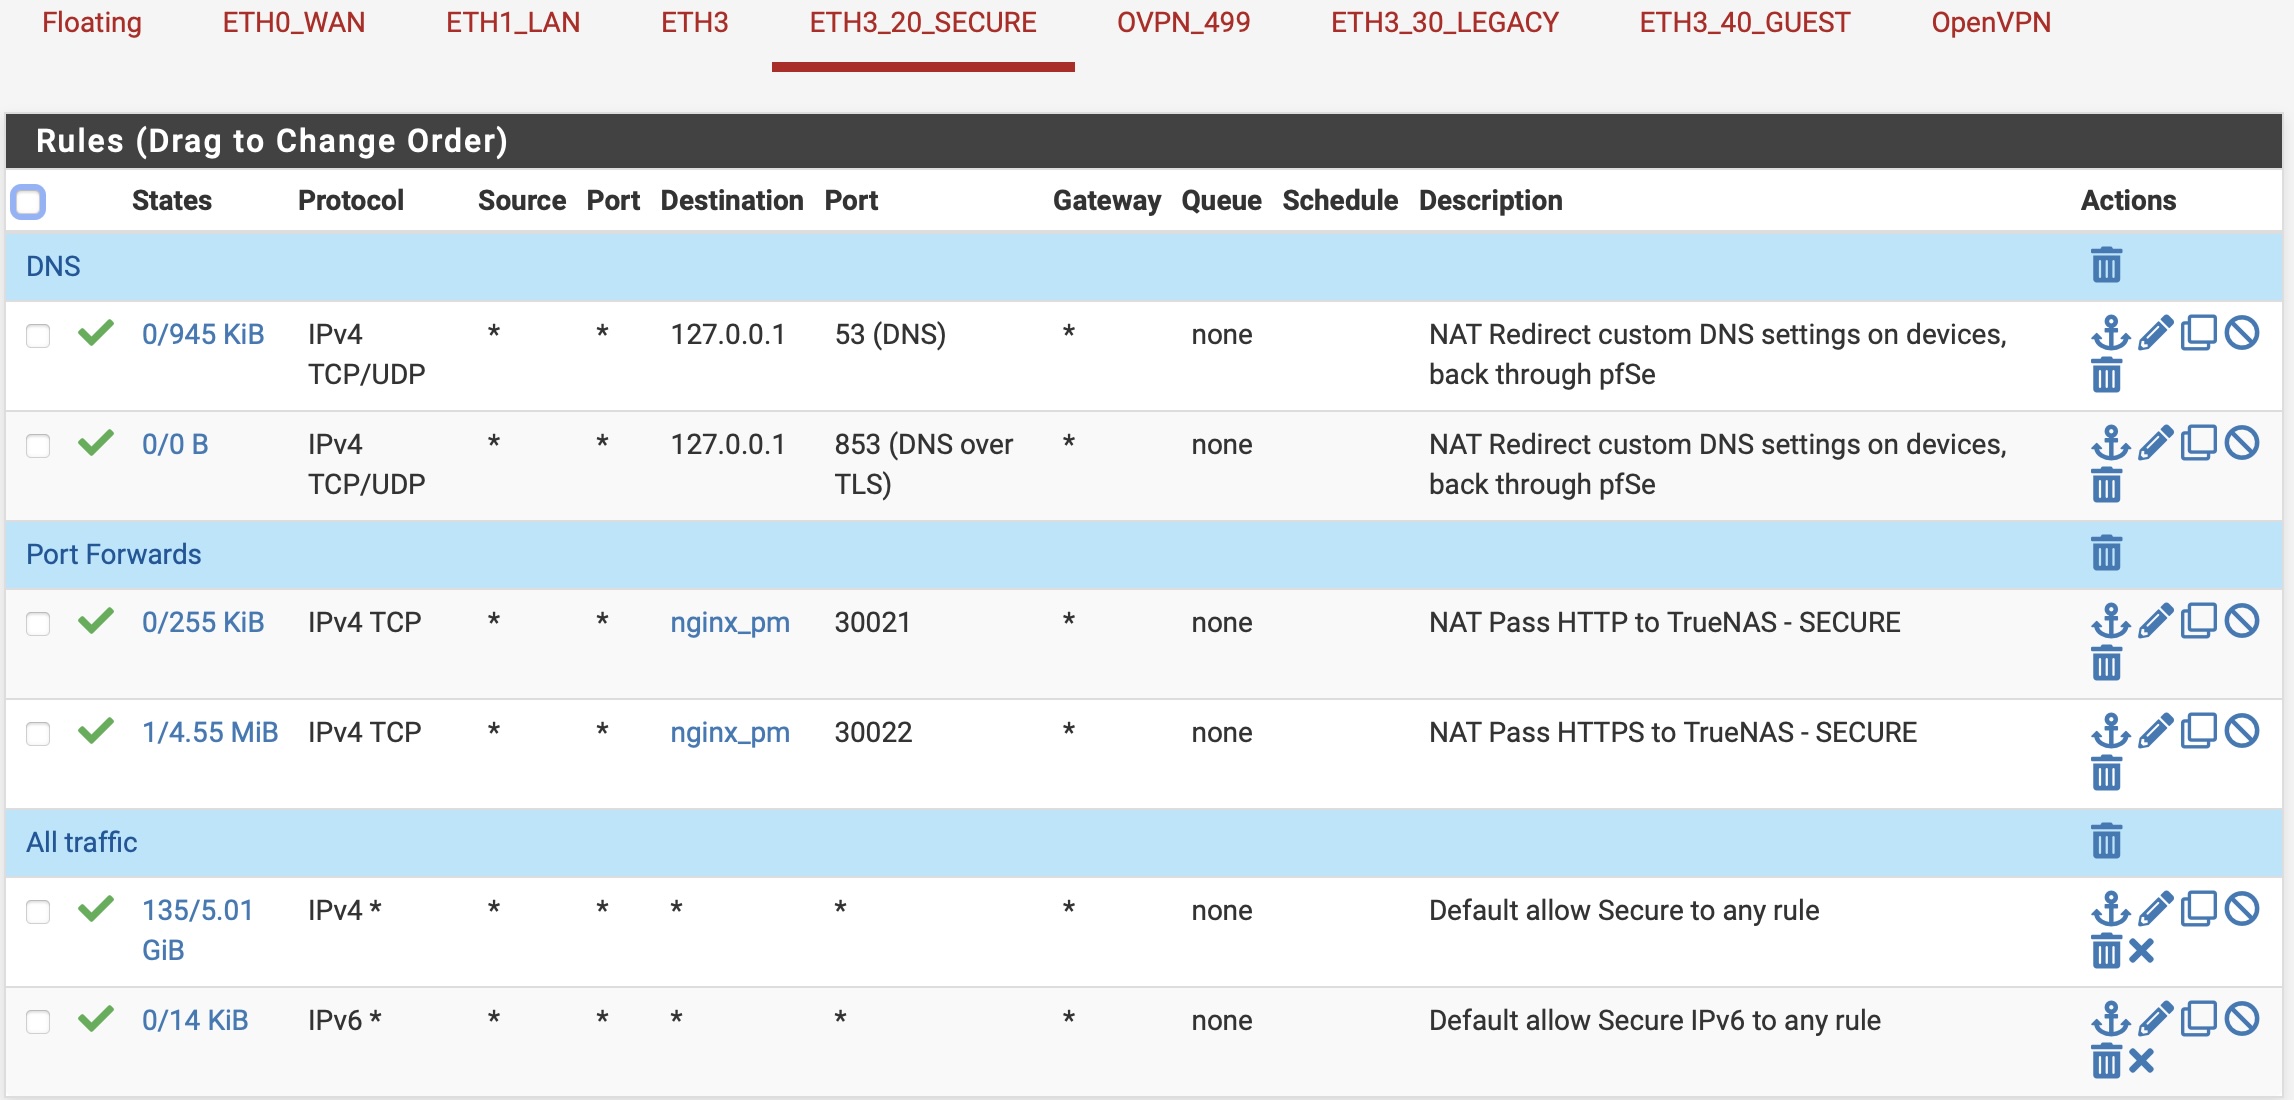
- Install the Nginx Proxy Manager and note the following values:
- HTTP Port: (e.g. 30021)
- HTTPS Port: (e.g. 30022)
- Go to your router and set up the following port forwarding rules:
- Port 80 → HTTP Port (e.g. 30021)
- Port 443 → HTTPS Port (e.g. 30022)
- Log into Nginx Proxy Manager.
- Go to Hosts → Proxy Hosts
- Click on Add Proxy Host
- In the Details Tab, put in the following:
- Domain name: The name of your ABS server (e.g. abs.example.com)
- Scheme: http
- Forward Hostname / IP: The IP address of your ABS instance (e.g. 192.168.1.2)
- Forward Port: The port of the ABS instance (e.g. 10223)
- Cache Assets: Off
- Block Common Exploits: On
- Websockets Support: On
- Click on the SSL tab and set the following settings:
- Force SSL: On
- HTTP/2 Support: On
- HSTS Enabled: On
- HSTS Subdomains: On
- I use a Lets Encrypt certificate for each of my domains. To generate the certificate, go to SSL certificate and select Request a New SSL certificate.
- Enable Use a DNS challenge which brings up the following values:
- DNS Provider: Cloudflare
- Credentials File Content: The default value will be # Cloudflare API token
dns_cloudflare_api_token=0123456789abcdef0123456789abcdef01234567 . Replace the token value with the Cloudflare User API Token - Propagation Seconds: Leave blank
- Email Address for Let’s Encrypt: Put in a email address. (e.g. domreg@example.com)
- I agree to Let’s Encrypt Terms of Service: Enable
- Click on Save and allow a minute or so for the certificate process to complete.
Addendum: If you want to add additional domain after this initial configuration, then you simply add the additional sub-domains (comma seperated) in the DDNS updater, then add the each domain and certificate following Nginx steps 3-10.
3 Likes
This worked today getting it to deploy. Thank you!
1 Like
Yes,This step is the one I’m missing. Very detailed steps, thanks for sharing and helping! ![]()
1 Like
Here is where I can chime in and maybe something alike the mentioned effects of host networking could help along. I described the issue here: Using Nginx with AdGuard - #2 by achmetinternet
In my instance I’d like AdGuard to have its own IP since this seemed to solve the issue I had.
Weirdly after todays update (30-1-25) i had to add :
- Name:
S6_STAGE2_HOOK - Value:
sed -i $d /etc/s6-overlay/s6-rc.d/prepare/30-ownership.sh
For it to work again.
Previous version just worked.
App Version:
2.12.2
Version:
1.1.8
I’ve followed this guide as closely as I can, different SSL cert names et al.
I’m using pfSense as my edge router/firewall, and CloudFlare for DNS. Changed the web UI ports for TrueNAS to 60080 and 60443. Running an instance of WordPress on port 30040.
So here’s what’s strange for me, I have 3 proxy hosts set up. 2 of them /appear/ to be working correctly, and one is not.
I have wordpress.example.com working correctly to serve my WP site, this is on my TN box with the internal ip of 192.168.2.247:30040
I have rt6600ax.example.com correctly serving the GUI for my WAP with internal IP of 10.100.20.1:8000
Then I tried to get my TN box working with internal ip of 192.168.2.247:60080
This one doesn’t work.
The odd thing is that I couldn’t get any of them to work when I had local DNS host overrides set up in pfSense so I deleted them and that’s when the first 2 started working, but they are using the free automatically issued certificates that CloudFlare now creates and not the ones from Let’s Encrypt that nginx made, see:
So I still don’t know why the TN host isn’t working.
1 Like
I must be going crazy. I’ve tried every combination I can think of and I simply cannot get this to work.
If anyone wants to help me debug, just let me know what specifics you need. I’ve made so many changes to local host overrides, and dicked with my DNS provider’s settings, and mucked with NPM, and messed with FW rules that I’m just super frustrated now.
It’s definitely something on the local end that’s not serving correctly.
Okay, making some headway.
Am I not understanding something or can you simply not use the same FQDN for both your external DNS and your internal DNS?
I have a domain name in CF called truenas.example.com. I set up a NPM proxy host with the same name using SSL (tried Let’s Encrypt & CloufFlare Origin for certs). I then tried every combination I could think of, turning off CF proxy, turning off CF SSL back end. Nothing at all works. When I try to access the site it fails in a different but spectacular way depending on the combination of settings I have en/dis abled in CF.
So finally I tried creating a new proxy host called true.nas.example.com. When I added a split horizon DNS setting pointing that one to NPM in an unsecured manner…
VIOLA! It worked.
So then I created a CF A record for it, but set the IP address to my internal IP. That way its back end SSL chain doesn’t screw with anything. Then I went back to NPM, and created a new Let’s Encrypt SSL cert for that name, assigned it to the proxy host, and it continued to work but now is showing a trusted SSL connection.
So is it something that CloudFlare is doing (by that I mean some setting that I’m using) that’s screwing with this working, or am I making an assumption that’s incorrect?
More progress, but hitting a harder wall now.
I had created a NAT rule in my firewall to forward ports 80 and 443 to ports 30221 and 30222 on my nginx host.
Problem was that I only created it on my WAN interface. I finally realized that last night so I added identical rules for both my secure wireless and wired subnets.
Immediately all the host names started working on my wireless subnet and I figured all was well, I went to bed.
Got up this morning and tested the host names from my desktop on the wired subnet and I’m still getting a cannot connect error in my browsers.
And checking from my phone with wifi off (public internet) I also can’t access anything. I’m getting a 522 error from CloudFlare.
As far as I can tell, the same rules are in effect on all firewall rulesets. And I see that the request is getting as far as the proxy manager, but it’s only returning results for the secure wireless subnet.
When I attempt to hit mokerlink.example.com (which does not offer it’s own SSL connection), I see the lock icon in the browser address bar before it returns the ‘cannot connect’ error.
You may want to check out Cloudflare Tunnels. There are a few benefits:
- Ports don’t have to be exposed on your router to make services available
- DDNS isn’t needed.
- Works fine even when CGNAT-ted
- You can continue to hide your server behind Cloudflare
Thanks for the info. Wouldn’t that also hide them from everyone that’s outside the tunnel? I have public facing websites that need to be exposed. I had everything up and running via TailScale tunnels at first but that’s not my desired outcome.
Also, that doesn’t fix the fact that for clients that are on the same subnet as the server connections aren’t completing.
And finally, for the 2 port forwards on the WAN interface, I changed the destination to ‘WAN address’ and they started working.
So my last hurdle is same subnet. I’ve been trying different combos of ‘NAT reflection’ as the documentation for it says something about helping to complete forwards on the same subnet, but I’ve not found the winning combo yet.
For the sake of completeness for future search results…
I had an empty interface on my pf box so I brought it up as a separate subnet and moved my TrueNAS server onto it. I updated my firewall alias to point to the new IP address, pointed the other internal subnets’ forwarding rules back to the alias, put my split horizon DNS rules back in place, and everything is working as it should.
I know it’s academic now, but I’d really LOVE to find out what was causing my issues in the first place.
Sounds like you got your problem resolved, but I’ll respond anyway.
No, it doesn’t hide them from everyone outside the tunnel or prevent you from exposing public websites. I host websites from my TrueNAS server through a Cloudflare Tunnel, which is why I recommended it for you ![]()
Essentially, you are establishing a tunnel between Cloudflare and your LAN. Instead of your home IP address being advertised by your domain’s DNS records, it just has a nondescript tunnel ID. User visits your page, it resolves to a Cloudflare IP, Cloudflare pulls it from your server through the tunnel, and presents it to the user. Proxied. DDNS isn’t needed because the client side of your tunnel (your home server) is telling Cloudflare where to find you.
That’s interesting. It sounds like that’s most of what CF proxy already does.
The proxy hides your public IP address from the requester already. That’s why I have an allow list to only accept requests to NPM from:
173.245.48.0/20
103.21.244.0/22
103.22.200.0/22
103.31.4.0/22
141.101.64.0/18
108.162.192.0/18
190.93.240.0/20
188.114.96.0/20
197.234.240.0/22
198.41.128.0/17
162.158.0.0/15
104.16.0.0/13
104.24.0.0/14
172.64.0.0/13
131.0.72.0/22
So does the tunnel protocol/application/daemon whatever take care of updating the DNS A records for you? Seeing as that’s the job of DDNS now and you’re saying that’s not needed.
Trying to wrap my head around this, if I want to connect to SSH on my server, I just have to use a FQDN in order to find it as that’s the path into the tunnel?
SSH > starfleet.example.com > DNS resolver > CF DNS > (tunnel takes the place of the A record as it’s technically already on the same network?) > SSH server responds to “local address”
And then back.
So your firewall rules can block all external traffic and just allow incoming connections from the same list I stated above? Or is it even better and it’s always going to be the same initial IP address you’re allowing local access to?
That’s not really what that does.
It runs the container as if it is running directly on the host, using its network.
The host is directly on the LAN, so the container is. But the container does not have its own IP.
The problem is the host only has one set of ports, and the same port (80, 443, etc) can’t be used by two containers at the same time.