TrueNAS 25.04-BETA.1 is Now Available!

Uneventful - great work for a beta release.

  • 4 iX catalog apps, 2 custom apps - all up and running
  • networking with LACP and VLANs on top - also working

I don’t run VMs on my SCALE installation.

Still no LLDP … you are targeting enterprise customers, aren’t you? :slightly_smiling_face:

1 Like

Of course, I would very much suggest waiting for RC1 or reverting to 24.10 instead of modifying system files, but in the interest of having fun:

sudo mount -o remount,rw,nodev,noatime,xattr,noacl,casesensitive boot-pool/ROOT/25.04-BETA.1/usr /usr

cp /usr/lib/python3/dist-packages/middlewared/api/v25_04_0/virt_instance.py ~/virt_instance.py.bak
cp /usr/lib/python3/dist-packages/middlewared/plugins/virt/instance.py ~/instance.py.bak

sudo sed -i '28s/.*/    netmask: int | None/' /usr/lib/python3/dist-packages/middlewared/api/v25_04_0/virt_instance.py
sudo sed -i '133s/.*/                        '\''netmask'\''\: int(address[ '\''netmask'\'' ]) if address[ '\''netmask'\'' ] else None,/' /usr/lib/python3/dist-packages/middlewared/plugins/virt/instance.py

sudo mount -o remount,ro,nodev,noatime,xattr,noacl,casesensitive boot-pool/ROOT/25.04-BETA.1/usr /usr

sudo systemctl restart middlewared

Backported from NAS-134104 / 25.04-RC.1 / Fix netmask being empty string (by Qubad786) by bugclerk · Pull Request #15662 · truenas/middleware · GitHub
This has fixed that invalid literal for int() with base 10: '' ValueError for me.

2 Likes

I just want to say I reproduced this problem with Windows Server 2022.
Clean install on 24.10, AHCI disk.

First I switched to 25.04 without virtio drivers installed to see what will happen. It got stuck at boot as expected.
But then I went back to 24.10 and installed virtio drivers via installer but it didnt help. Still got stuck at boot.
Next I also tried manually select and install vioscsi.inf. I also checked that its installed in C:\Windows\System32\DriverStore\FileRepository. But still no success.

I yet couldnt find a way how to install virtio drivers (especially vioscsi) so they get loaded at first boot after migration.

Trying out Incus containers. Two things I’ve noticed so far:

  1. Deleting a container redirects me to the dashboard afterward, but I think the user should stay on the Instances page.
  2. Mounting a dataset inside the container works, but the path inside the container is owned by nobody:nobody and that can’t be changed with chown (Operation not permitted). How can I control the permissions here?

Comment: When I tell the server, PC, phone, whatever, to shutdown or reboot, I expect it to complete that action, not ask for a reason why. Is this a temporary set up (for feedback), or something else?

I needed to revert back to EE because I couldn’t bring up an already existing VM which I needed to use tonight. Incredibly simple to revert, so continued kudos for that: the biggest problem is that I forgot to unplug a keyboard and was wondering why I couldn’t type into a PC :rofl:

Incus Container Instance “Memory Limit” can be empty, but only if it’s always kept empty. If it ever had text, it cannot be empty in future, and creates an error that input must be a valid integer

https://ixsystems.atlassian.net/browse/NAS-134210

If it’s a linux VM, should be as simple as Instances → Create New Instance → VM → Use zvol with previously installed OS. Then just select the zvol your VM is installed on and fill out the rest of the settings as usual.

Might need to redo networking, all my interfaces changed from ens3 to enp5s0 :frowning:

I went through those steps, except for the network step. However, the instance page did not register any CPU activity. Due to need to utilise the VM ASAP I swapped back. I’ll probably have a play around at the weekend.

I think this is missing so the device disk0 has correct ownership:

shift=true, the setting that automagically performs the necessary UID/GID translation.

From How to share a folder between a host and a container in Incus – Mi blog lah! , which calls this “a good exercise to show the common mistake in sharing a folder from the host to the container.” - exactly this nobody:nogroup problem

Thanks to ChatGPT I found how to make driver load at boot in theory but in practice its complicated…
You would need to edit registry.
Similarly how distrobuilder does it. distrobuilder/windows/driver_vioscsi.go at 5a2ba30072d2838457a0bbdd8b3a993b238a381f · lxc/distrobuilder · GitHub

The important part is registering the driver in right location. I think HKEY_LOCAL_MACHINE\SYSTEM\CurrentControlSet\Services\
Or ControlSet001 like distrobuilder does. I dont know which is correct.
Then set key "Start"=dword:00000000 which should make the driver load at boot.

I read it can also be done with sc.exe tool which is Service Control Manager.

I cant believe its this complicated to load driver at boot in Windows.

Yeah, that’s why I recommended the way of modifying the io.bus to nvme temporarily (for one boot only). After that, Windows automatically loads the drivers for the next boot, since the current VM setup attaches two disks (one 10 GiB that forces the virtio-scsi driver to be loaded at boot).

But if nvme also doesn’t boot your (older) Windows VM, you need to do it like how you described AFAIK.

To get a Windows VM working again:

  1. Import via existing ZVOL using TrueNAS UI
  2. Switch io.bus via: incus config device set VmName ix_virt_zvol_root io.bus=nvme
  3. Boot Windows VM once, shut it down again.
  4. Unset io.bus again: incus config device unset VmName ix_virt_zvol_root io.bus
  5. Boot VM again and notice how the main virtio-scsi attached disk now also works as expected.
1 Like

I have Win10 VM so I will try it later. But I fear the worst :smiley:

1 Like

Another uneventful update :sweat_smile:. ix-dockage app with two custom apps back up and running without issues. One VM with Home Assistant OS recreated (using macvlan), selected the existing z-vol, and it’s back running, also without issue.

There was one small glitch when recreating the VM - I could not use the same VNC port as before. Not a big deal, I used a different port.

Well. So much for shift=true.

https://ixsystems.atlassian.net/browse/NAS-133679

The solution suggested in that issue worked: On the TrueNAS system, chown 2147001001:2147001001 /mnt/<pool>/<dataset> for the dataset being shared into Incus. That maps it to 1000:1000 inside lxc.

“Again, this is advanced feature that we assume (and expect) the end-user to have some basic knowledge about the underlying technologies.” :harold

Have a heart, guys. That’s a harsh and arrogant way to put it. But thanks for the guidance on how to set permissions correctly.

1 Like

Has anyone tried to migrate their apps from jailmaker to incus lxc and can answer how gpu passhtrough works? I’m kind of hesitant to try the beta because i don’t have a system to play around with.

Wow! The upgrade process could not possibly have gone any smoother. Dockge popped back up, my NVIDIA card is still working and everything is as it should be. Outstanding work.

4 Likes

Bizarrely, I’ve come to try and fix it today and it’s working fine?! But it is taking ages to boot. It looks like it’s trying to boot from the “disk” as the fourth line option, and I can’t see how to change the boot order in “Instances” whereas it was relatively straight forward in the previous virtualization tab.

And I can’t pass through my NVMe Coral 2 TPU (identified via lspci easily enough, in it’s own IOMMU group). (Plan: Move Frigate from App to VM, pass through Coral device, as HAOS can have the drivers set up, reduce energy expenditure compared to use Epyc cores for object detection. I’m interested in there are alternative solutions that do not require skill or significant knowledge to implement!

Otherwise everything looks stable and is doing what it needs to do.

Posted about my first two raidz expansions under BETA 1 here (1x fast, 1x very slow):

I want to confirm you method works also for Windows 10.

I also created another method that installs all virtio drivers and registry the same way distrobuilder would do it, but on live system before migration.

Your method is easier, so I write mine just to have a backup.
And for everyone, this method is quite experimental.

GUIDE:

First I will simply write steps how to do it. Then I will explain step by step how I made it and what everything means. This is just for Win10 and Win11 but easily applied to other versions. It includes adding drivers and editing registry, so dangerous. Dont forget to snapshot first. Here we go:

  1. You need to download and extract this prepared zip which includes everything you will need and put it on your VM. In this guide I will assume its placed directly on C drive and I am using Windows.10. In different conditions modify your steps accordingly. virtio-drivers.zip - Google Drive

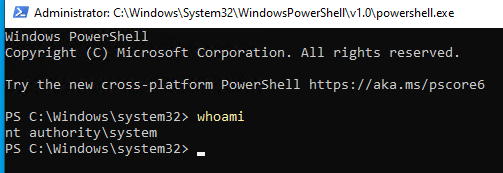
  2. Our actions will need the highest privileges so we use PsExec.exe to run Powershell as SYSTEM user which is the highest in Windows. First run Powershell as Administrator.
    image
    Next use command: C:\virtio-win10\PsExec.exe -i -s powershell.exe
    This opens another Powershell, this time as SYSTEM. You can check with whoami.


    Everything after this is done in the SYSTEM Powershell.

  3. Windows folder in our downloaded zip contains all needed virtio drivers placed in correct folder hierarchy. We just need to copy it to Windows folder on our VM. Use this command to copy (and overwrite if needed) all the files:
    Copy-Item -Path "C:\virtio-win10\Windows\*" -Destination "C:\Windows" -Recurse -Force

  4. Now we need to edit registry. First load missing hive with command:
    reg load HKEY_LOCAL_MACHINE\DRIVERS "C:\Windows\System32\config\DRIVERS"
    Next import three reg files:
    reg import "C:\virtio-win10\driversRegistry.reg"
    reg import "C:\virtio-win10\softwareRegistry.reg"
    reg import "C:\virtio-win10\systemRegistry.reg"
    Finally, unload DRIVERS hive:
    reg unload HKEY_LOCAL_MACHINE\DRIVERS

  5. Thats all. Shutdown the VM and try to migrate it to Fangtooth. This way all virtio drivers and registry entries should be installed the same way as if you used distrobuilder.

Extended explanation:

I will write here how I derived my solution so anyone can check or do it their own way.

When installing Windows on Incus you should repack it with Distrobuilder which does basically two things. Adds virtio drivers to specific folders in ISO and edits registry.
Lets start with driver files, thats easy.
Just have original Windows ISO and another that was repacked by distrobuilder. Inside are many files, but Distrobuilder edits BOOT.WIM (windows installer) and INSTALL.WIM (origin files for installed system).
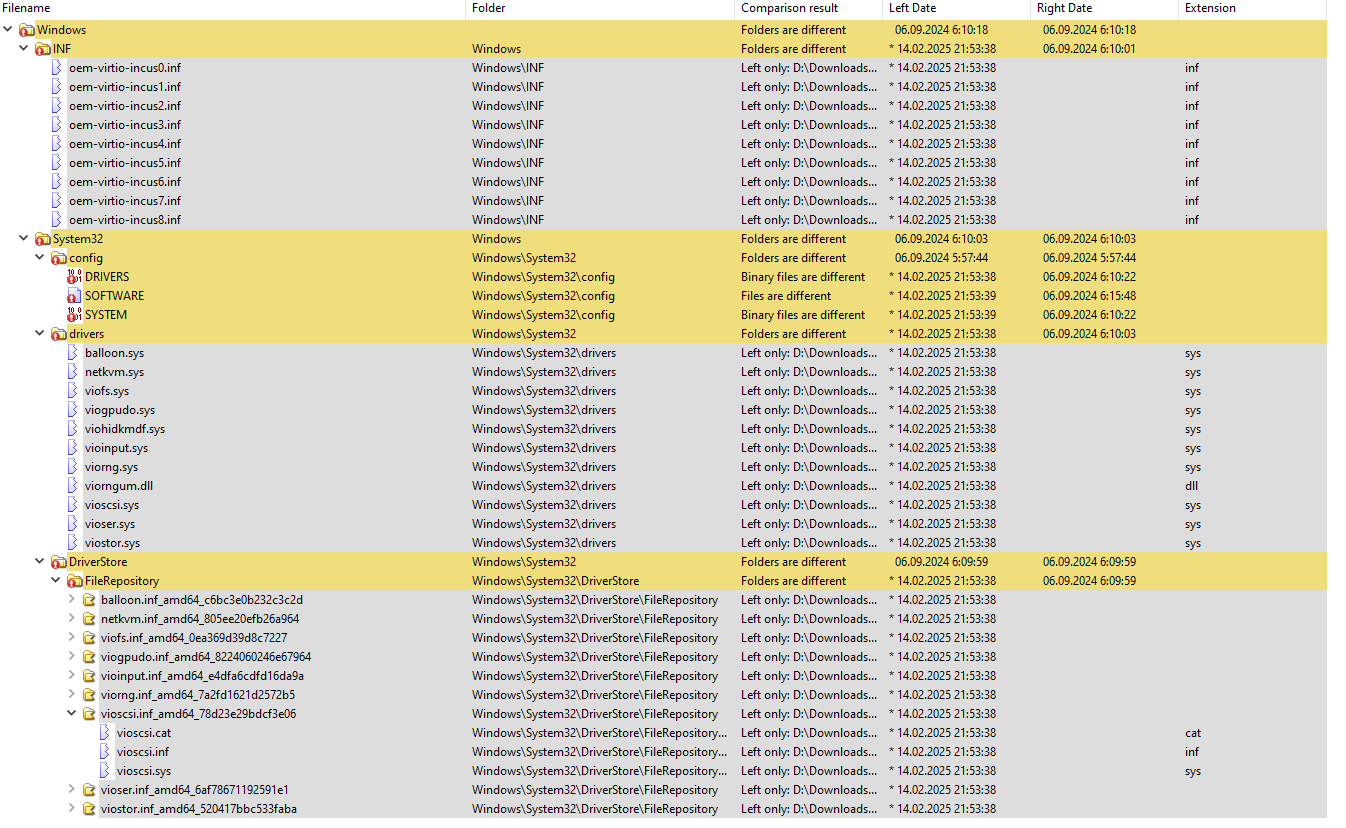
I used PowerISO to extract INSTALL.WIM from both original and repacked ISO. Then I compared contents with WinMerge.
And I saw what exactly Distrobuilder added/edited.

The driver files are obvious and those three files in config folder are hives (Windows Registry).

Next we need to understand Distrobuilder source code.
Registry edits are controlled by templates like this one: distrobuilder/windows/driver_vioscsi.go at main · lxc/distrobuilder · GitHub
Majority of it is static, few variables are populated on runtime. I needed to find if anything changes depending on Windows version bering repacked.
Used variables: distrobuilder/windows/repack_util.go at eb79e943082325eda4b3b747ff33506bfd65ad9b · lxc/distrobuilder · GitHub

I found out all variables are either the same or defined by virtio driver files.
driverName is defined here: distrobuilder/windows/drivers.go at eb79e943082325eda4b3b747ff33506bfd65ad9b · lxc/distrobuilder · GitHub
classGuid is defined in virtio driver .inf file. Win11 and Win10 have the same for any particular virtio driver. I didnt check older Windows.
packageName is defined in template itself.
infFile is generated here: distrobuilder/windows/repack_util.go at eb79e943082325eda4b3b747ff33506bfd65ad9b · lxc/distrobuilder · GitHub

This part of code executes the command to edit the registry: distrobuilder/windows/repack_util.go at eb79e943082325eda4b3b747ff33506bfd65ad9b · lxc/distrobuilder · GitHub
You can see it uses hivexregedit.
But we only need to extract driversRegistry, systemRegistry and softwareRegistry variables that contain the final processed templates.
I just complied the source and added lines like this to save it to a file:
err = os.WriteFile("driversRegistry.txt", []byte(driversRegistry), 0644)

Ok, I again recompiled and ran it. I got three almost-reg files.
These files have keys like:
[\ControlSet001\Services\VirtRng] and then hivexregedit adds prefix like HKEY_LOCAL_MACHINE\\SYSTEM defined in command: distrobuilder/windows/repack_util.go at eb79e943082325eda4b3b747ff33506bfd65ad9b · lxc/distrobuilder · GitHub

We need to include this prefix in the file to have valid .reg files. That easy in Notepad++. Just find and replace every beginning of the key in particular file with the same prefix.

One this is done you have basically the same .reg files I included in the zip above. Just remember its not entirely deterministic and the keys get mixed on every build. It can be confusing when diffing to compare. The keys are the same but in different places in the file.

Thats basically it.

In summary. For virtio drivers I just put them in the same positions as Distrobuilder does inside the ISO. Just needs to be careful to use correct version of the drivers.
And for registry I saved the input of hivexregedit (processed template) and added prefixes into .reg files.

Special thanks to ChatGPT and Golang for being actually readable language.

3 Likes

Update completed without issue. Docker apps all started without issue.

The only problem that I have is the temperature widget is not working on Intel Xeon Gold 6230

I don’t run VM on the NAS they are run in XCP-ng via NFS.

I thought that there would macvlan in the GUI this release for Docker apps. Is this coming later?