INTRODUCTION
For those who have or currently use Jailmaker, we know that the project is EOL and has no maintainer (Thank you for all your effort @Jip-Hop!). It provided an easy solution for creating jails using
systemd-nspawn. This was useful for creating highly customizable environments that are not as heavy as full virtual machines.IX is moving in a different direction in TrueNAS SCALE 25.04 with inclusion of Incus. With that in mind, Jailmaker isn’t really needed in it’s current form.
This thread is getting a head start on the new release to have something in place for easy, templated, yet customizable jail creation with flexibility that possibly won’t be available in the SCALE UI.
How far I take this remains to be seen, as Fangtooth is in active development. Currently, this is just creating simple profiles to launch instances with Incus.
IMPORTANT: This guide is intended for TrueNAS SCALE 25.04+. If you want to try it on your own distro, feel free to, but don’t reply here for support questions. Take those to the Incus discussion boards.
NOTE: If you’re running this in a VM, you may run into Nesting issues. You need to configure your VM to nest from the host and enable the proper CPU virtualization extensions in your BIOS then it “should” work fine…
Config options added to the
docker-init.yamlanddocker-init-nvidia.yamlwill load the needed kernel modules, sysctl values, and Incus instance configs.
NOTE: This guide assumes you already have your TrueNAS SCALE networking, bridge(s), and ZFS pools configured. I’m assuming you are using
br0for the bridge andpoolfor your ZFS pool name. If not, go ahead and adjust the appropriate configs below with your specific interface(s) and pool(s).
DISCLAIMER
I am not responsible for your actions. If you attempt these and mess up your system, that’s on you.
Getting started
NOTE: If you don’t
suto therootuser you’ll need to prependsudoto the commands listed below.
- Download the one or both of following yaml configs to your TrueNAS 25.04+ host and modify as needed.
a. Configure your<pool-name>for therootdrive. In our instance, it would be calledpool.
b. Configure your appropriate mount points on your TrueNAS host where you will be hosting your app data.
c. Set yourtimezone.
d. Feel free to modify anything else you might need, like adding additional packages you would like in your base image, additional datasets passed through, modifying your GPU PCI address, etc.
NOTE: When you modify this config, it will launch the same configuration on all instances created from the config moving forward. Don’t add anything to the config/profile that you don’t want on EVERY instance created from the config. If you need separate settings, create multiple configs.
Config docker-init.yaml:
description: Docker
devices:
  eth0:
    name: eth0
    nictype: bridged
    parent: br0
    type: nic
  root:
    path: /
    pool: <pool-name>
    type: disk
  data:
    path: /mnt/data
    source: /mnt/pool/data/apps
    recursive: true
    type: disk
  stacks:
    path: /opt/stacks
    source: /mnt/pool/data/stacks
    recursive: true
    type: disk
config:
  # Start instances on boot
  boot.autostart: "true"

  # Load needed kernel modules
  linux.kernel_modules: br_netfilter

  # Enable required security settings
  security.nesting: "true"
  security.syscalls.intercept.mknod: "true"
  security.syscalls.intercept.setxattr: "true"

  #cloud-init.network-config: |
  #  #cloud-config

  #  network:
  #    version: 2
  #    ethernets:
  #      eth0:
  #        addresses:
  #          - 192.168.1.100/24
  #        gateway4: 192.168.1.1
  #        nameservers:
  #          addresses: [192.168.1.1]
  #          search:
  #            - domain.lan

  cloud-init.user-data: |
    #cloud-config

    # Enable docker sysctl values
    write_files:
      - path: /etc/sysctl.d/20-docker.conf
        content: |
          net.ipv4.conf.all.forwarding=1
          net.bridge.bridge-nf-call-iptables=1
          net.bridge.bridge-nf-call-ip6tables=1

    # Set timezone
    timezone: US/Eastern

    # apt update and apt upgrade
    package_update: true
    package_upgrade: true

    # Install apt repos and packages needed for docker
    apt:
      preserve_sources_list: true
      sources:
        docker.list:
          source: deb [arch=amd64] https://download.docker.com/linux/debian $RELEASE stable
          keyid: 9DC858229FC7DD38854AE2D88D81803C0EBFCD88
          filename: docker.list
    packages:
      - apt-transport-https
      - apt-utils
      - ca-certificates
      - curl
      - gpg
      - docker-ce
      - docker-ce-cli
      - containerd.io
      - docker-buildx-plugin
      - docker-compose-plugin

    # create groups
    groups:
      - docker
      - apps: [root]

    # create users
    users:
      - default
      - name: apps
        primary_group: apps
        uid: 568
        groups: docker
        lock_passwd: true

    # Add default auto created user to docker group
    system_info:
      default_user:
        groups: [docker,apps]

    # additional configuration
    runcmd:
      - 'echo "-----------------------------"'
      - 'echo "Configuring system uid/gid..."'
      - 'echo "-----------------------------"'
      - 'groupmod -g 568 apps'
      - 'groupmod -g 500 docker'
      - 'usermod -u 1000 debian'
      - 'groupmod -g 1000 debian'
      - 'echo "-----------------------------"'
      - 'echo "    Installing dockge...     "'
      - 'echo "-----------------------------"'
      - 'mkdir -p /opt/dockge'
      - 'cd /opt/dockge'
      - 'curl https://raw.githubusercontent.com/louislam/dockge/master/compose.yaml --output compose.yaml'
      - 'docker compose up -d'
Config docker-init-nvidia.yaml. Read the FAQ for info of additional steps that may need to happen for GPU’s:
description: Docker Nvidia
devices:
  eth0:
    name: eth0
    nictype: bridged
    parent: br0
    type: nic
  gpu0:
    gputype: physical
    pci: 0000:2b:00.0
    type: gpu
  root:
    path: /
    pool: <pool-name>
    type: disk
  data:
    path: /mnt/data
    source: /mnt/pool/data/apps
    recursive: true
    type: disk
  stacks:
    path: /opt/stacks
    source: /mnt/pool/data/stacks
    recursive: true
    type: disk
config:
  # Start instances on boot
  boot.autostart: "true"

  # Load needed kernel modules
  linux.kernel_modules: br_netfilter,nvidia_uvm

  # Enable required security settings
  security.nesting: "true"
  security.syscalls.intercept.mknod: "true"
  security.syscalls.intercept.setxattr: "true"

  # Nvidia configs
  nvidia.driver.capabilities: compute,graphics,utility,video
  nvidia.runtime: "true"

  #cloud-init.network-config: |
  #  #cloud-config

  #  network:
  #    version: 2
  #    ethernets:
  #      eth0:
  #        addresses:
  #          - 192.168.1.100/24
  #        gateway4: 192.168.1.1
  #        nameservers:
  #          addresses: [192.168.1.1]
  #          search:
  #            - domain.lan

  cloud-init.user-data: |
    #cloud-config

    # Enable docker sysctl values
    write_files:
      - path: /etc/sysctl.d/20-docker.conf
        content: |
          net.ipv4.conf.all.forwarding=1
          net.bridge.bridge-nf-call-iptables=1
          net.bridge.bridge-nf-call-ip6tables=1
      - path: /etc/systemd/system/fix-gpu-pass.service
        owner: root:root
        permissions: '0755'
        content: |
          [Unit]
          Description=Symlink for LXC/Nvidia to Docker passthrough
          Before=docker.service

          [Service]
          User=root
          Group=root
          ExecStart=/bin/bash -c 'mkdir -p /proc/driver/nvidia/gpus && ln -s /dev/nvidia0 /proc/driver/nvidia/gpus/0000:2b:00.0'
          Type=oneshot

          [Install]
          WantedBy=multi-user.target

    # Set timezone
    timezone: US/Eastern

    # apt update and apt upgrade
    package_update: true
    package_upgrade: true

    # Install apt repos and packages needed for docker
    apt:
      preserve_sources_list: true
      sources:
        docker.list:
          source: deb [arch=amd64] https://download.docker.com/linux/debian $RELEASE stable
          keyid: 9DC858229FC7DD38854AE2D88D81803C0EBFCD88
          filename: docker.list
        nvidia-container-toolkit.list:
          source: deb https://nvidia.github.io/libnvidia-container/stable/deb/$(ARCH) /
          keyid: C95B321B61E88C1809C4F759DDCAE044F796ECB0
          filename: nvidia-container-toolkit.list
    packages:
      - apt-transport-https
      - apt-utils
      - ca-certificates
      - curl
      - gpg
      - docker-ce
      - docker-ce-cli
      - containerd.io
      - docker-buildx-plugin
      - docker-compose-plugin
      - nvidia-container-toolkit

    # create groups
    groups:
      - docker
      - apps: [root]

    # create users
    users:
      - default
      - name: apps
        primary_group: apps
        uid: 568
        groups: docker
        lock_passwd: true

    # Add default auto created user to docker group
    system_info:
      default_user:
        groups: [docker,apps]

    # additional configuration
    runcmd:
      - 'echo "-----------------------------"'
      - 'echo "Configuring system uid/gid..."'
      - 'echo "-----------------------------"'
      - 'groupmod -g 568 apps'
      - 'groupmod -g 500 docker'
      - 'usermod -u 1000 debian'
      - 'groupmod -g 1000 debian'
      - 'echo "-----------------------------"'
      - 'echo " Configuring fix-gpu-pass... "'
      - 'echo "-----------------------------"'
      - 'systemctl daemon-reload'
      - 'systemctl enable fix-gpu-pass'
      - 'systemctl start fix-gpu-pass'
      - 'echo "-----------------------------"'
      - 'echo "    Configuring nvidia...    "'
      - 'echo "-----------------------------"'
      - 'nvidia-ctk runtime configure --runtime=docker'
      - 'nvidia-ctk config --set nvidia-container-cli.no-cgroups -i'
      - 'echo "-----------------------------"'
      - 'echo "    Restarting docker...     "'
      - 'echo "-----------------------------"'
      - 'systemctl restart docker'
      - 'echo "    Installing dockge...     "'
      - 'echo "-----------------------------"'
      - 'mkdir -p /opt/dockge'
      - 'cd /opt/dockge'
      - 'curl https://raw.githubusercontent.com/louislam/dockge/master/compose.yaml --output compose.yaml'
      - 'docker compose up -d'
- Build a docker instance. You can build as many as you like.
docker1is the instance name which will show up when you list the Incus instances by runningincus ls.
With docker-init.yaml:
incus launch images:debian/bookworm/cloud docker1 < docker-init.yaml
or docker-init-nvidia.yaml:
incus launch images:debian/bookworm/cloud docker1 < docker-init-nvidia.yaml
- Access the new Incus instance shell.
incus exec docker1 bash
- NOTE: If you configured
cloud-init.network-config, you can skip this step as it’s done automatically for you with thecloud-initscripts. Configure static IP and DNS resolver. Once the instance is built, you should configure a static IP address and point to your DNS server. Edit the following files with your favorite editor.
NOTE: You can also use a static DHCP lease and leave the instance set to
DHCP. Refer to your DHCP servers` manual on how to do this. There is advanced managed networking features in Incus that can be leveraged as well, but that is outside the scope of this guide.
/etc/systemd/network/10-cloud-init-eth0.network
Output below. Modify your Address and Gateway.
[Match]
Name=eth0

[Network]
#DHCP=ipv4
DHCP=false
Address=192.168.0.30/24
Gateway=192.168.0.1
LinkLocalAddressing=no
LLDP=yes
EmitLLDP=customer-bridge
/etc/systemd/resolved.conf
Output below. Modify DNS to point to your DNS server and Domains to your search domain if needed. If you don’t need the search domains, just comment out the Domains line.
#  This file is part of systemd.
#
#  systemd is free software; you can redistribute it and/or modify it under the
#  terms of the GNU Lesser General Public License as published by the Free
#  Software Foundation; either version 2.1 of the License, or (at your option)
#  any later version.
#
# Entries in this file show the compile time defaults. Local configuration
# should be created by either modifying this file, or by creating "drop-ins" in
# the resolved.conf.d/ subdirectory. The latter is generally recommended.
# Defaults can be restored by simply deleting this file and all drop-ins.
#
# Use 'systemd-analyze cat-config systemd/resolved.conf' to display the full config.
#
# See resolved.conf(5) for details.

[Resolve]
# Some examples of DNS servers which may be used for DNS= and FallbackDNS=:
# Cloudflare: 1.1.1.1#cloudflare-dns.com 1.0.0.1#cloudflare-dns.com 2606:4700:4700::1111#cloudflare-dns.com 2606:4700:4700::1001#cloudflare-dns.com
# Google:     8.8.8.8#dns.google 8.8.4.4#dns.google 2001:4860:4860::8888#dns.google 2001:4860:4860::8844#dns.google
# Quad9:      9.9.9.9#dns.quad9.net 149.112.112.112#dns.quad9.net 2620:fe::fe#dns.quad9.net 2620:fe::9#dns.quad9.net
DNS=192.168.0.8
#FallbackDNS=
Domains=domain.lan
#DNSSEC=no
#DNSOverTLS=no
#MulticastDNS=yes
#LLMNR=yes
#Cache=yes
#CacheFromLocalhost=no
#DNSStubListener=yes
#DNSStubListenerExtra=
#ReadEtcHosts=yes
#ResolveUnicastSingleLabel=no
- Restart container
exit
midclt call virt.instance.restart docker1 -j
- Verify your new instance looks good. You should see output similar to below when everything is up and running. Notice that you will have an
eth0interface which is the instances bridge to the TrueNAS hosts’br0interface. You will also havedocker0for Docker’s interface toeth0. Finally you should have abr-*interface that Dockge is using.
incus ls
+-------------+---------+------------------------------+------+-----------+-----------+
|    NAME     |  STATE  |             IPV4             | IPV6 |   TYPE    | SNAPSHOTS |
+-------------+---------+------------------------------+------+-----------+-----------+
| docker1     | RUNNING | 192.168.0.30 (eth0)          |      | CONTAINER | 0         |
|             |         | 172.18.0.1 (br-7e7ee82b01bf) |      |           |           |
|             |         | 172.17.0.1 (docker0)         |      |           |           |
+-------------+---------+------------------------------+------+-----------+-----------+
- Setup your
userns_idmap’s for setting permissions for local host passthrough storage. See here for the docs. - (OPTIONAL, but recommended): look at the production setup configuration guide and network tuning guide for your server and tweak as needed.
Known Issues
Nvidia GPU is broken inResolved in25.04.1because of the version ofnvidia-container-toolkitdeployed with the build. See here and here for more info.25.04.2.- Privileged containers are not currently supported. That is coming in a future release.
- Custom profiles, pools, networks, and storage DO NOT persist currently between TNS upgrades. See here for how to recover after upgrades if you are using anything custom outside the
defaultprofile.
* Passing datasets through is considered a potiential security risk usingThis has been addressed in this post by using theshift: true. This will be addressed over time.userns_idmapfeature being implemented by IX. This will get better over time and is planned to be integrated into the Web UI as well in a future update.
TODO
1. Integrate custom ZFS datasets/pools into the jail creation process.
2. Add GPU attachment to instances.
3. Investigate using block mode for Docker instances.EDIT: It can be done, see here for more info and gotchas.
4. Investigate incorporating Incus Web UI.EDIT: Not possible in it’s current form because of how it installs unless users wanted to do their own install of Incus in VM’s, which defeats the purpose on TNS.
5. Investigate using separate profiles, datasets, networks, etc. that are managed outside the purview ofEDIT: Not possible unless IX allows persistence of custom profiles, datasets, etc. outside ofmiddlewared.middlewared.
6. Investigate settingSee this post on how to useidmapviacloud-initscripts to move away fromdisk: shift: true.userns_idmap’s.
7. Possibly create script to manage custom instance profiles in Incus, if applicable.
Changelog
11.08.2024:
- Add ZFS
jailsdataset to profile and instructions on adding the dataset to Incus.- Add nvidia instance configs to
docker-init.yamlprofile.02.24.2025:
- Add Nvidia
docker-init-nvidia.yamlwith full configuration and installation ofnvidia-container-toolkit.- Removed Nvidia configs from
docker-init.yaml.- Removed creating with a profile.
- Removed creating a separate
jailsdataset and reconfigured thedocker-init.yamlanddocker-init-nvidia.yamlto use thedefaultstorage pool in to survive reboots.- Update GPU FAQ.
- Added additional formatting for log readability for
/var/log/cloud-init-output.log.02.26.2025:
- Updated
docker-init.yamlanddocker-init-nvidia.yamlwith additional recommended security configs for Docker:# Enable required security settings security.nesting: "true" security.syscalls.intercept.mknod: "true" security.syscalls.intercept.setxattr: "true"02.28.2025:
- Added
cloud-init.network-configtodocker-init.yamlanddocker-init-nvidia.yamlto allow for creating preconfigured network settings, ie. IP, DNS, search domains, etc. NOTE: they are commented out, so if you want to use them uncomment them.03.12.2025:
- Remove
disks: shift: truefromdocker-init.yamlanddocker-init-nvidia.yaml.- Remove
shiftverbiage from FAQ.- Added Step 7 on
userns_idmap.- Added
appsuser/group creation todocker-init.yamlanddocker-init-nvidia.yaml. This is done because IX currently passes thoughappsfrom the local host to containers by default. Creating a new container and a new dataset withappsas the owner should result in a working container immediately.- Updated reboot command to use
midcltsouserns_idmaptakes place properly on container/vm.midclt call virt.instance.restart docker1 -j03.13.2025:
- Add
roottoappsgroup sincerootcan’t be passed through usinguserns_idmap. Also addeddefaultcloud-init user toappsgroup for a similar purpose. This will allow docker containers that require root to be able to write to datasets with permissions ofapps:apps. Make sure to set your dirs/files as 775/664 respectively. Example for your host dataset/folder (This can be accomplished in the TNS Web UI as well under:Datasets > click YOUR apps dataset > Permissions > Edit):chown apps:apps dir chown apps:apps file chmod 775 dir chmor 664 file03.16.2025:
- Fixed
nvidiagpu double passthrough with a workaround. This will create asystemdunit file that will run before docker starts and puts a symlink in place so docker containers can access the GPU. Please modify the PCI address to match your card in the following line indocker-init-nvidia.yaml.mkdir -p /proc/driver/nvidia/gpus && ln -s /dev/nvidia0 >>/proc/driver/nvidia/gpus/0000:2b:00.0
- Modify
/etc/nvidia-container-runtime/config.tomlto disablecgroups.no-cgroups = true03.17.2025:
- Added additional nvidia config to
docker-init-nvidia.yamlto load needed modules into Incus containers.nvidia.driver.capabilities: compute,graphics,utility,video
- Updated
runcmdformatting.03.18.2025:
- Added
nvidia_uvmtodocker-init-nvidia.yamlconfig to allow for proper startup on boot.- Updated GPU FAQ with instructions on creating a
PREINITcommand to run/usr/bin/nvidia-smi -f /dev/nullto allownvidiabased containers to boot properly on reboot.03.25.2025:
- Update to
cloud-init.network-configv2. More info here.cloud-init.network-config: | #cloud-config network: version: 2 ethernets: eth0: addresses: - 192.168.0.21/24 gateway4: 192.168.0.1 nameservers: addresses: [192.168.0.8] search: - domain.lan03.27.2025:
- Add step 8 with links to the Incus tuning guides.
04.17.2025:
- Add
apt-utilspackage.- Updated Step 7 for
userns_idmapsince it’s now supported in the UI. See here for more info.- Update Known Issues that Privileged Containers are not supported currently.
04.23.2025:
- Added note to read the FAQ for GPU’s.
- Removed beta verbiage.
FAQ
Does this work?
Yes! This will install docker and run docker images. Mounts can write data through to your host and datasets you are assigning to your containers which are configured under
devices:andtype: diskandrecursive: trueenabled.
Do GPU’s work?
Yes! Just use the
docker-init-nvidia.yamlcloud-init config. This will configure the Nvidia container options and GPU configuration options in Incus install thenvidia-container-toolkit, then update the docker runtime will need to be updated.In order for
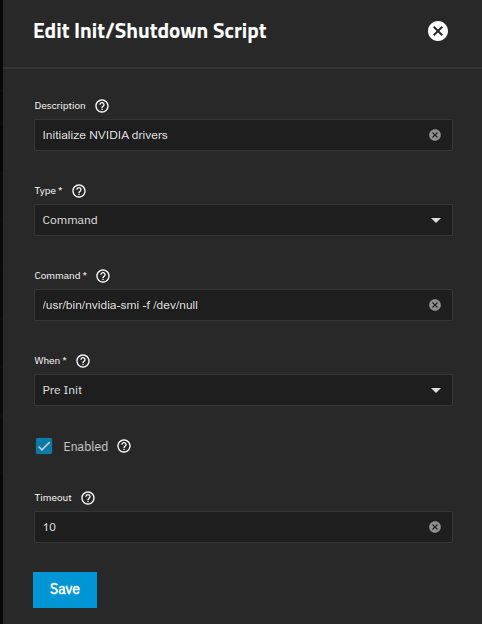
nvidiabased containers to boot, you will need to initialize the drivers on boot using aPREINITcommand. Run the command below to workaround this issue:/usr/bin/nvidia-smi -f /dev/nullExample Screenshot:
You will need to manually configure your GPU PCI address for the time being. To get a list of GPUs, run the following command:
incus info --resources | grep "GPUs:" -A 20Grab the PCI address for your card and substitute it in the
docker-init-nvidia.yaml.PCI address: 0000:2b:00.0One liner that “should” work:
incus info --resources | awk '/^[^[:space:]]/ { g = (/GPUs?:/) } /Vendor:/ { v = (tolower($0) ~ /amd|intel|nvidia/) } g && v && sub(/.*PCI address: /,"")'
For AMD and Intel GPU’s, it should just be a matter of passing through
/dev/driand off to the races you should be.
Do I have to install Dockge?
No. You can comment out, remove, or replace the lines with something you want to use in the config. I added Dockge to the config because I use it and I see it used by other users in the forums. How you accomplish that will be up to you.