I just moved from my main pool having 2 disks to 4 disks.
I documented every single step and verified it works flawlessly by doing it a second time. This could save you hours if you are running the latest release because it talks about all the “gotchas” caused by bugs in the latest version of Scale and what the workarounds are.
Be sure to follow all the steps especially in moving the system dataset before you export the main pool!
-
add nvme card to slot near 4 eth ports and chelsio 10G eth card to supermicro opposite the HBA. Put 1G eth cable into IPMI slot. Route the 10G SPI+ DAC cable to the UDM Pro 10G port. Note: SuperMicro documentation is terrible. To remove the riser, you have to lift the two black tabs in the back, and then you can pull straight up on the riser. There are NO screws you need to remove. So now 10G is the only way in/out of my system. Note: unluckily for me, changing ethernet cards like this can cause the Apps not Starting bug later, but I found a fix for that.
-
Config the NVME disk in TrueNAS as a new pool SSD. I used this to back up my existing data (which is modest at this point)
-
insert the 2 more disks into the supermicro, but don’t create a pool yet. Make sure they are recognized. They were. Flawless. To pre-test the newly added disks, see: Hard Drive Burn-in Testing | TrueNAS Community. Just make sure you are NOT specifying the old disks… WARNING: the system assigns different drive letters on EVERY boot.
-
save TrueNAS config (just to be safe). Always good to checkpoint things. 12:22pm System>General>Manage Configuration>Download file
-
This is a good time to:
-
stop the SMB service
-
stop all the apps
-
unset the app pool on the apps page.
-
Those steps will make it easier when you detach the pool later (no errors and no retries). It will say “No Applications Installed” after you complete those steps.
-
In Data Protection, create a periodic snapshot task that snaps Main recursively. Recursively is CRITICAL. You can make the frequency once a week for example. You need this for the next step. I used the custom setting for timing so that the first one would be 5 minutes after I created the task. This meakes the next step easier since I will have an up to date snapshot. You must check “Allow taking empty snapshots.” The reason you need to check this is that the full filesystem replication makes sure every snapshot is there. If you recently snapshotted a dataset which didn’t change, this check will fail to create a snapshot and the sanity check will fail so you won’t be able to replicate the filesystem.
-
In Data Protection, Replication Tasks, use the GUI to create a new task to copy everything in the main pool to the SSD pool by using the ADVANCED REPLICATION button in Data Protection>Replication Tasks. Transport is LOCAL. “Full Filesystem Replication” is checked. Source and dest are the pool names: Main and SSD. Read only policy is set to IGNORE. You do NOT want to set this READ only. Replication schedule: leave at automatically. Pick the replication task you just configured for the replication task. Set retention to be same as source. Leave everything else at the default. Automatically will start the replication job right after the snapshot job above finishes. So less work for you.
-
During the full filesystem replica, it will unmount the SSD pool so if you ssh to the system, you will find that /mnt/SSD will be gone. So if you look at the Datasets page and refresh, it will give you an error about not being able to load quotas from SSD. This is only unavailable while doing the full filesystem replica.
-
If you click on the Running button, you can see the progress. You can also go to the Datasets page and expand the SSD pool and see that it is populating and that the sizes match up with the originals. You can also click on the Jobs icon in the upper right corner of the screen (left of the bells); that screen updates every 30 seconds to show you the total amount transferred.
-
Note: if you’ve already made a backup once, this process will be very fast since it will only replicate the new data.
-
In datasets tab, check the used sizes just for sanity check. They may not be identical if one of your pools uses dRAID; the dRAID sizes will be larger than other RAID types because filesizes will be rounded higher. Also, there can be differences if you have existing snapshots.
-
Migrate the system dataset from main pool to SSD pool (so I have a system when I disconnect the pool) using System >Advanced>Storage> System Dataset pools, then select the SSD pool and save. You’ll need to do that because you’re about to clobber the main dataset the system was using.
-
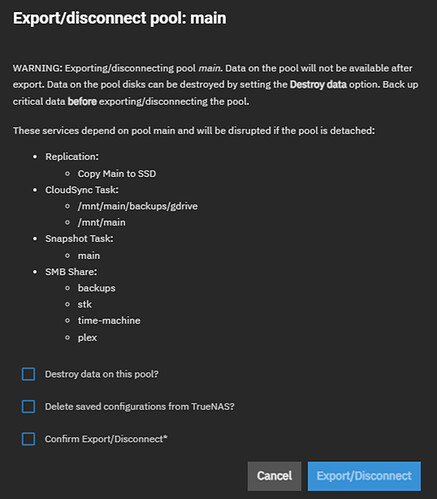
Use GUI (Storage>Export/Disconnect) to disconnect MAIN pool (do not disconnect the SSD pool). If you get a warning like “This pool contains the system dataset that stores critical data like debugging core files, encryption keys for pools…” then you picked the wrong pool. Select to delete the data but do NOT delete the config information. The config info is associated with the pool name, not the pool. You will get a warning with a list of all the services that will be “disrupted.” That’s to be expected. Be sure you don’t have any SSH users who are currently using the pool or the disconnect will fail.
-
For the three boxes, you only check the Confirm Export. There is no need to destroy the data (but you can if you want to do it now). You NEVER want to delete saved configurations from TrueNAS because otherwise, when you bring main back in as main, all the config stuff regarding main (like replication jobs, SMB shares), will be gone from the system config. So you check either the first and third box, or just the third box. If you choose to delete the data on the pool now (which is perfectly fine), then be sure to type the pool name below the checkboxes or the Export/Disconnect button will not be enabled.
-
The export is pretty quick.
-
If you followed the process (stopping apps, disconnecting SSH users), you won’t get any errors about filesystems being busy.
-
It worked! “Successfully exported/disconnected main.”
-
Storage now shows I have 4 unassigned disks!!! Perfecto!
-
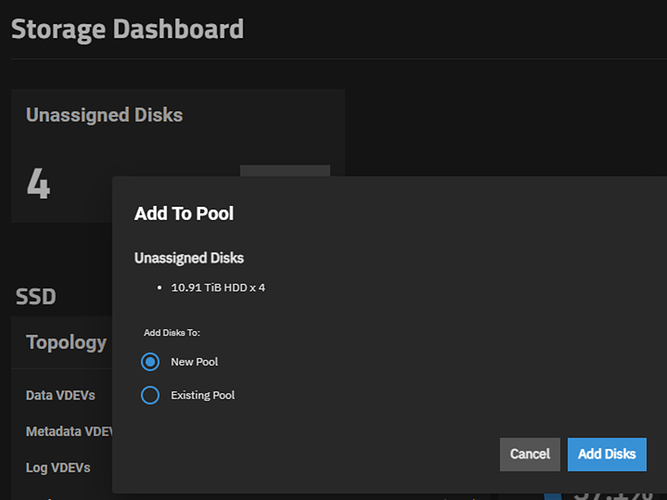
Now click that “Add to pool” button!
-
Use GUI (hit “Add to Pool” button on the Unassigned disks, and then pick New Pool to create a brand new main pool with all four disks with same name as my original main pool (including correct case). You will need to use the old name in the “Name” section and select “main” on the section “Select the disks you want to use”
-
Under Data, I opted for RAIDZ1. So Data>Layout: RAIDZ1. Width is 4 which means to use all 4 disks for the VDEV (it will make the parity disk). Number of VDEVs: 1 (you have no choice). Then click “Save and Go to Review”.
-
If you didn’t delete the data on the pool, you are going to get a warning “Some of the selected disks have exported pools on them. Using those disks will make existing pools on them unable to be imported. You will lose any and all data in selected disks.” That’s because you’re deleting the data at this point. You could have done it earlier. Same net effect… Deleting the data at this point just minimimizes your time without your main pool data. The pool creating is very fast. You will have a brand new pool: **Usable Capacity:**31.58 TiB.
-
At this point, look at your SMB shares. They are preserved (even though there is no data on them)!!! So are the snapshot tasks, replication tasks, etc. in the Data Replication page. So looking great!!! It’s all downhill from here! We now just have to replace the data. Note that the SMB shares will all preserved right after the disconnect; there was nothing magical you gained when you added the pool
-
Just for safety, let’s export the config at this point. (at 1:39pm on 4/26). I always check the box to add the secrets.
-
Now we get to do what we just did in reverse. This is the time to create a periodically snapshot on the SSD. Essentially, do the snapshot process we did above; a periodic snapshot of the SSD pool just like we did before. This sets you up for the transfer back to the main pool of the data that was there originally. So recursive, custom start time (weekly starting in a 15 minutes) to give us time to create the Replication Task that will start automatically after the SSD full recursive snapshot.
-
Use GUI again to copy data over from SSD pool to the new main pool. So same steps as before. We need to use the SSD snapshot and reverse the source and destination and use the SSD snapshots. Due to a bug, you need to create this job from scratch. DO NOT try to import the existing job. Otherwise you will get an error like this: middlewared.service_exception.ValidationErrors: [EINVAL] replication_create.source_datasets: Item#0 is not valid per list types: [dataset] Empty value not allowed. I reported this bug.
-
Hit reload to see your SSD to main Replication Task. It’s status will be pending. It will run automatically right after the SSD recursive snapshot is done. Hit reload and the periodic snapshot tasks will be “Finished” and the “SSD to main” replication task will be running.
-
You can monitor progress as before by clicking in upper right or on the Running button. And look on the datasets page.
-
As I mentioned before, with a full filesystem replication, you will not be able to touch the destination from the CLI until the copy finishes. So don’t try to login via SSH: your home directory will not be there since your pool isn’t mounted yet.
-
After the replication finishes, it’s time to put things back in order
-
Move the system dataset to the new main pool using GUI using the process used above.
-
Shares>Restart the SMB service using the dots, then enable all the shares.
-
Apps> Change app pool to main (settings>choose pool)
-
Start all the apps you had running before.
-
If apps wouldn’t start. I covered the fix for Apps not starting here.
-
Re-enable snapshot task of main. Disable the Replication Task (from SSD → main). And possibly from main → SSD if you want to use the SSD for a different use. Otherwise, as long as your SSD is larger than the data on your new pool, this will provide a nice backup. I migrated my RAID config when I only had 1 TB of storage in use, so I could get away with the backup to/restore from the NVME drive inside the system.
-
Save system config
-
Reboot just to make sure there are no issues. There shouldn’t be, but I’d rather find out now than at a less convenient time.
-
Take a manual full system recursive snapshot of your shiny new pool now that everything works.
-
Make sure you configured periodic smart checks for your new array. It seems the GUI is broken to enable SMART tests. Go to the CLI and type: smartctl -s on /dev/sda and do for each disk. Then go to the GUI to start the tests. You can close the window after you start the test.
-
Have a beer. You did it!

