I’m running TrueNAS Scale 25.04.0 and want to move my existing VM Instances from my current HDD pool (data) to a new NVME pool (appsvms) for better performance.
Questions:
What is the recommended/official procedure for migrating existing VM Instances (including their virtual disks) to a new storage pool in TrueNAS Scale 25.04.0?
Is there an “export VM” feature for an entire Instance that would allow me to re-import it onto the new pool? Or perhaps a GUI option to migrate a VM’s disk(s) to a different pool?
I’m running TrueNAS Scale 25.04.0. I have successfully set my global storage pool for Instances (VMs) to appsvms under Instances > Global Settings
However, when I go to Instances > Configurations > Manage Zvols > Import Zvol, the “Select Zvols” browser only shows ZFS volumes from my data pool. It does not display or allow me to browse/select ZFS volumes from my appsvms pool
Expected Behavior:
I would expect the “Import Zvol” UI to list ZFS volumes from the currently selected global Instance storage pool (appsvms), or at least provide an option to browse all available pools.
Current State:
Global Instance Storage Pool is set to appsvms.
appsvms pool contains ZFS volumes that I would like to import (e.g., under appsvms/migrated_vm_zvols/).
The “Import Zvol” UI only shows zvols under the data pool.
Is this a known issue, or is there a step I’m missing to make the “Import Zvol” UI recognize ZFS volumes on the selected appsvms pool?
But sadly, I still can’t see another pool under Instances > import zvolumes. There is still only one entry that points to my old pool under /dev/zvol
Though I have also tried to replicate my current .ix-virt from one pool (data) to another pool (appsvms) and then set my new pool (appsvms) as my default pool. Now it throws an error that the VM’s belong to another pool.
Which seems a valid error.
Not sure if this is same scenario as others but I also needed to move some VMs to a newly created SSD Pool. This is what worked.
Info:
TrueNAS Scale: 25.04.1
VMs are in pool A (data pool with spinning disks) – using generic labels for illustration
VMs to be moved in pool B (newly created mirrored SSD pool)
VMs were linux distros, did not have any Windows to verify
These VMs were originally imported from TrueNAS Core, the volumes did not show up in Snapshot or Replication Dataset, so could not try moving the VMs with those options.
Steps:
Instances > Configuration > Global Setting
Under Pools, add pool B, keep the existing pool A
Stop the VM to be moved, let’s say its existing disk is ‘Z’
In pool B, create a Zvol ‘X’ same size or slightly larger than ‘Z’
Back to Instances > Configuration > Manage Volumes > Import Zvols
Note that Pool B shows up only after the Zvol ‘X’ was created
Import the Zvol ‘X’ (clone or move). I did clone.
Perhaps not the most elegant way, but the only way I cloud move the VM was to use clonezilla to clone the existing VM disk ‘Z’ to new disk ‘X’
Grab a clonezilla.iso from the web unless you already have a copy
Import the iso through Instances > Configuration > Manage Volumes > Upload ISO
Back to the stopped VM that is to be moved
Under Disks, add both the clonezilla ISO and the imported disk ‘X’
Ensure the clonezilla ISO Boot Priority is the highest (3 or higher)
Will need a VNC client (I used RealVNC) to do the rest of the steps
Start the VM, go to VNC client and connect to the VM with the host IP:VNC port (x.x.x.x:590x)
VM should be booted to clonezilla
Won’t add further details here
Need to do a device-to-device copy (‘Z’ disk to ‘X’) with disk_to_local_disk disk_to_local_disk _clone operation
Caution: select the Source and Destination disk carefully. I intentionally made the new ‘X’ disk slightly larger so that I can distinguish between the new ‘X’ disk from exiting ‘Z’ disk in clonezilla during cloning
Once cloning is complete, shut down VM and remove the ISO and ‘X’ disk
Now create a new VM Instances with Storage Pool being the new B pool. Add the ‘X’ volume while creating the VM
Fire up the new VM and hopefully it starts.
In shell use, ‘zfs list -t volume’ to see the volumes under /.ix-virt in new Pool
Tried, step by step.
But ultimately the disks are unable to boot in any way.
Cloned the disks using 2nd option given in clonezilla that is disk to disk method.
Did you have any errors during cloning process?
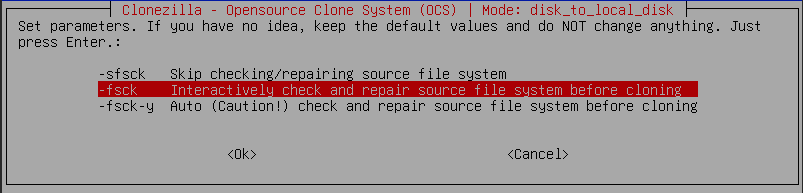
In one cloning instance I had similar issue where it failed booting (there were errors during cloning). Re-cloned with the following option (this option can be selected after choosing source and destination disks) while accepting suggested error/repair for source disk. It booted after re-cloning. No guarantee this will work for your case but thought will share in case you wanted to try.
“-fsck Interactively check and repair source file system before cloning”
I just went through this same issue. The key for me was to ask ChatGPT how to do this from the command line using the “incus” tools as this is what drives the Instances tool in TrueNAS.
It was all pretty straight forward in the end:
# 1) Stop the VM so the volume isn’t in use
incus stop freepbx-muko

# 2) Copy the live block data into RAID10
incus storage volume copy nvme-pool/freePBX RAID10/freePBX --volume-only

# 3) Verify the new volume exists
incus storage volume list RAID10 | grep freePBX

# 4) Re-point your VM’s disk0 at the RAID10 copy
incus config device set freepbx-muko disk0 pool RAID10

# 5) Start the VM again
incus start freepbx-muko

# 6) Once you confirm the VM is working off RAID10/freePBX, delete the old copy
incus storage volume delete nvme-pool freePBX
Honestly in this whole process I just copied and pasted any errors into chatGPT and it went and found the reasons why and fixed them. Absolute time saver as there is very little documentation I could find that fitted this exact scenario.
Hope it helps for next time rather than using “clonzilla” which is still a good workaround!
@pdanz approach didn’t work in my case (move VM from one pool to another) because incus storage volume copy works for custom volumes, not VMs.
However, I was able to move VM to another pool with commands:
# 1) Stop the VM so the volume isn’t in use (feel free to use UI for this)
sudo incus stop YourVmName

# 2) Perform an export
sudo incus export YourVmName YourVmName.tar.gz

# 3) Delete the VM (feel free to use UI for this)
sudo incus delete YourVmName

# 4) Import the VM to necessary pool
sudo incus import YourVmName.tar.gz --storage NameOfTargetPool

# 5) Start the VM again (feel free to use UI for this)
sudo incus start YourVmName
Note: you have to delete the VM and it’s risky. I couldn’t rename and create a new one as only one VM can use the volume, so you have to delete entire VM. The entire VM will be automatically recreated, so you don’t need to do anything.
By merging and following up by post@pdanz and post by @Antoshka I was able to move the .ix-virt and the VM instance / container to the new pool. Great. Thank you very much both of you.