What exactly are the practical implications of wider DRAID redundancy groups?

I’ve been reading jro’s various posts and personal website trying to learn as much as I can about DRAID. As I start to learn more about DRAID, more and more questions have come up when I think about things.

The confusion for me seems to be that, because of the redundancy groups present interior to a DRAID VDEV, it has properties not unlike a pool while simultaneously being a VDEV.

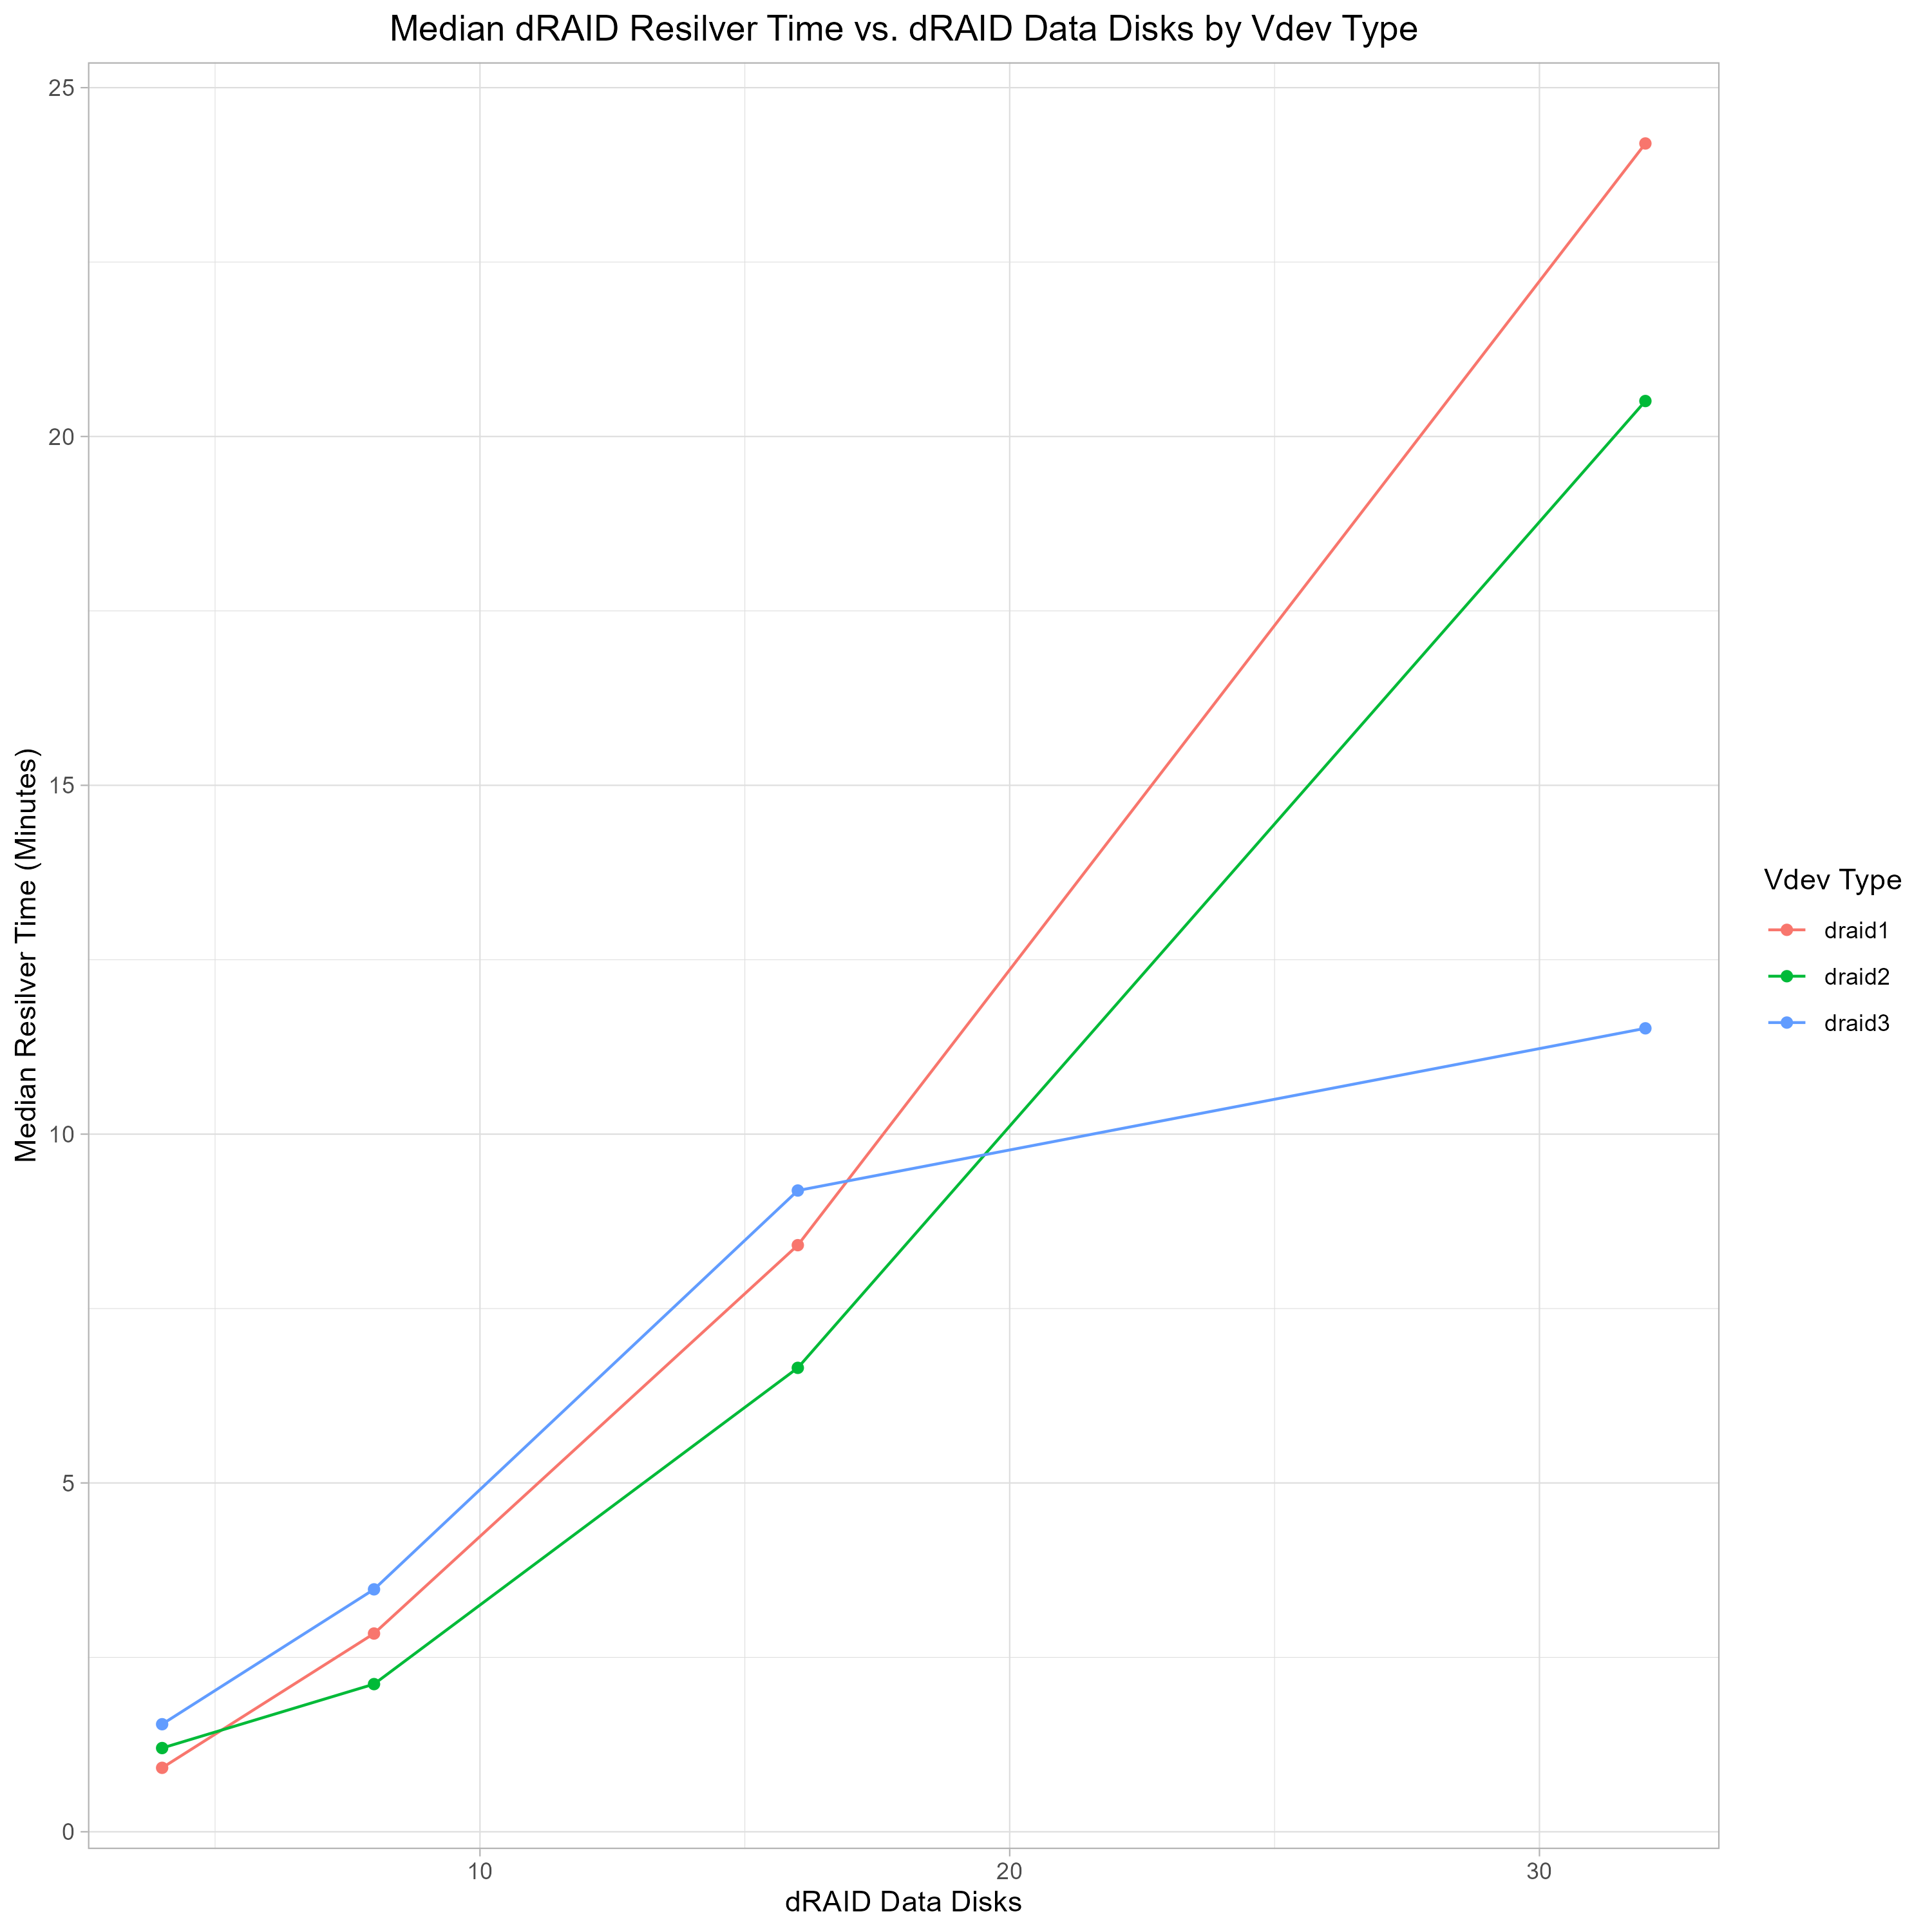
For example, a hypothetical DRAID2:8:48:2 is created. Internally, with the redundancy groups, you could visualize this as something akin to 6x RAIDZ2 VDEVs of 8 disks each, with 2 hot spares. They obviously aren’t exactly the same, but I think close enough for illustrative purposes.

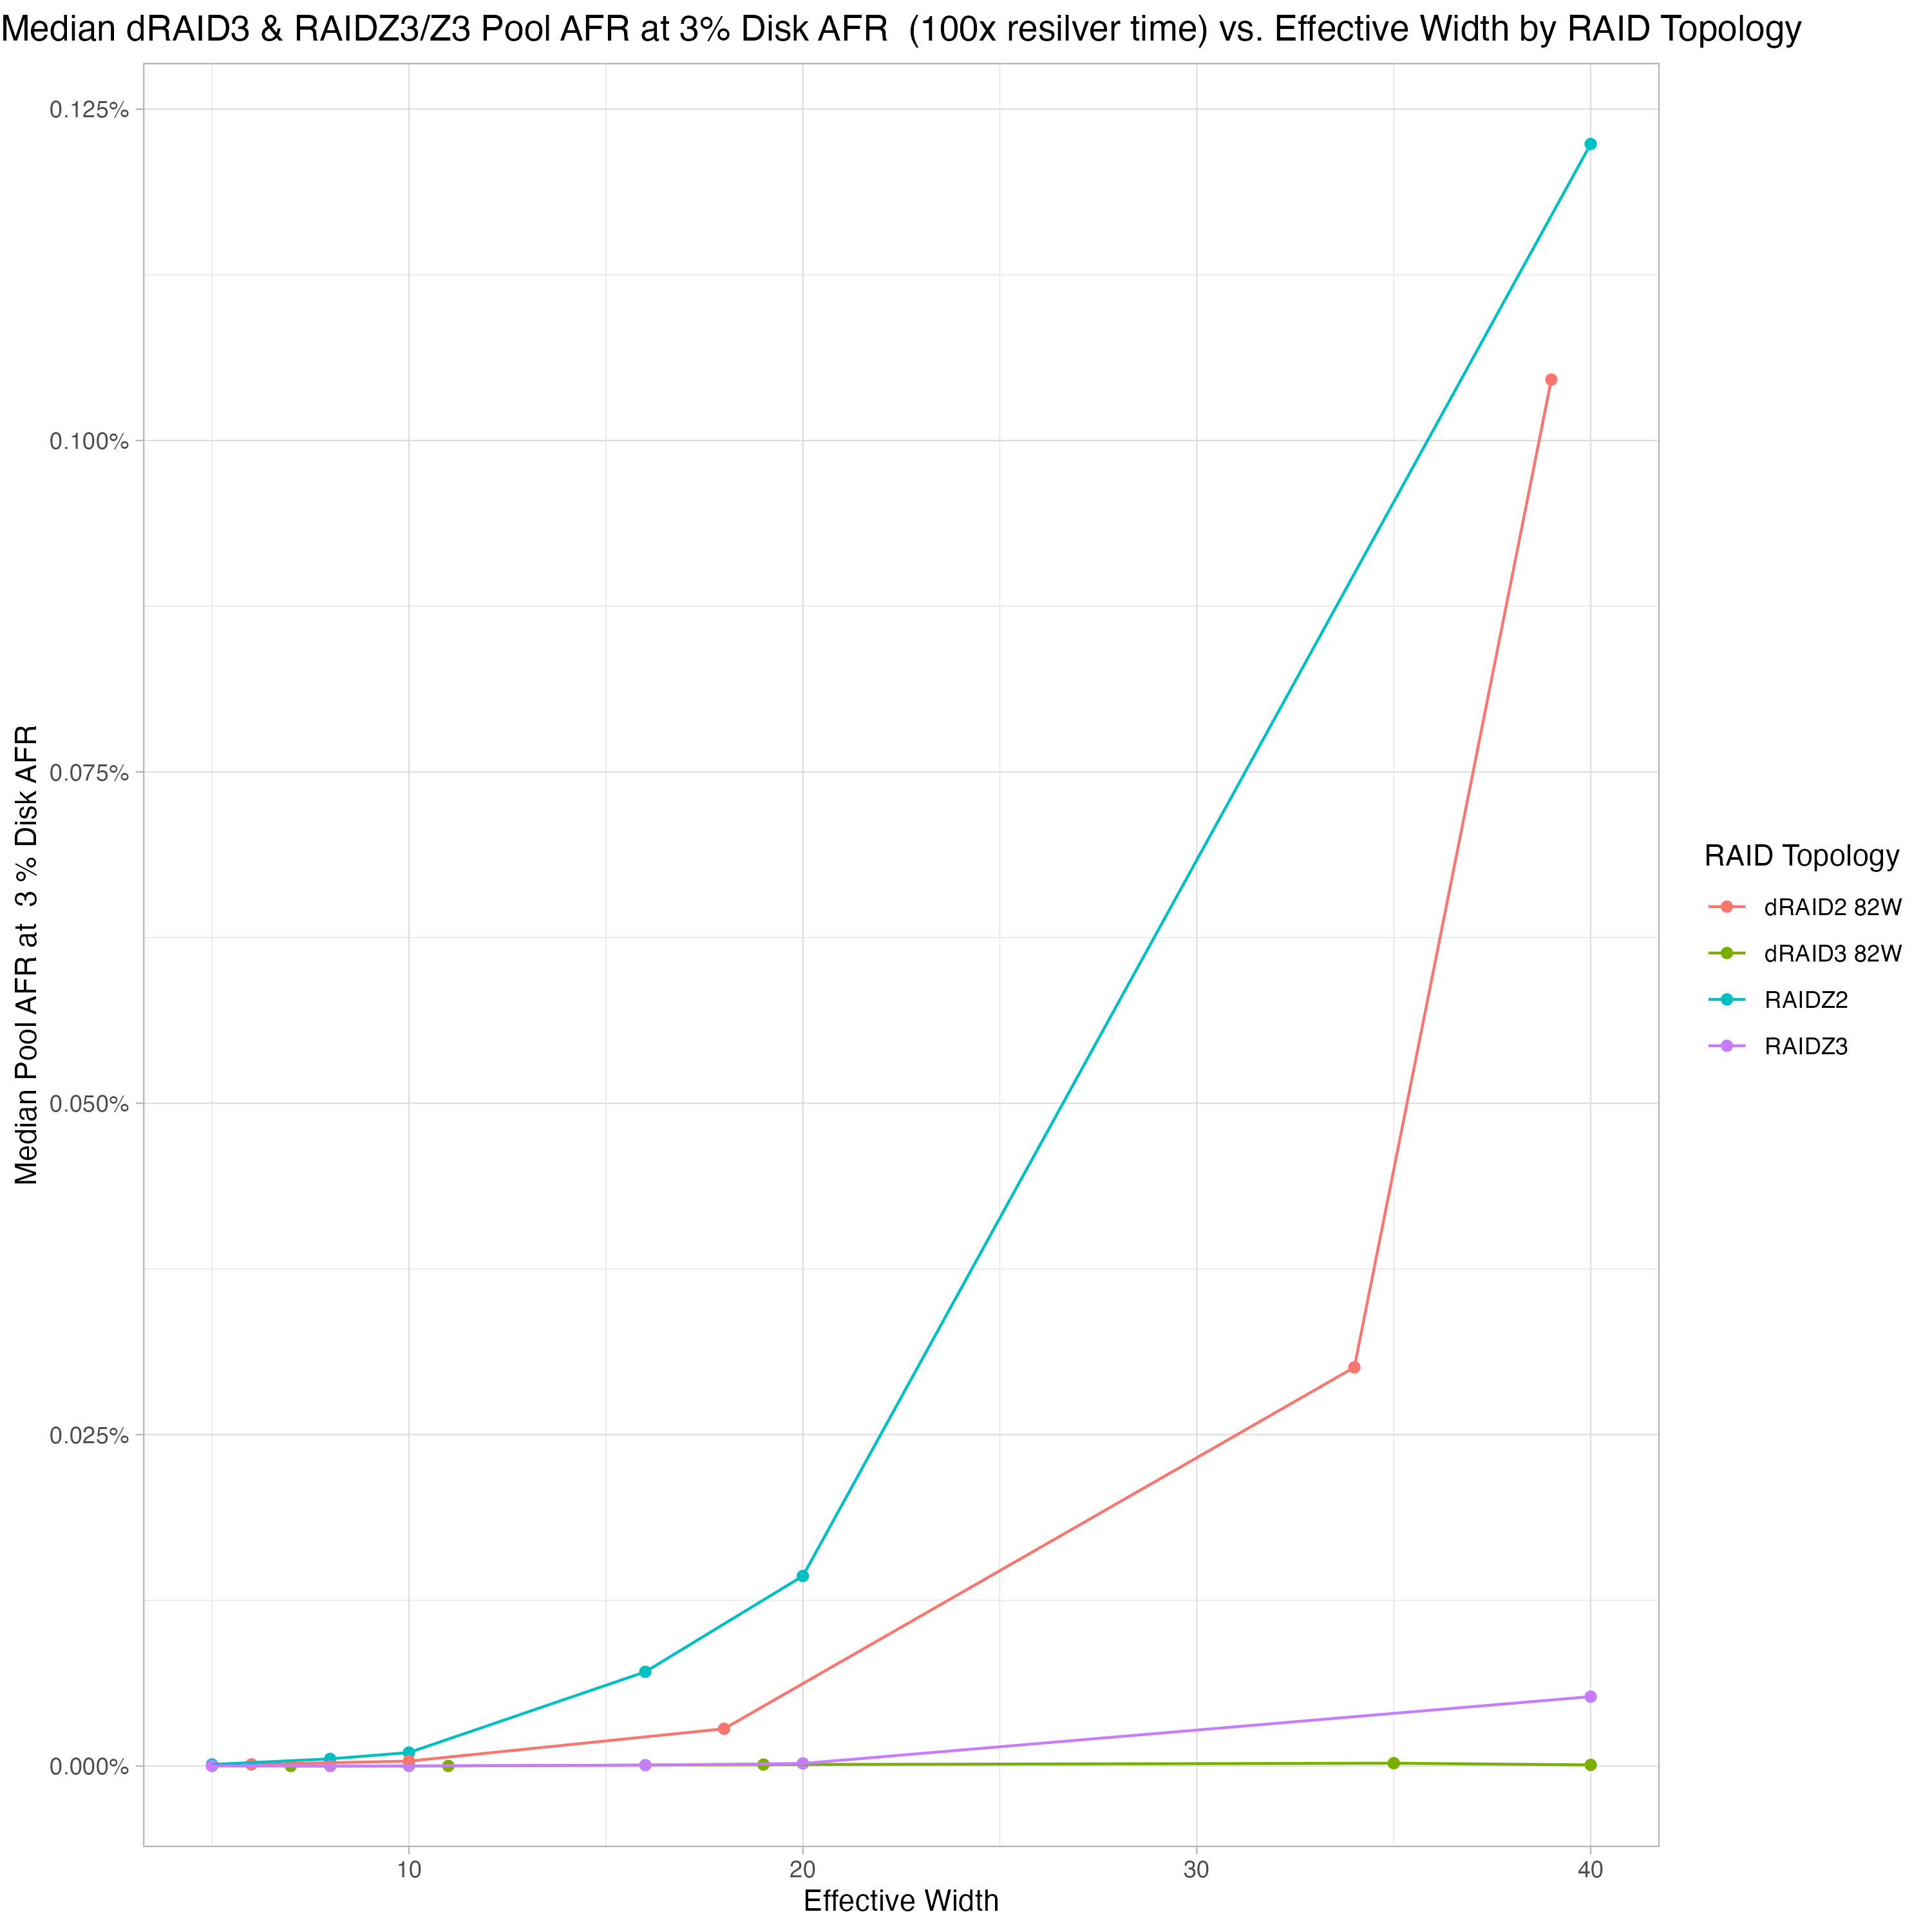
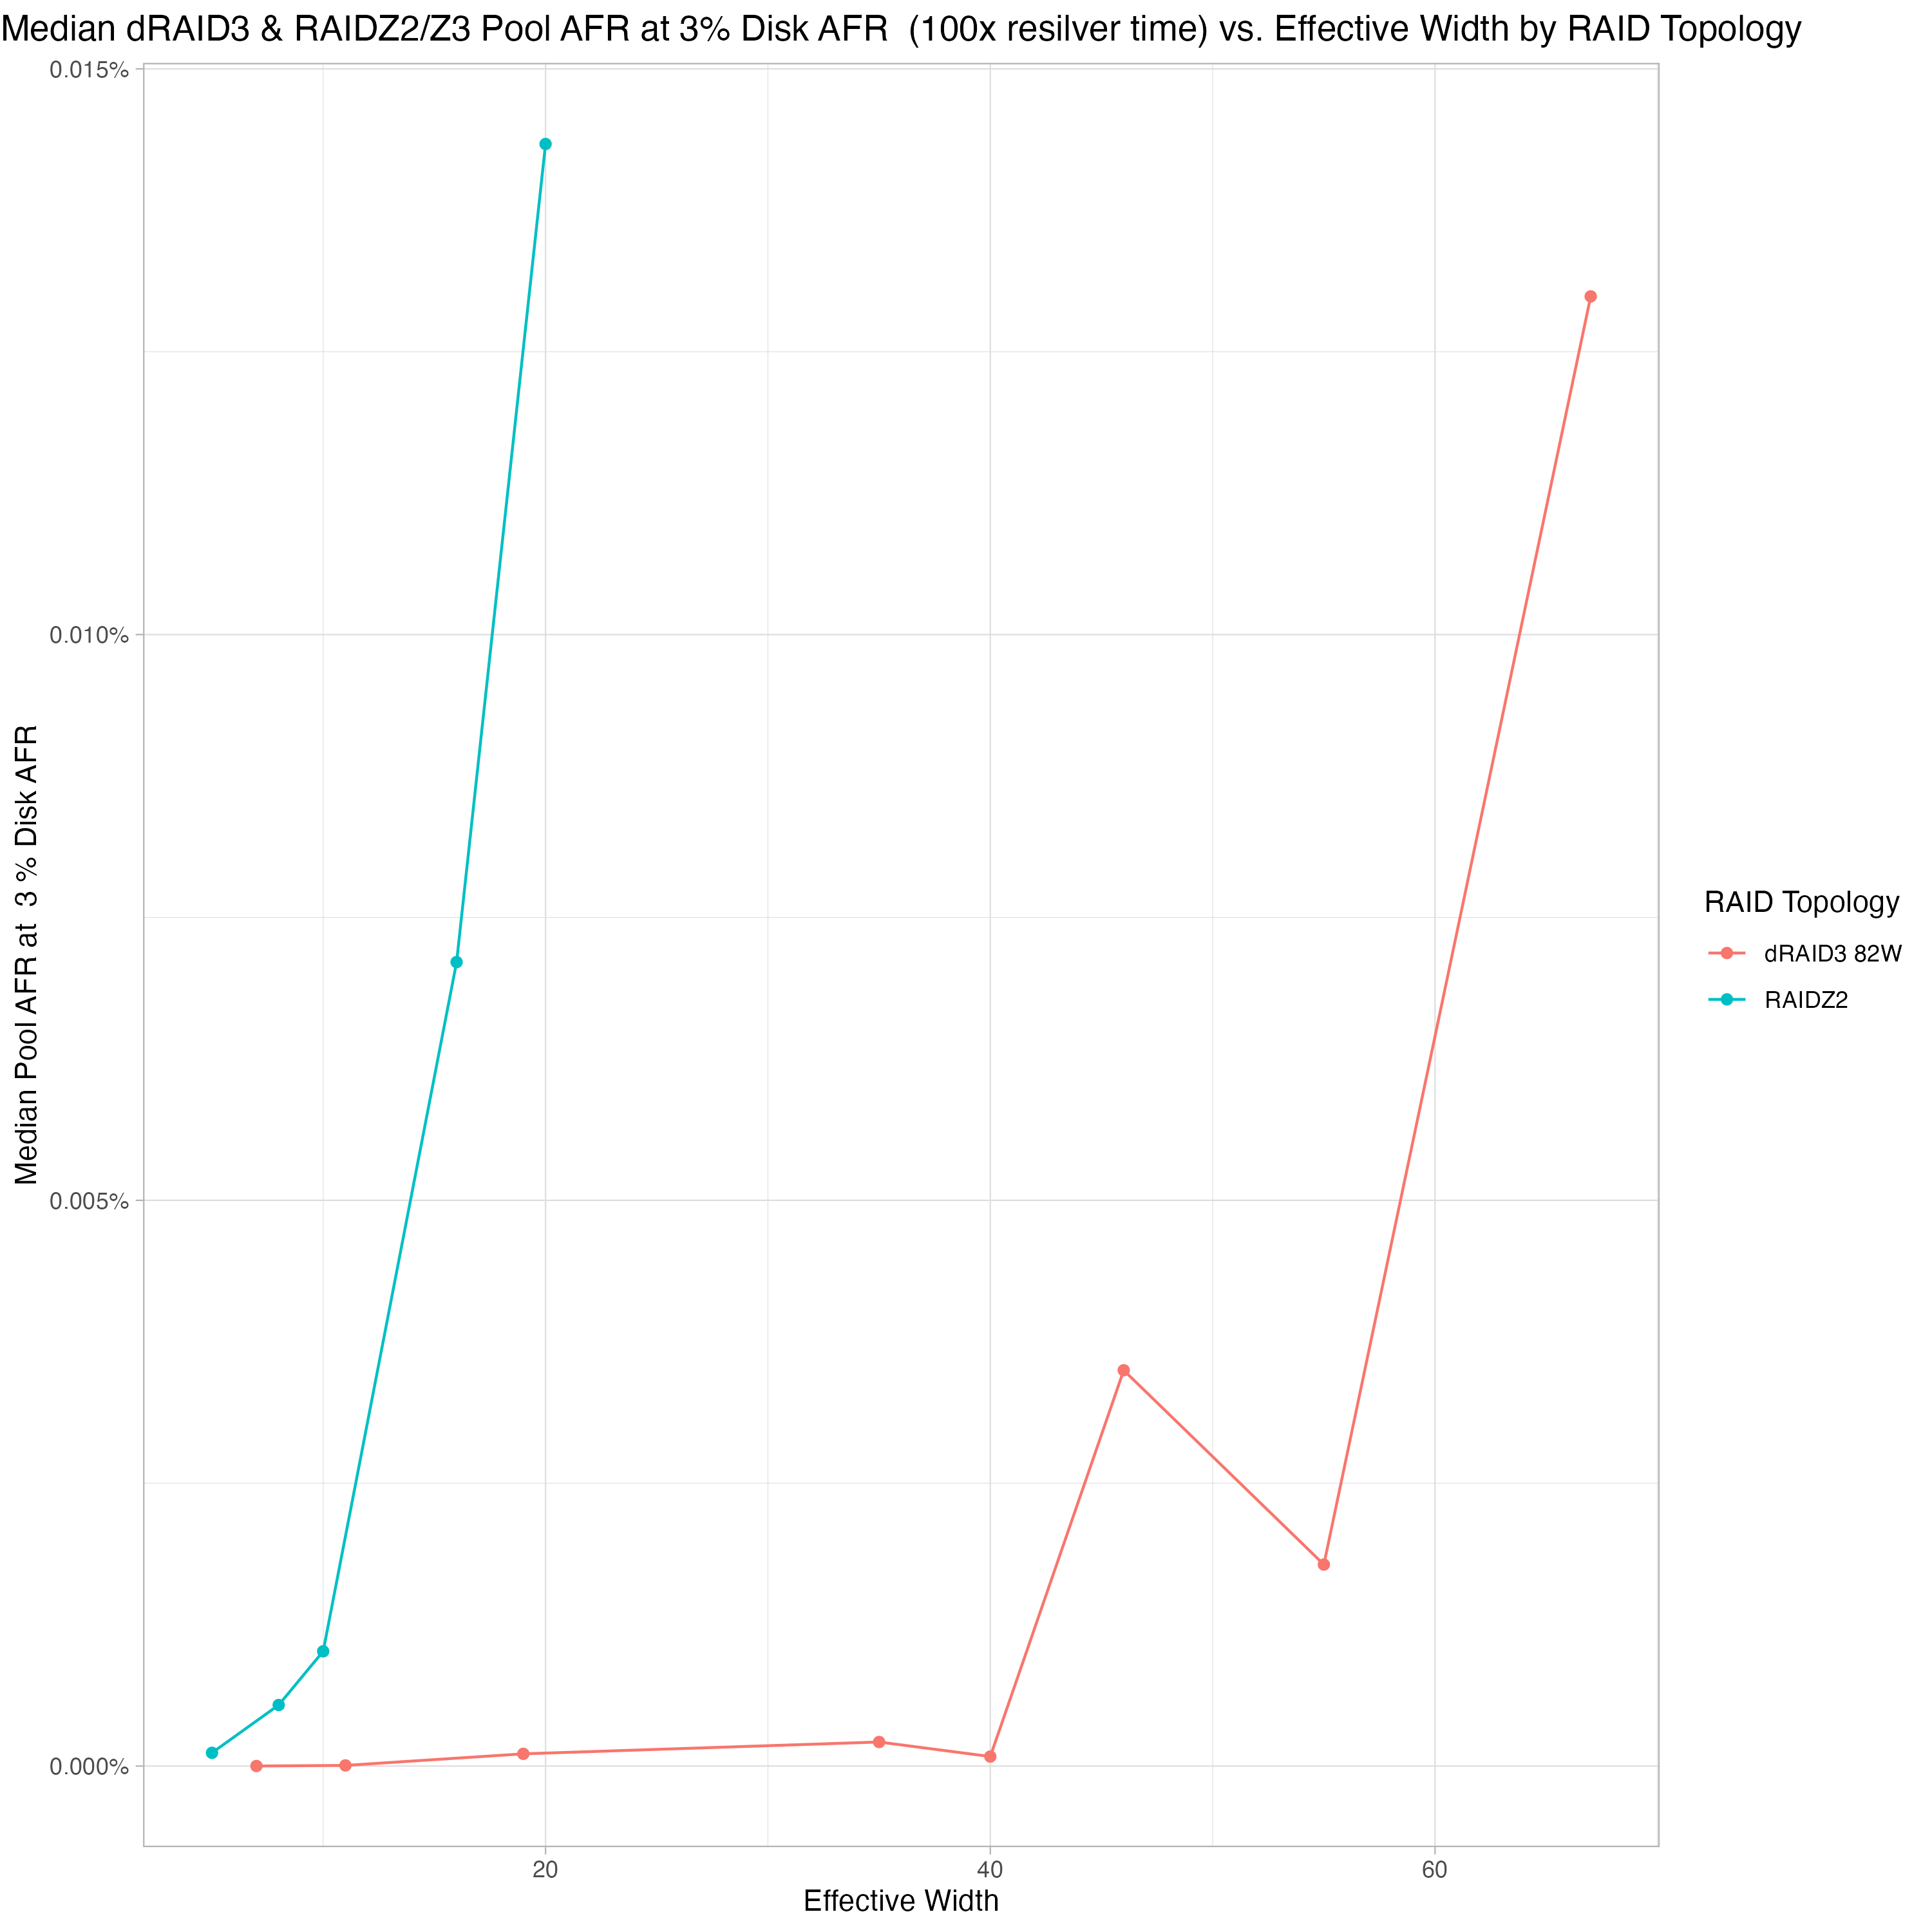
A traditional RAIDZ2 pool created with the same layout could, in theory, sustain 12 device failures (a highly unlikely scenario, but possible) and remain online provided the failures were evenly distributed amongst the VDEVs.

However, with DRAID2, you can sustain 2 device failures. Any more are guaranteed to take the VDEV offline.

So the question is, internal to the DRAID VDEV, what purpose do the redundancy groups serve? As an extension to this question, what are the consequences of wider redundancy groups within a DRAID VDEV? If I were to change the above DRAID configuration to something like RAID2:16:48:2 what are the consequences of that choice?

It doesn’t change the number of maximum device failures that can occur.

The percentage of space dedicated to parity data is significantly decreased, resulting in more usable capacity. How is this possible without negatively impacting the reliability of the pool?

Because of DRAIDs lack of partial stripes, the minimum stripe size becomes 64k instead of 32k. Depending on the type of data store on the pool this could be a significant overhead if you were to be storing, say, millions of tiny files.

Overall decreased performance of the VDEV.

Any input would be appreciated. Thanks.

I can’t comment on other aspects of dRAID on ZFS. But, the failure of more than 2 disks and taking out the vDev in your example does not seem right.

I would expect each dRAID group to survive up to it’s parity limit, just like RAID-Zx.

The difference is that with 2 integrated hot spares the time to restore full redundancy is reduced, up to 2 disks lost.

1 Like

Based on the following, that is not accurate: OpenZFS dRAID - A Complete Guide

Leaving resilver time aside, a dRAID-based pool will almost always be more susceptible to total pool failure than a comparable RAIDZ pool at a given parity level. This is because dRAID-based pools will almost always have wider vdevs than RAIDZ pools but still have per-vdev fault tolerance. As discussed above, a pool with 25x 10-wide RAIDZ2 vdevs can theoretically tolerate up to 50x total drive failures while a dRAID configuration with 250x children, double parity protection, and 8 data disks per redundancy group can only tolerate 2x total disk failures. Once we consider the shorter resilver time of dRAID vdevs, the pool reliability comparison becomes a lot more interesting. This is discussed more below.

As the number of data disks in the redundancy groups increase, so does resilver time, thus making the pool more prone to total failure. I’m in the final stages of some long-running analysis looking at resilver times, but here is how resilver times scale based on data disk quantitty:

I’ll have better analysis on how resilver times influence pool reliability, but I’m seeing draid3:32d being at least as reliable as a 10wZ2 while offering ~20% more capacity. I see draid2 “competing” more directly with RAIDZ1.

1 Like

This does not make sense. I would think, (and could be wrong), that it is 2 disks PER redundancy group in the above example.

But, this is more of an intellectual discussion for me. At present I don’t have any interest in using dRAID.

Nope, he’s correct; draid2 with 250 children can only take 2 drive failures no matter how you configure the raid groups.

Edit: to clarify, 3 drive failures of a draid2 vdev will kill the vdev if they all happen before the resilver/hot spare activation completes. That process is relatively fast and usually completes in well under an hour.

2 Likes

This is great. Thanks. Not sure how many datapoints you have for this, but that 30+ draid3 datapoint seems like it would be an outlier, no? Otherwise that’s a wild result for the resilver time to decrease so minimally with such a huge change in width.

I’m currently evaluating options for a 44 disk pool and I’d like to get your input on a potential pool layout, if you wouldn’t mind. Based on your statement about draid3:32d what layout you would think appropriate for a such a pool? I had been leaning towards something like draid3:8d:44c:3s but based on this it seems like going wider should be fine, e.g. draid3:16d:44c:3s. The additional usable space is not insignificant between these two options.

Yeah, the draid3:32d one is a little odd… that dot is the median from 8 different resilvers. I’ve got more data around that point now that I just haven’t explored yet.

Honestly, with 44 disks, I’d just do 4x 11wZ2 and get a 45th drive as a hot spare (or 4x 10wZ2 with 4 hot spares). DRAID is neat and all, but it hasn’t been widely deployed yet, so you might run into weird issues that don’t have an easy solution. If you’re comfortable being a little bit of a guinea pig, draid3:32d:44c:2s or draid3:16d:44c:2s would probably be your best bet. draid3:8d:44c:2s I think is overly cautious.

I’ll get some pool AFR plots put together tomorrow that will better illustrate the reliability of these different layouts.

Never mind, not tomorrow, here’s some AFR data…

This estimates the annual failure rate (AFR) of a pool assuming the individual disks in that pool have a 3% AFR (which is a decent estimate for consumer disks).

I’m using “effective width” here to more easily compare the different dRAID2/3 layouts to the RAIDZ2/Z3 layouts. Effective width for dRAID2 and 3 are the data disk quantities plus the parity level (so draid3:16d has an effective width of 3+16 = 19). Effective width for RAIDZ2 and 3 are just the vdev width.

This was rushed, so it could be laid out better, and the plot title should say “RAIDZ2/Z3”, but you can clearly see that dRAID2 is a bit more reliable than RAIDZ2 at a given effective width and dRAID3 is a bit more reliable than RAIDZ3 at a given width. In my opinion, that little bit of extra reliability going from Z2 to dRAID2 or Z3 to dRAID3 doesn’t offset the major dRAID drawbacks (huge pool growth increments and no partial stripe write support).

I think where dRAID can shine is by using dRAID3 instead of RAIDZ2. 10wZ2 is generally considered pretty safe and we can see that even super-wide dRAID3 layouts are at least as safe:

Beyond an effective width of 40, dRAID3 gets pretty wacky:

Again, after all this testing is complete, I plan to more carefully look over the data and write up something a bit more organized. I’m also going to try to create a statistical model of all the resilver data I’ve gathered (at this point, over 3,000 different data points, each one a resilver of a different pool layout with different fragmentation levels, pool stress levels, cpu stress levels, recordsizes, disk sizes, etc) and make it available in a javascript app.

1 Like

Thanks. I’m not against a standard RAIDZ2 layout, I’ll investigate further. The issue would be where to put that hot spare, as our current 44 bay SM JBOD is fully populated.

I appreciate the reassurances on draid3:16 vs draid3:8. With 20TB/18.2TiB disks that results in roughly an additional 90TiB of usable space which is sizable.

Just want to make sure I’m understanding this point correctly.

By growth increments, you’re referring the inability to just add an additional, say, 11 disks into a RAIDZ2 VDEV and growing the pool that way? In our situation that’s not a problem as we plan on expanding by adding additional fully populated shelves. Obviously with DRAID the downside there is that you’re “wasting” the virtual spare as they can’t be shared between DRAID VDEVs but that’s a pretty minimal overhead in our opinion.

As for partial stripe support, it’s something I’ve been considering. We’ve done some pretty in depth reporting/metrics on our data.

With ashift=12/4Kn disks, 16 wide redundancy group, the stripe width would be 64KiB. From what I’ve been reading the primary concerns with this would be:

  1. Write amplification. Small files incur large IO overhead due to the entire stripe needing to be written. As this is an archive, it’s going to be WORM. After the initial data move, write amplification should not be a concern.

  2. Wasted space due to padding. While we do have roughly 15m files under 4KiB, this only results in ~1TiB of losses to padding if I’m doing my math correctly here (64KiB stripe width * 15m files).

  3. Compression. Due to the stripe width, files under 64KiB are effectively unable to be compressed as after compressing they still will be padded out to the full 64KiB.

I really appreciate you taking the time to share your knowledge on this. While there’s tons of information out there in general, being able to directly converse with an expert is immensely helpful. I can never be sure if what I’m reading is accurate, and if it is accurate, that I am interpreting it correctly.

Everything here looks correct except for this I think you’d want to figure out how many files you have under 64KiB.

Yeah, strangely enough for whatever reason we have many under 4KiB, then a huge drop off until we get over 1MiB in size.