Managed to setup Nextcloud (w/o cert) and Collabora (w/o cert) by following this guide. Reverse proxy using Caddy on OPNsense. Thanks a lot for the effort
Anyone able to use the Extra Parameters to set default UI object? --o:user_interface.mode=compact works but not --o:user_interface.TextRuler=true?
i have a question about Nextcloud and TrueNAS. I setup and intalled Nextcloud on TrueNAS Scale with this tutorial. But i experince an issue with it.
When i upload files via web interface from a windows client over local area network it is very slow. It seems that there is no nat loopback because the domain in browser points to the domain which is set in “OVERWRITEHOST”.
When i reconfigure the Nextcloud app in TrueNAS and set “HOST” to the local ip adress of the server, and remove the environmet variable “OVERWRITEHOST” the slow speed is fixed. But with this i am (logically) not able to get connection from outside of the lan.
If i use the windows app and configure the nextcloud server to local ip, the transfer speed fast.
Do you have an idea, howto solve this?
Rather new to TrueNAS and trying to reinstall NextCloud following a disk getting fried.
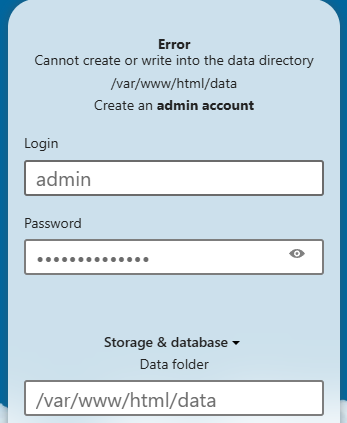
Am following this guide step by step and but on launching NextCloud, I’m getting an error can’t create or write into the data directory ‘/var/www/html/data’.
I followed your instructions and everything worked perfectly, thanks for writing the post!
How did you manage to force SSL with NPM? I did set up NPM but only works with HTTP, I’m using cloudflare certification to solve this problem, but when I try to use NPM force SSL method it does not work.
@SrGuspin So, if understand correctly, you are able to port forward to Nginx Proxy Manager just fine, but you can’t get the SSL certificates to work, so you are connecting a Cloudflare Tunnel to Nginx Proxy Manager and then relying on the SSL certificate from Cloudflare?
How did you try to generate the SSL certificate on NPM? Was it through your domain registrar (like I showed with Dynu)? Also, are you able to verify that you have correctly set up port forwarding for your network and DNS records for your domain so that your network can be reached from the outside?
My first hunch would be that your network is failing to communicate with your domain and/or the internet in general, which would explain the failure to generate an SSL certificate and suggest a possible port forwarding issue. Cloudflare Tunnels would, of course, circumvent this issue as they don’t require port forwarding.
I’m also running into a roadblock with trying to get SSL cert to work with NPM.
When NPM is installed as a TrueNAS app:
when trying to create a certificate, server reachability is failed. The error is that a server can found but returned an unexpected status code ‘invalid domain or IP’
port 443 and 30022 (as required for the app) has been forwarded to the device running NPM, however I’m not sure if the port forward is actually running properly
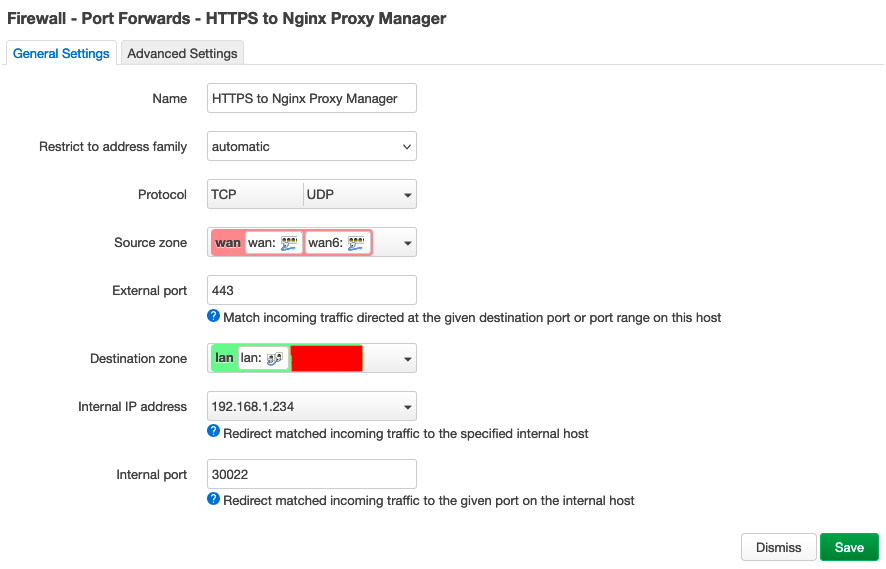
@PZ0013 You shouldn’t open the external port 30022. You should only open the external port 443 and then forward it to the internal port 30022 on your local device running Nginx Proxy Manager.
If you only forward port 443 to your local Nginx Proxy Manager device without specifying local port 30022, this will not work. You need to specify the device AND port.
This is what my rule looks like on OpenWrt (ignore the HTTP port forward):
That makes sense but unfortunately the Server Reachability test is still failed:
port check on domain at port 443 is open now
however accessing Nextcloud returns ERR_SSL_UNRECOGNISED_NAME_ALERT, which I guess is due to the SSL certificate not set up yet due to the Server Reachability fail as above
If I access:
192.168.9.3:30021, I get the ‘Congratulations’ page as expected; and
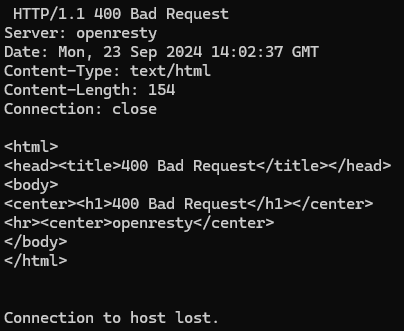
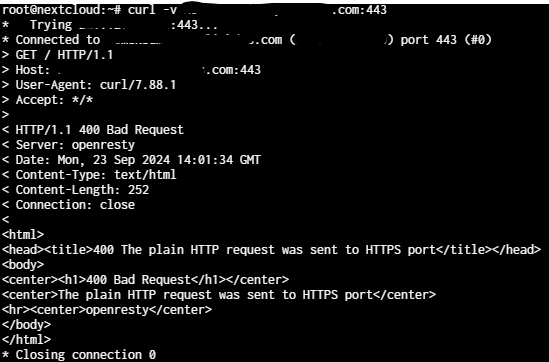
192.168.9.3:30022, I get the 400 Bad Request as expected
so I think that means NPM is at least handling the request properly at the specified ports.
What other test/config/logs/etc can I do/provide to check I’ve followed your guide correctly?
I don’t know what your exact configuration looks like, so I’m just throwing ideas out there, but is there a chance that your network isn’t reachable at all through your domain (and instead only through your external IP address)?
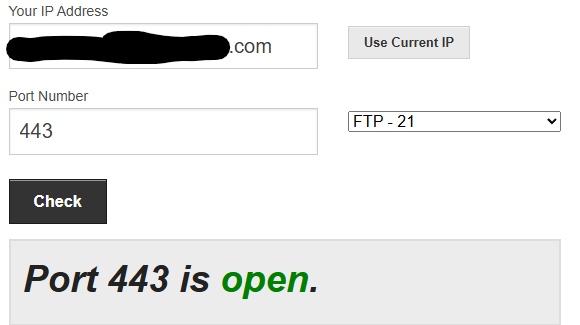
The port check tool that you linked didn’t allow me to enter my domain (it just autofilled to my external IP). When I used the port check tool at portchecker.co, I could enter any value that I wanted, and found that port 443 was open for both my external IP and my domain.
If the port checker says that port 443 is closed on your domain but open on your external IP, it may be worth checking that you’ve correctly set up DNS records for your domain.
This is what my DNS records page looks like on Dynu:
The only records that I created myself are the ones in the red box (i.e., the A record and the AAAA record with the hostname *.mydomain.tld, and the A record points to my external IP address). You need to make sure that you put a star before the domain if you want to redirect all subdomains of your domain to your network.
If none of this helps, it may also be good to know how exactly how you are trying to create your SSL certificate. Are you trying to create it directly through Nginx Proxy Managerlike I did with Dynu or are you using a different tool?
With your last suggestion on the port forward, my network looks to be now reachable via my domain (verified with telnet mydomain.com 443 and also ```portcheck.co`` as you’ve suggested), with return of 400 Bad Request as expected.
and curl from a different machine for good measure:
So re the SSL certificate, I’m using the DDNS that came with my router. This worked with the previous TrueCharts NextCloud installation with Traefik, hopefully it can also work here too.
Dynu looks like it’s an open DDNS service which does the same thing? If so, I was looking to keep things as simple as possible but please let me know if otherwise.
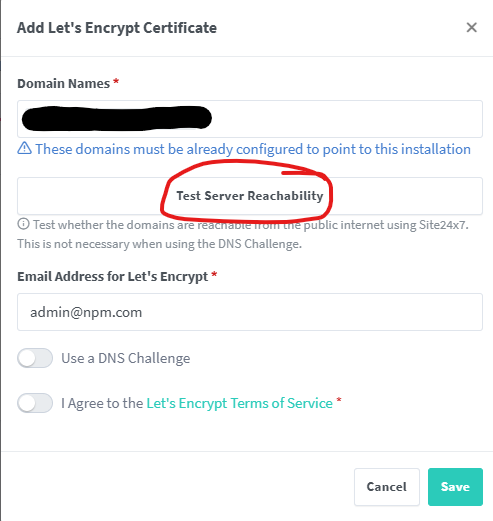
So with the router provided DDNS, I’m trying to create the SSL directly with Nginx Proxy Manager as you’ve done above but ‘Test Server Reachability’ is failed
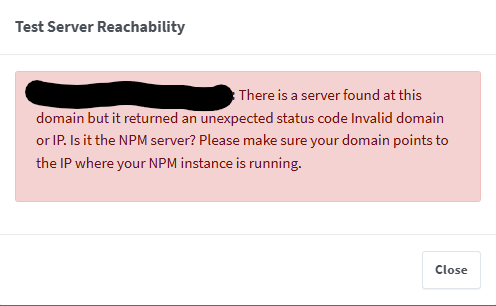
I just did the same “Test Server Reachability” test in Nginx Proxy Manager that you did but for my own, wildcard domain (*.mydomain.tld) and got the same message:
There is a server found at this domain but it returned an unexpected status code Invalid domain or IP. Is it the NPM server? Please make sure your domain points to the IP where your NPM instance is running.
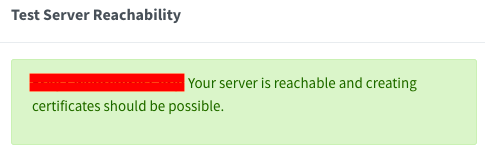
Then, I did the same test but on mydomain.tld (i.e., the same domain as before but without the “*.” at the beginning) and got this message:
However, my SSL certificate is for my wildcard domain (the one I got the “Invalid domain or IP” error message for), and I’m pretty sure it needs to be, because my Nextcloud server is hosted at nextcloud.mydomain.tld, and I don’t think that an SSL certificate that applies to mydomain.tld but not *.mydomain.tld would accommodate my Nextcloud subdomain.
So, how did I make the SSL certificate for my wildcard domain if I got the same error message as you when I tested my wildcard domain for reachability?
My guess is that the solution involves enabling the “Use a DNS Challenge” option. This required me to enter an API Key that I got from my Dynu account (I outline all of this in my comment to @Wacky-Mole). I don’t think I would have been able to create a wildcard SSL certificate for my domain without doing this. You may find that the same applies to you.
As for how you could get this to work with your own configuration, you mentioned that you want to keep things as simple as possible. I assume that what you mean by this is that you don’t want to mess around with any third-parties for your DDNS services, but you must already be relying on some third party to serve as your domain registrar, right?
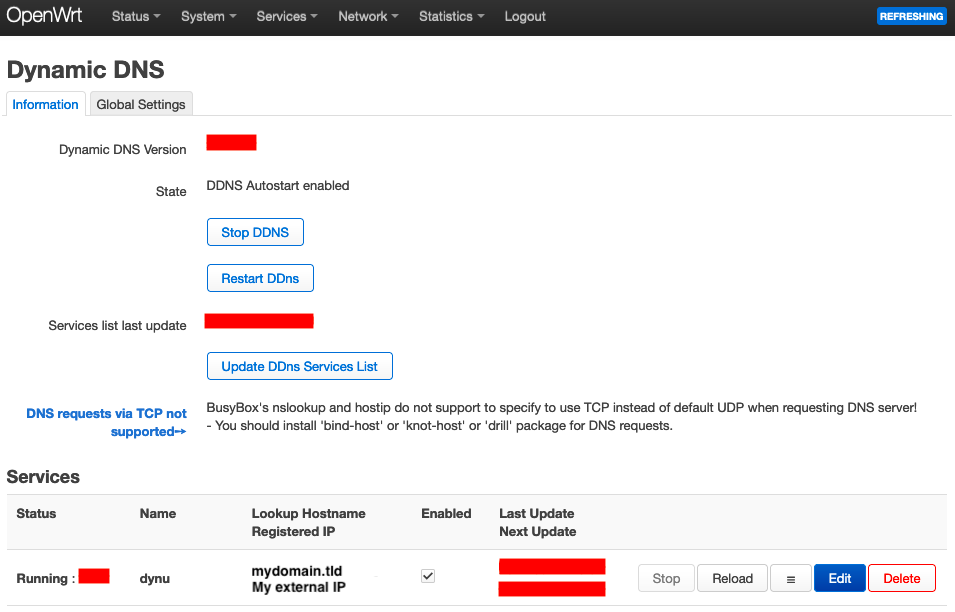
I ask this because I think that your setup might already be pretty similar to mine (correct me if I’m wrong): I use Dynu for both my domain and DDNS services, but I have configured my router running OpenWrt to automatically update the external IP associated with my Dynu domain whenever my external IP changes. This is what my Dynamic DNS page looks like on OpenWrt:
If what you meant when you said that you wanted to keep things as simple as possible was that you don’t want to have to run any program on your PC or click on a periodic reminder email to maintain ownership of your domain/DDNS (as is often the case when using services like No-IP), then my configuration satisfies those conditions. My DDNS configuration is completely “hands-off” once you get it up and running and it’s also completely free.
Of course, this only worked for me because OpenWrt supports Dynu (although I had to edit a script on OpenWrt over ssh to get it to work). If you want to configure your DDNS using only your router and not have to mess around with any software on your PC, then you would be restricted to using the DDNS services that your router firmware supports.
Is your domain registrar available as an option for the DNS provider after you select Use a DNS Challenge when you’re trying to create the Let’s Encrypt certificate in Nginx Proxy Manager? If it is, see if you can find the values that Nginx Proxy Manager asks for in the Credentials File Content box.
I see, no my domain registrar isn’t available on the DNS Provider list. A couple of daft questions:
does this just happen to be the DNS providers that’s supported by Let’s Encrypt?
what’s the difference between a ‘(purchased) domain’ and ‘DDNS’? I’ve seen/read some references before but still don’t understand the difference that would make or break its usage in a case like this
I see no reason why Let’s Encrypt certificates would be restricted to the DNS providers that are listed in the Nginx Proxy Manager wizard. It’s just that Nginx Proxy Manager makes creating a Let’s Encrypt certificate so much more convenient, which is why I like to stick with DNS providers that Nginx Proxy Manager natively supports.
There are plenty of guides on the internet for creating Let’s Encrypt certificates the “manual” way (like this), but I don’t think I would be of much help if you were to try to go that route. However, according to this post, it still does seem as though some DNS providers generally cater better to Let’s Encrypt than others.
Thanks for bringing this up. This can be tricky to understand.
Since DDNS (or Dynamic DNS) is just an extension of DNS, the main difference is actually between a domain registrar and a DNS server. I’ll describe the difference between DNS and DDNS first:
A DNS server allows you to translate a domain name into an IP address. When I posted the picture showing how to update the A and AAAA records in Dynu, I was showcasing Dynu’s DNS functionality:
DDNS is exactly same as this, but with the added functionality of automated DNS updates, which can be convenient for home users whose ISPs have given them dynamic IP addresses. When I posted the picture showing my Dynamic DNS page on OpenWrt, I was showcasing the DDNS portion of Dynu’s DNS functionality:
Most businesses have static IP addresses and will therefore be fine using DNS without DDNS.
As for the difference between a DNS server and a domain registrar:
While it is common for people to use the same provider for both domain registration and DNS, it is also possible to have a domain that relies on the DNS servers of one provider but is registered elsewhere. This is quite simple to set up and involves changing the name servers of a domain.
If you are lucky, there will be a DDNS service that is supported by both your router firmware and Nginx Proxy Manager. Based on what you’ve described, it sounds like your router has built-in DDNS functionality.
If I were you, I would check whether there is a DDNS page that I could access on my router and see which, if any, DDNS services are natively supported. Then, I would see which of those services, if any, are available as options for the DNS provider in the Let’s Encrypt certificate wizard in Nginx Proxy Manager. Then, I would either change the name servers of my domain over to one of those providers or—if I didn’t want to bother with using separate services for domain registration and DNS—just transfer my entire domain over to one of those registrars.
I see I see, as it turns out the list of DNS Provider for my router’s DDNS function just doesn’t match Let’s Encrypt’s list of DNS Providers (did I use the terms correctly?)
It seems that Let’s Encrypt’s native DNS Provider leans towards more ‘professional grade’ DNS providers? eg. noip.com (which I thought was one of the more popular ones) isn’t on the list.
More broadly on the significance of SSL certificates, I understand the underlying purpose of SSL certificates is to allow encrypted (and therefore secure) traffic. Apart from the innate protection, the other function of the SSL certificate then is to give confidence to a third party user to interact with the site. If there are no third party users (ie. just internal usage amongst family and friends), then a self-signed certificate achieves the same thing?
This is correct. To be honest, for me, the main drawback of self-signed certificates is having to dismiss the warning page that comes up each time I try to access a website that uses them, but self-signed certificates will still encrypt traffic. There is, potentially, an easier way to go about all of this that I don’t know about that simply relies on self-signed certificates.
You are referring to the list of DNS Providers that appear in Nginx Proxy Manager, and not the list from the Let’s Encrypt forum that I linked in my last comment, right? If all you are trying to do is create a Let’s Encrypt certificate, then you should be able to use just about any DNS you want, but you just might not be able to create the certificate through Nginx Proxy Manager.
Blockquote
You are referring to the list of DNS Providers that appear in Nginx Proxy Manager , and not the list from the Let’s Encrypt forum that I linked in my last comment, right? If all you are trying to do is create a Let’s Encrypt certificate, then you should be able to use just about any DNS you want, but you just might not be able to create the certificate through Nginx Proxy Manager .
You’re right, sorry I missed that link (thanks and very helpful btw). Unfortunately it doesn’t change the conclusion about compatibility with Let’s Encrypt or Nginx Proxy Manager.
So I did stumble upon this - an installation guide for File Browser with explanation on implemenation of a self-signed certificate. Easy to install, and works right out of the box - that’s a solution for me there.
Then at least to apply everything that has been learnt from above, I wanted to improve(?) on this setup by using Nginx Proxy Manager to handle the traffic and forward to File Browser.
Naiively I:
set up the forward from external ports (443 and 80) to NPM internal ports for http and https, and then in NPM forward to the File Browser instance port for https.
installed a self-signed certificate created in TrueNAS per the installation guide above
This didn’t work.
Not sure if I have a fundamental misunderstanding or there’s another installation quirk with NPM.
And just to make sure it doesn’t go unsaid, thanks so much for your attention and an awesome guide
At 13:07 in the video you linked, he put his local IP as the Common Name and both his local IP and domain under Subject Alternate Names, but he made it clear that he put his local IP as the Common Name because he only plans on accessing his File Browser installation from the local network and that you should enter your “DDNS name” if you plan on using DDNS to access your File Browser installation from the internet (by “DDNS name”, I assume he is referring to a domain name).
However, judging by both the fact that only Subject Alternate Names but not Common Name has an asterisk (*) next to it as well as the fact that, at 2:05 in the video that @Wacky-Mole linked, the guy skipped adding a Common Name entirely and only put a value under Subject Alternate Names (although he was creating a CSR there and not a Certificate Authority like in the video you linked), my guess would be that what matters most is filling in the correct value for Subject Alternate Names.
So, have you tried adding a wilcard DNS value (i.e., *.yourdomain.tld) under Common Name/Subject Alternate Names when creating your certificate/certificate authority (primarily, the Subject Alternate Names for your certificate)? Also, you forwarded port 80 to the http port (30021 by default) and port 443 to the https port (30022 by default) of your Nginx Proxy Manager installation, right? The way you wrote it kind of made it sound like you did it the other way around:
Thanks! It’s nice to see that this guide seems to have helped so many people, and I’m happy to answer your questions. Hopefully, our comments will also help some people who’ve been getting stuck.
Had a bit more of a play around and reinstalled the certificate, a few observations:
the ‘Common Name’ field is actually not a mandatory field (which would otherwise be asterisked)
can only add 1 string value, which suggests the value here is behaving more like a label (as opposed to ‘Subject Alternate Names’ field which registers more than 1 distinct values.
after installation, I can see that the ‘Issued to’ and ‘Issued by’ fields in the installed certificate changed to the values inputted for ‘Common Name’.
Also I note that other certificates don’t have ‘Issued to’ and ‘Issued by’ fields as an ip or domain name but rather the name of the organisation (eg. DigiCert Assured ID, Entrust Root Certification Authority, etc)
So I’m suspecting the ‘Common Names’ field is probably a bit of a red herring.
And more of a note on refining the guide’s installation process, double clicking to install the certificate to the user might be redundant. At least this is the case for me as when I remove the certificate from my browser, it’s also removed from my user profile in Win11.
Re the port forward, yes sorry port 80 and port 443 was indeed forwarded to NPM port 30021 and port 30022 for http and https respectively. (Great attention to detail!)
So back to trying to make use of NPM, it still doesn’t work. Update now is the error
ERR_SSL_KEY_USAGE_INCOMPATIBLE,
which suggests it’s a certificate configuration issue.
At this stage, more keen for a structured solution rather than trial and error on inputs/input format.
Have seen an example such as this (self-signed certificate with no input of domain name at all).
Or maybe if really want to put a reverse proxy in, consider if there’s an alternative that’s easier to configure than NPM?
I guess one aspect in my case is that Let’s Encrypt is adding a layer of complexity that’s doesn’t seem to have that much more benefit.
I have been experimenting with this and I think I have found the solution, i.e., a self-signed SSL certificate for Nextcloud that can be imported into Nginx Proxy Manager that is independent of the DNS/DDNS provider! What finally got things working for me was a combination of the TrueCharts video that @Wacky-Mole linked and the Techworks video and 45Drives article that you linked.
What I didn’t realize at first is that, in the Techworks video, he doesn’t appear to be using a reverse proxy at all, since, at 18:05, he manually adds the port number for File Browser to the end of his URL. This suggests that he forwarded the external port 30044 on his network to the internal device and port of his File Browser installation.
However, opening services to the outside world directly through port forwarding is generally not recommended for three reasons:
By forwarding a different port to each app instead of only forwarding one or two ports to your reverse proxy (and allowing the reverse proxy to redirect traffic), you are increasing the surface area on which attacks can occur, as hackers can simply run automated programs that scan home networks for open ports and check for vulnerabilities.
A reverse proxy has more robust capabilites to block any access requests that it deems suspicious. This is a feature which can be hardened in Nginx Proxy Manager by enabling options for your proxy hosts like Block Common Exploits, Force SSL, HTTP/2 Support and HSTS Enabled.
A reverse proxy allows you to specify a memorable subdomain for each of your services (e.g., nextcloud.mydomain.tld), whereas with proxyless port forwarding, you and your users would have to remember each service’s unique port number (e.g., mydomain.tld:9001 for Nextcloud).
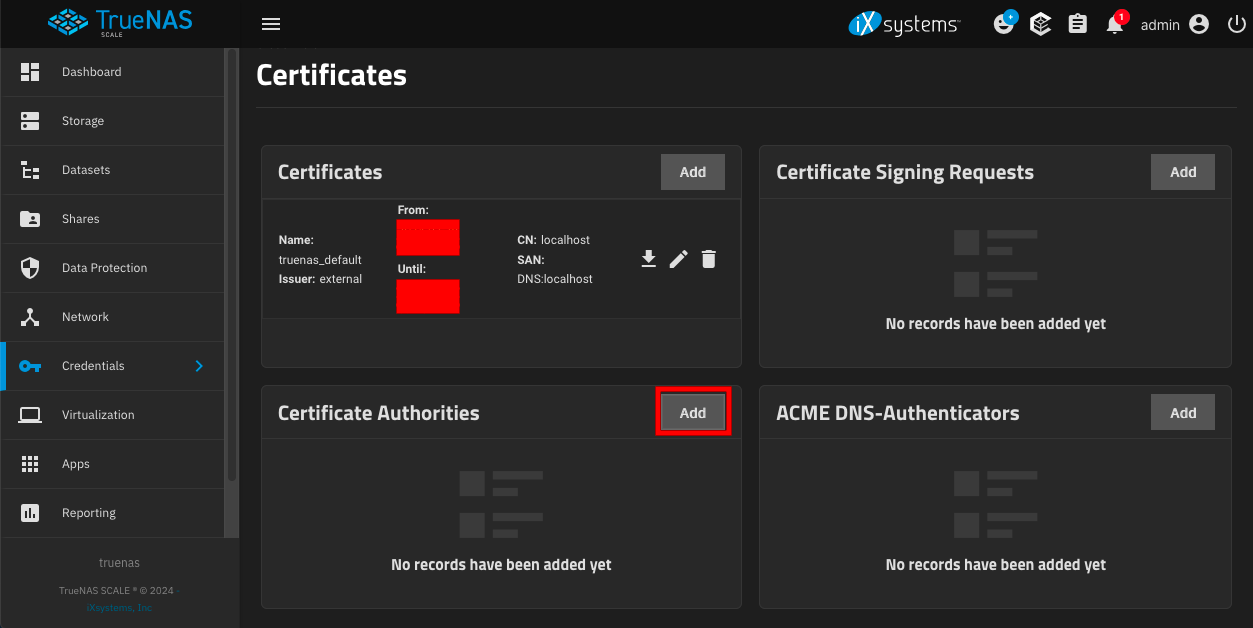
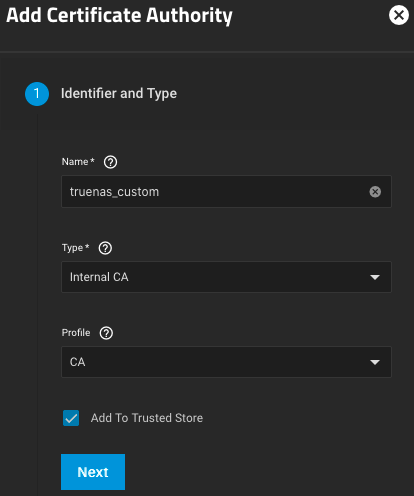
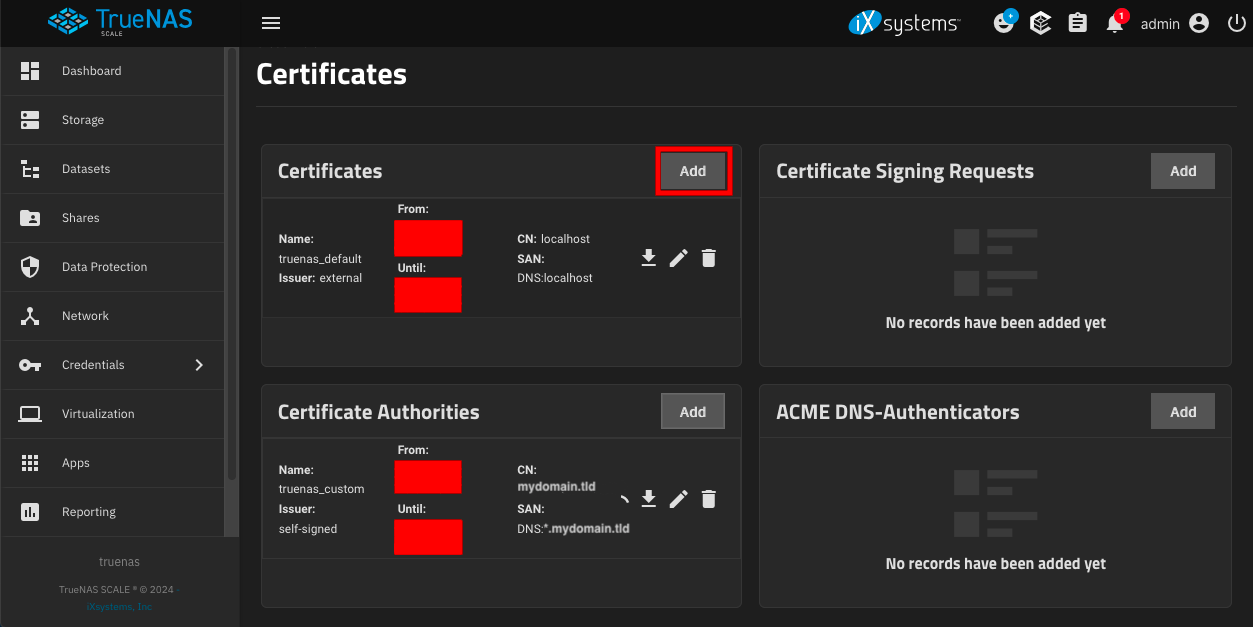
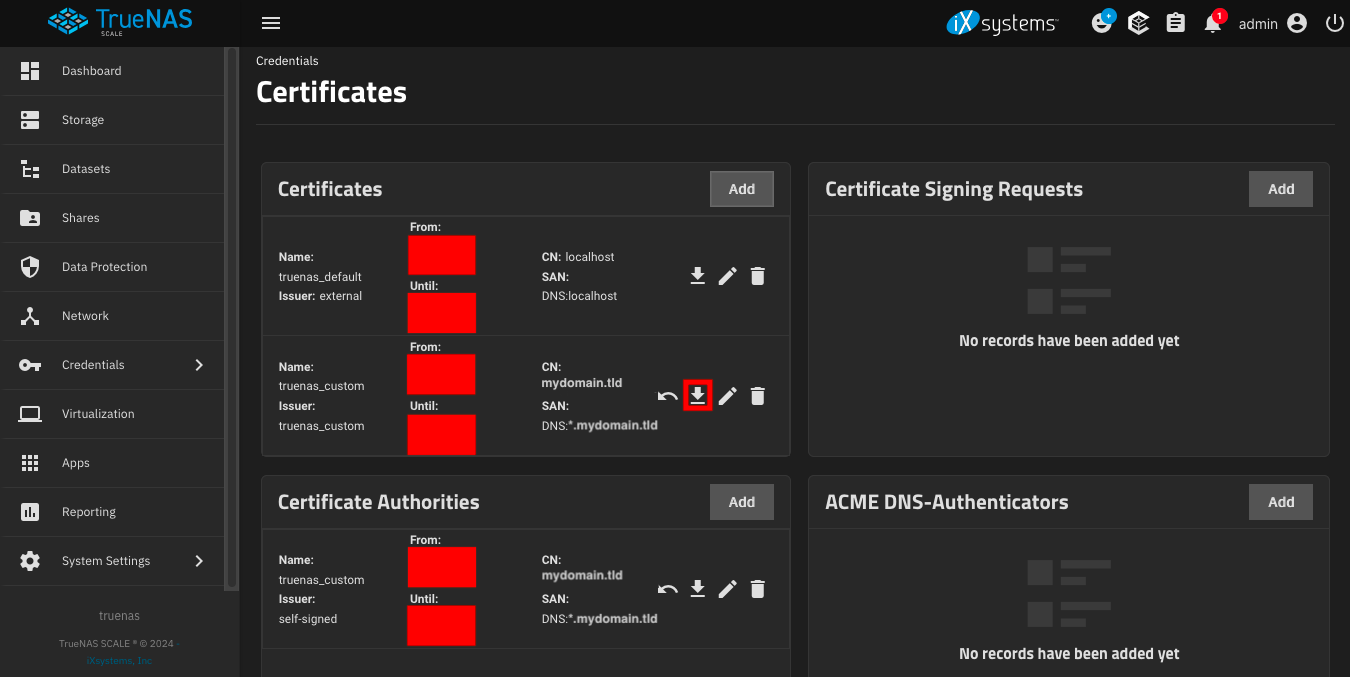
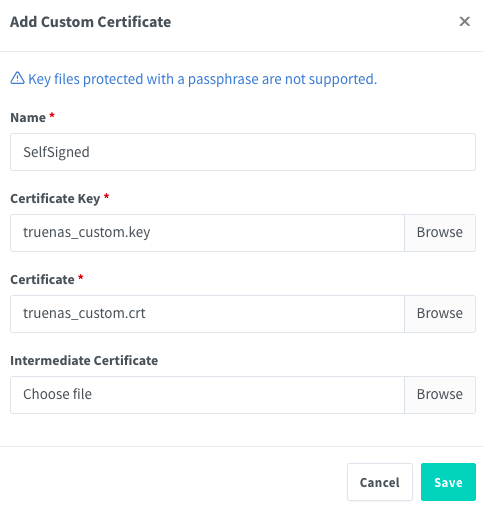
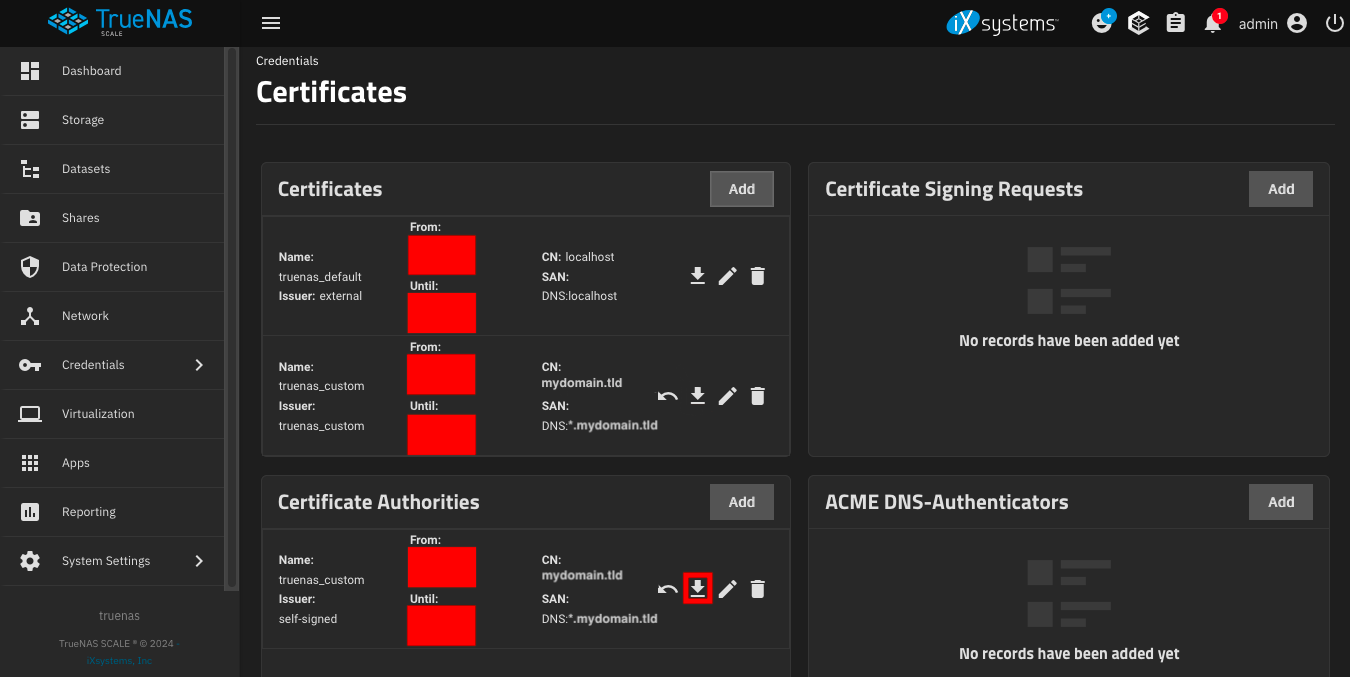
So, here is how I got a self-signed certificate for Nextcloud and imported it into Nginx Proxy Manager. I’ll start with the certificate authority first:
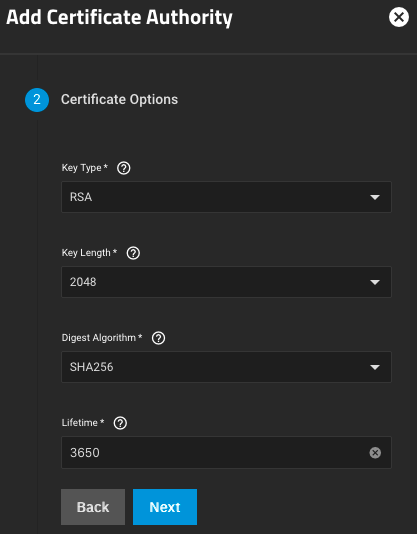
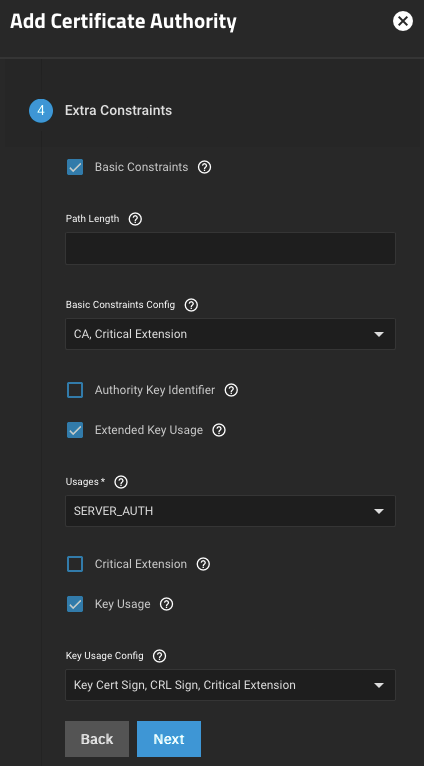
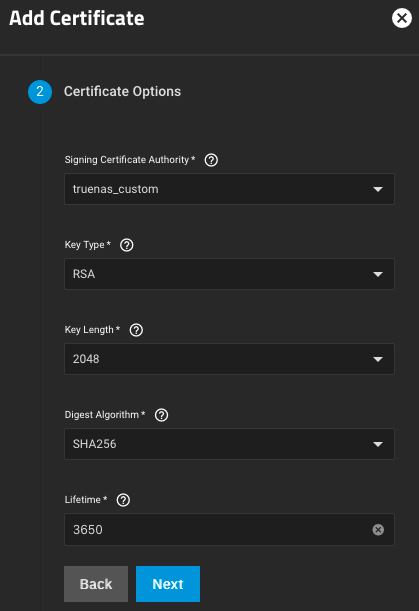
Here are my settings for the CA’s Certificate Options. Adjust the value for Lifetime to adjust the amount of time for which you would like your certificate authority to be valid (a value of 3650 means the CA will be valid for 3650 days, or ~10 years).
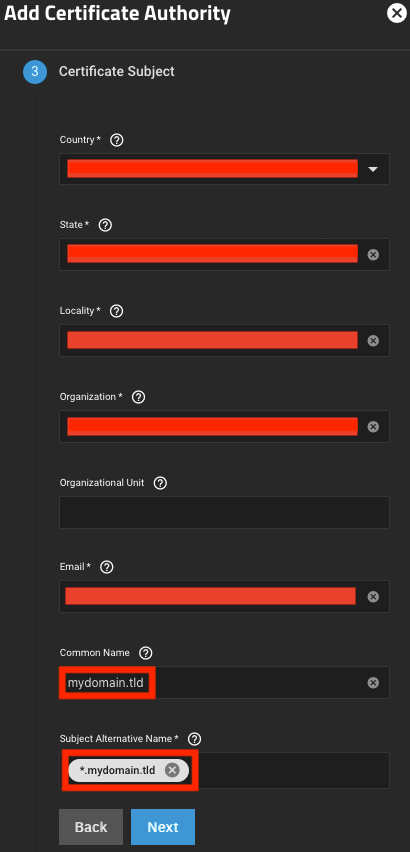
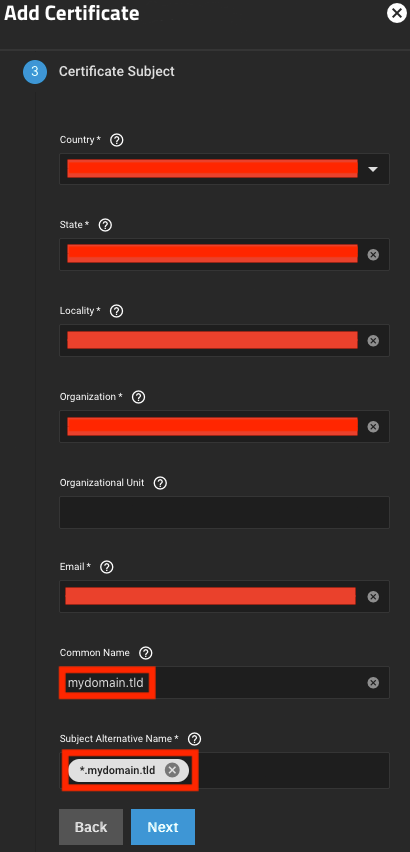
For the CA’s Certificate Subject, the values you enter for Country, State, Locality, Organization and Email shouldn’t have any influence on the efficacy of the certificate itself, but they are required fields, so you will be forced to put something. For Common Name, put your domain (e.g., mydomain.tld) and for Subject Alternative Name, put your wildcard domain (e.g., *.mydomain.tld).
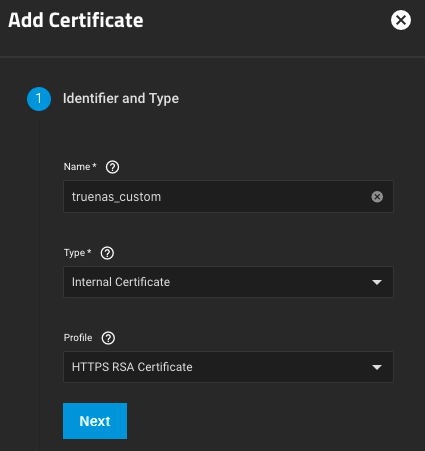
Here are my settings for the certificate’s Certificate Options. Adjust the value for Lifetime to adjust the amount of time for which you would like your certificate to be valid (a value of 3650 means the certificate will be valid for 3650 days, or ~10 years).
For the certificate’s Certificate Subject, just as for that of the CA, the values you enter for Country, State, Locality, Organization and Email shouldn’t have any influence on the efficacy of the certificate itself, but they are required fields, so you will be forced to put something. For Common Name, put your domain (e.g., mydomain.tld) and for Subject Alternative Name, put your wildcard domain (e.g., *.mydomain.tld).
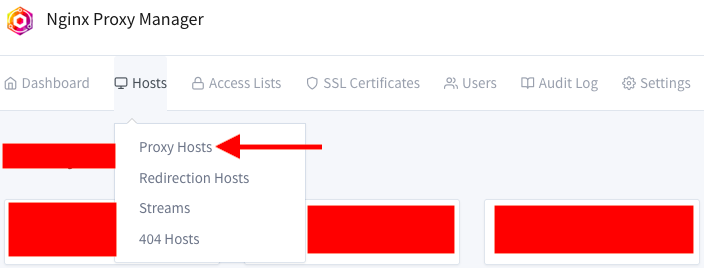
In the Details tab, fill in the information for your Nextcloud proxy host in the exact same way that I originally showed in the section of my guide titled Create a proxy host for Nextcloud (don’t necessarily just copy what’s in this picture; refer to the guide for more help with exactly what you should put here).
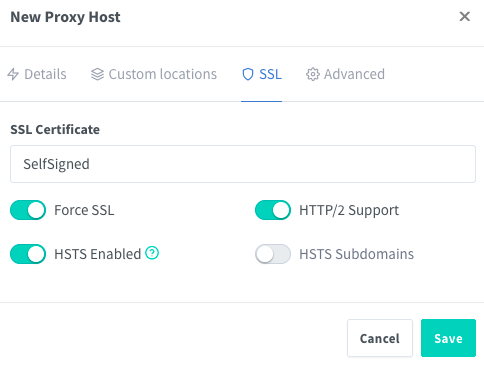
In the SSL tab, add the self-signed certificate that you just imported (I also went ahead and enabled Force SSL, HTTP/2 Support and HSTS Enabled). Then, hit Save.
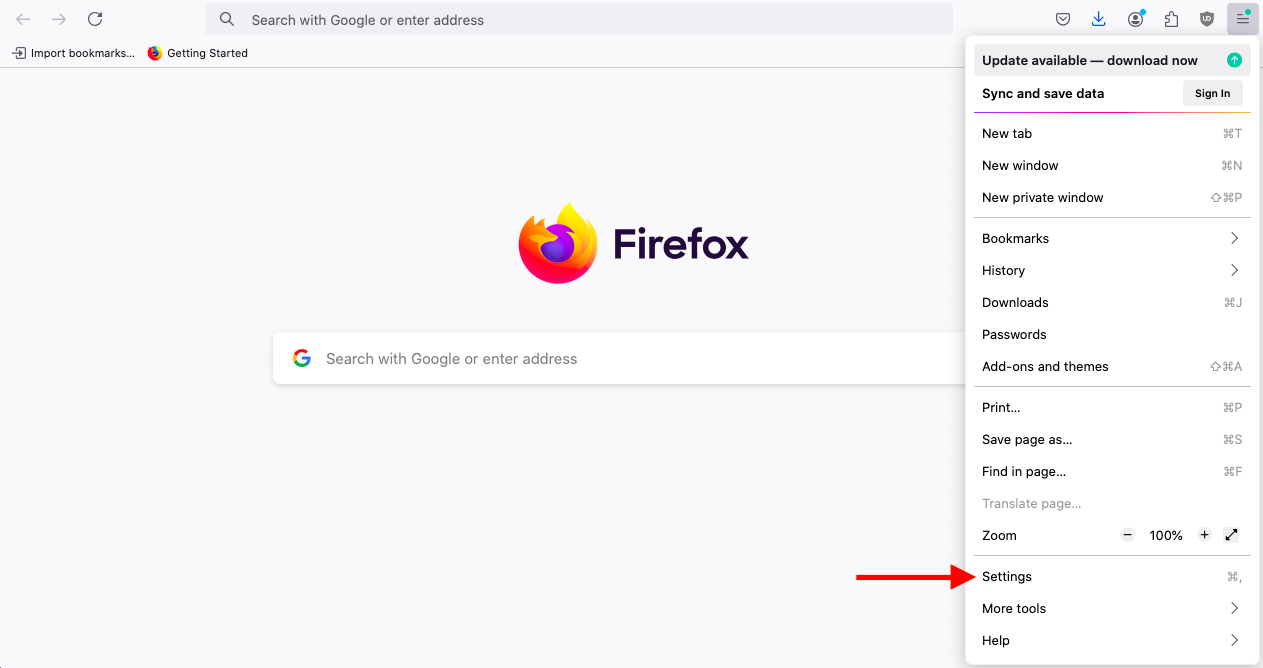
You may already be able to access your Nextcloud installation by going to nextcloud.mydomain.tld. However, at this point, you still may find, as I did, that you are unable to access your Nextcloud installation, especially if you are using Firefox. This is likely due to you not yet having added your custom certificate authority as a trusted CA within your internet browser.
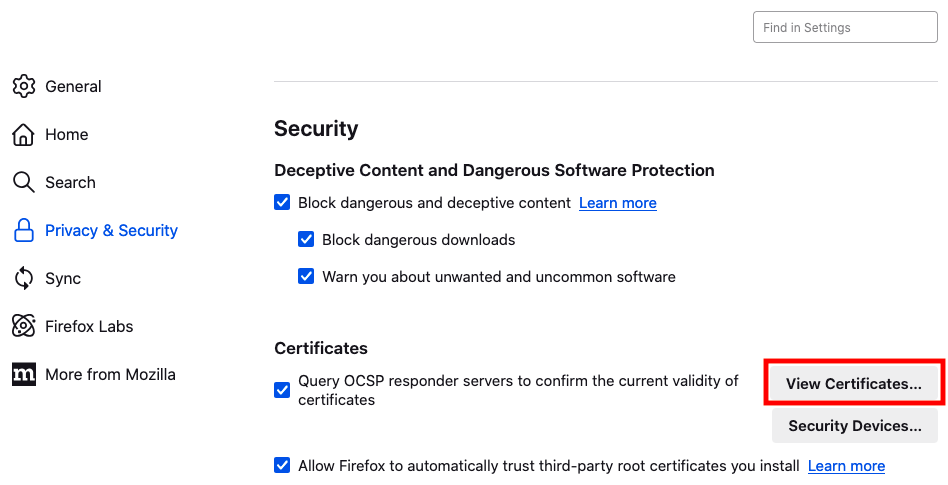
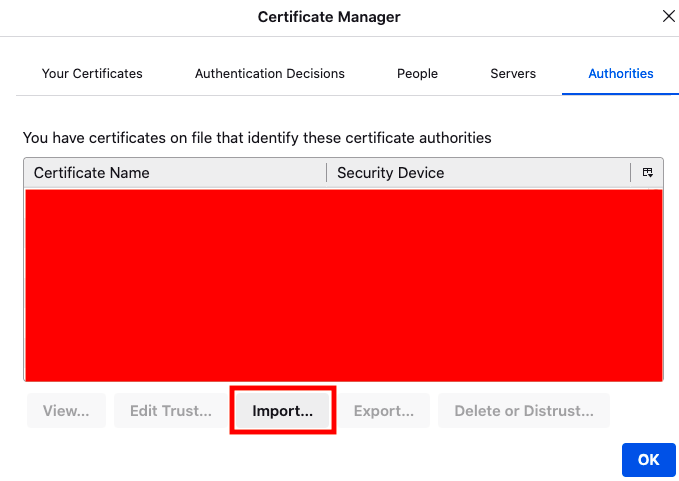
Here is how to add your custom certificate authority in Firefox: