Background
It took me over 30 hours of actual time on the computer to correctly install Nextcloud on TrueNAS SCALE both with Collabora integration as well as with the ability to access Nextcloud from outside the local network, but I finally got everything working.
Considering the amount of people on these forums that seem to be struggling with this exact same issue, or a variant of it, I thought that there might be a reasonably large audience for a guide that details EXACTLY what one person, with little prior knowledge, did to get all of this working.
Here are all of the versions of the software that I am using:
- TrueNAS SCALE Dragonfish-24.04.0
- Nextcloud 29.0.1 (chart version 2.0.7)
- Collabora 24.04.3.1.1 (chart version 2.0.15)
- Nginx Proxy Manager 2.11.2 (chart version 1.0.32)
NOTE: I used the official TrueNAS versions for Nextcloud, Collabora and Nginx Proxy Manager, not the Truecharts versions. I have not tested this setup with any of the Truecharts versions of these apps, so I am not sure how transferable this guide is to those versions.
Prerequisites
In the interest of preventing this guide from becoming too broad, I am already assuming that you have done the following:
- Installed TrueNAS SCALE
- Installed Nginx Proxy Manager
Additionally, there are several prerequisites for this guide that I will not be going over because the exact way in which they need to be done will vary depending on which services you are relying on. Those prerequisites are:
- Acquire a domain
- Add DNS records to your domain that point your domain to your network
- If you have a dynamic IP address, then you also need to set up dymanic DNS for your network.
- Forward port 443 on your network to the local IP of your Nginx Proxy Manager installation followed by the https port for Nginx Proxy Manager (normally port 30022)
- If your ISP blocks port 443, you can try forwarding a different port, but you will then need to append that port number to the URLs you access your Nextcloud/Collabora installations with, as well as replace all references to port 443 in this guide with your chosen port.
- Create an SSL certificate for your domain
- If you are okay with using self-signed certificates, then you can check out my instructions for creating a self-signed certificate in TrueNAS SCALE and importing it into Nginx Proxy Manager in the comments section below (special thanks to @PZ0013 for all of the feedback). However, please be aware of the drawbacks of using self-signed SSL certificates.
- If you would prefer using an SSL certificate that is signed by a trusted certificate authority and you happen to be using Dynu as your DNS provider, then you can check out my instructions for creating a Let’s Encrypt certificate with Dynu and importing it into Nginx Proxy Manager in the comments section below.
Installing Nextcloud
Creating custom Nextcloud datasets (optional, but recommended)
During the Storage Configuration portion of your Nextcloud installation, you will need to point the installer to the locations of the required storage groups. The storage groups that you will need to set here will vary depending on which version of Nextcloud you are installing. For me, installing Nextcloud 29.0.1, there were four storage groups that needed to be set: AppData, User Data, Postgres Data and Postgres Backup.
I would recommend using datasets that you created (i.e., the Host Path option during the Storage Configuration portion of your Nextcloud installation) instead of ixVolumes, as custom datasets are easier to manipulate and easier to back up (at the cost of requiring a bit more work to initially configure). Just keep in mind that, if you use custom datasets:
- You will need to set the Dataset Preset to Apps as you are initially creating these datasets.
- You will also need to grant Full Control to the User www-data and the Group www-data in the ACLs of these datasets.
- As per this documentation, it may actually be that you only need to grant Full Control to User www-data and Group www-data for the AppData and User Data datasets but not the Postgres Data and Postgres Backup datasets, but I just went ahead and granted Full Control to all four datasets.
The biggest problem I faced with Nextcloud installation
One of the main problems I had with Nextcloud was that I kept getting redirected to the local IP and port of my Nextcloud installation when I tried to access Nextcloud using the external URL I set up with Nginx Proxy Manager.
This made it so that I could not access Nextcloud from the WAN, since the local IP is useless anywhere outside of the local network.
Changing Nextcloud’s config.php file seemed to have absolutely no effect (believe me, I tried adding a lot of different things there).
It appears that TrueNAS SCALE ignores any changes you make to config.php and instead only relies on the settings you specify in the Nextcloud installation wizard.
So, instead of editing config.php, I made all the correct adjustments directly in the Nextcloud installation wizard. Read on to see exactly how I did this.
Nextcloud installation wizard configuration
Setting the Nextcloud host
Option 1 (recommended): Remove the value for “Host” and set the OVERWRITEHOST environment variable
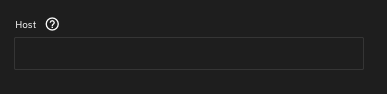
The thread that FINALLY pointed me in the right direction advised leaving the field labeled Host BLANK (for me, this was set to the local IP of my server by default).
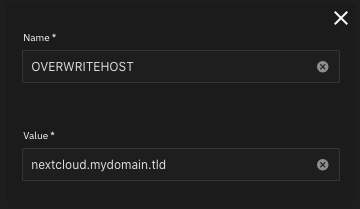
Then, and only then, set the OVERWRITEHOST environment variable to nextcloud.mydomain.tld.
Option 2 (alternative, only works with a certificate): Set the value for “Host” and use port 443 for URL rewrites
As an alternative to leaving the Host field blank and setting the OVERWRITEHOST environment variable to nextcloud.mydomain.tld, you can set the Host field to nextcloud.mydomain.tld and then select Use different port for URL rewrites and specify 443 as the External Access Port.
This solution only worked for me when I installed Nextcloud WITH a certificate. Also, I would only set the host in this way if option 1 does not work for you, as the only posts that I came across online recommended setting the host using option 1. I simply discovered option 2 by messing around with my configuration.
Set OVERWRITECLIURL

Set the environment variable OVERWRITECLIURL to nextcloud.mydomain.tld.
Set OVERWRITEPROTOCOL (only if installing Nextcloud without a certificate)
If you are installing Nextcloud WITHOUT a certificate, then you should also set the environment variable OVERWRITEPROTOCOL to https.
Setting the Nextcloud certificate

From what I have gathered, it seems to be RECOMMENDED that you install BOTH Nextcloud and Collabora WITH a certificate.
I am assuming that the certificates for Nextcloud and Collabora need to be the same, but I am not sure of this, because I only tested this installation with the ‘truenas_default’ Certificate.
Other configurations that WORKED for me:
- Interestingly, Collabora WITH a certificate seems to be compatible with Nextcloud WITHOUT a certificate.
- Also, Collabora WITHOUT a certificate seems to be compatible with Nextcloud WITHOUT a certificate.
Configurations that did NOT work for me:
- Nextcloud WITH a certificate did NOT appear to be compatible with Collabora WITHOUT a certificate.
Adding ffmpeg and smbclient to Nextcloud
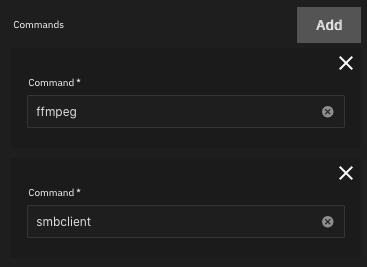
Don’t forget to add support for ffmpeg and smbclient if you want those features.
Nextcloud Storage Configuration
As mentioned, you will need to select the datasets that your Nextcloud installation should use. If you followed my recommendation of using custom datasets (with a Dataset Preset of Apps and Full Control of the datasets granted to both the User www-data and the Group www-data), then you should select those datasets here. The other option is to use ixVolumes.
Provided that you select custom datasets, your Storage Configuration for Nextcloud version 29.0.1 could look something like this:
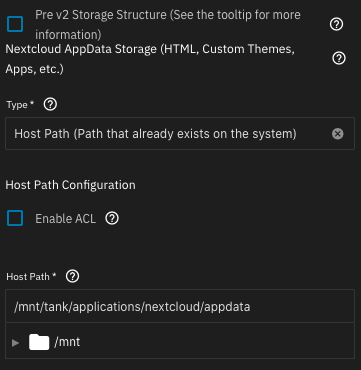
One dataset for AppData,
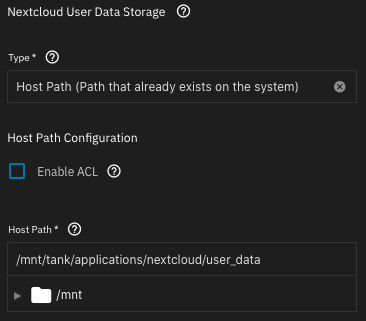
one dataset for User Data,
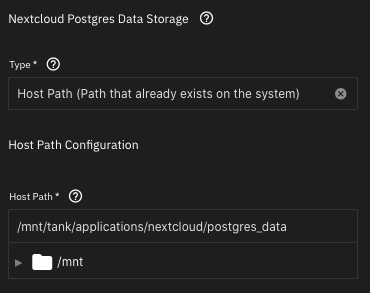
one dataset for Postgres Data,
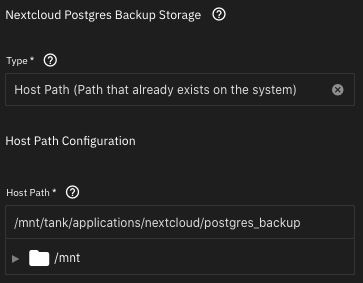
and one dataset for Postgres Backup.
Install Nextcloud
Once you have configured everything, hit Install and wait for Nextcloud to deploy.
You won’t be able to access your Nextcloud installation from the host path that you specified until you have set up a reverse proxy for Nextcloud. Read on for instructions on how to do this with Nginx Proxy Manager.
Getting an error message?
You may get an error message similar to this when you try to install Nextcloud:
Container - Environment Variable [OVERWRITEHOST] in [envList] tried to override the Environment Variable that is already defined in [Secret - nextcloud-creds]
This is a sign that you have tried to set the Nextcloud host by setting both the Host field as well as the OVERWRITEHOST environment variable. Remember, you should only set one of these values or the other, but not both.
To fix this, try setting the host by leaving the Host field blank and then setting the OVERWRITEHOST environment variable (i.e., option 1 from above). If that doesn’t work, and if you are installing Nextcloud WITH a certificate, then try setting the host by setting the Host field and using port 443 for URL rewrites (i.e., option 2 from above).
Enabling outside access to Nextcloud with Nginx Proxy Manager
Disclaimer
Remember that none of this will work if you haven’t already acquired a domain, added DNS records that point your domain to your network (as well as set up dynamic DNS if you have a dynamic IP address), forwarded port 443 (or a suitable alternative) on your network to the local IP and https port of your Nginx Proxy Manager installation and created an SSL certificate for your domain.
The exact way to do all of this will vary depending on your domain registrar, DNS provider, ISP and router firmware, so I will not be going over any of the aforementioned in this guide, unless you either:
- Are okay with using self-signed certificates and are aware of the drawbacks of doing so, in which case you can read my instructions for creating self-signed certificates in TrueNAS SCALE in the comments section below.
- Are using Dynu as your DNS provider, in which case you can read my instructions for creating Let’s Encrypt certificates with Dynu in the comments section below.
You can find plenty of guides elsewhere on the internet for acquiring a domain, adding DNS records, setting up dynamic DNS, forwarding ports and getting SSL certificates.
Create a proxy host for Nextcloud

Set the Domain Name to nextcloud.mydomain.tld (i.e., whatever you set the OVERWRITEHOST/OVERWRITECLIURL environment variables to during Nextcloud installation).
If you installed Nextcloud WITH a certificate, set the Scheme to https. Otherwise, set the Scheme to http.
Set the Forward Hostname / IP to the local IP of the device running your Nextcloud installation (e.g., 192.168.1.234).
Set the Forward Port to your Nextcloud port (which, for me, was 9001 by default).
I also enabled Block Common Exploits, although I doubt this is mandatory.
Add an SSL certificate to your Nextcloud proxy host
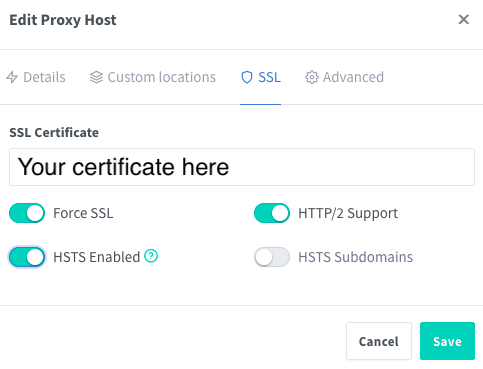
Add a valid SSL certificate for your Nextcloud proxy host.
- As mentioned, you can check out my instructions for making a self-signed SSL certificate and making an SSL certificate through Dynu in the comments section below.
I also went ahead and enabled Force SSL, HTTP/2 Support and HSTS Enabled.
Installing Collabora
The biggest problem I faced with Collabora installation
Just as with my Nextcloud installation, I eventually discovered that most of the troubles I had been having with installing Collabora revolved around one problem: the server name being set incorrectly.
Curiously, what ended up finally getting my Collabora installation working was something that I came up with myself. This leads me to believe that I set the name of my Collabora server using a method that was not intended by the developers (perhaps someone else can confirm this).
Nonetheless, you can read on to see how I configured everything to get my Collabora installation up and running.
Collabora installation wizard configuration
Configuring the Collabora WebUI
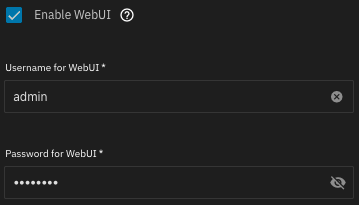
Enable the WebUI and set the Username and Password to anything you like.
Setting the Collabora Server Name

Set the Server Name to collabora.mydomain.tld, followed by a colon (:), followed by the SSL port for your network, which, in most cases, is 443 (as an example, the full value could be collabora.mydomain.tld:443).
- As mentioned, this was not a solution that was recommended to me by anyone. What was recommended in another thread was to change the server_name and domain environment variables, but I did not do this for the following reasons:
- Setting the server_name environment variable to collabora.mydomain.tld while leaving the explicit Server Name field blank made my Collabora server unreachable.
- Setting the environment variable domain to nextcloud.mydomain.tld (i.e., whatever my Nextcloud domain is) appeared to have no effect on my installation, so I did not bother setting it.
- It is possible that changing these environment variables was a valid solution for a previous version of Collabora, but is now obsolete.
Setting the Collabora certificate

It is recommended that you install both Nextcloud and Collabora with a certificate. The ‘truenas_default’ Certificate worked for me.
- If, for any reason, you want to install Nextcloud/Collabora without a certificate, refer to the above section labeled Setting the Nextcloud certificate for viable Nextcloud/Collabora certificate settings.
Enabling outside access to Collabora with Nginx Proxy Manager
Disclaimer
The disclaimer for this section is the same as the disclaimer for the section titled Enabling outside access to Nextcloud with Nginx Proxy Manager.
Create a proxy host for Collabora
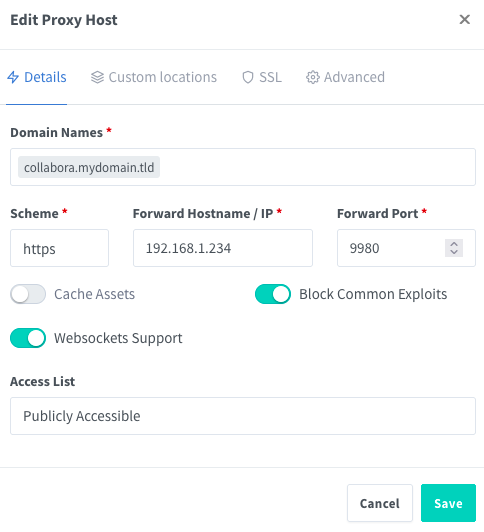
Set the Domain Name to whatever you specified as the Server Name during Collabora installation, but this time, do not add :443 to the end (for example, if you set the Server Name to collabora.mydomain.tld:443 during Collabora installation, then you would simply set the Domain Name here to collabora.mydomain.tld).
If you installed Collabora WITH a certificate, set the Scheme to https. Otherwise, set the scheme to http.
Set the Forward Hostname / IP to the local IP of the device running your Collabora installation (e.g., 192.168.1.234).
Set the Forward Port to your Collabora port (which, for me, was 9980 by default).
VERY IMPORTANT: Enable Websockets Support.
I also enabled Block Common Exploits, although I doubt this is mandatory.
Add an SSL certificate to your Collabora proxy host
Add a valid SSL certificate for your Collabora proxy host.
- As mentioned, you can check out my instructions for making a self-signed SSL certificate and making an SSL certificate through Dynu in the comments section below.
I also went ahead and enabled Force SSL, HTTP/2 Support and HSTS Enabled.
Verifying your Collabora installation
As per this resource, you can check that your Collabora instance is running properly by visiting https://collabora.mydomain.tld/hosting/discovery.
- This page should be an XML document displaying the file types which your Collabora server can open.
- Be sure to check that the entries in the XML document contain the correct public hostname for your Collabora instance and that they are preceded by https://, indicating a secure connection.
Integrating Collabora with Nextcloud

Download and enable the Nextcloud Office app within Nextcloud.

Select the drop-down menu for your Nextcloud profile in the top-right corner of the screen and then select Administration settings.

Select Office from the menu on the left under Administration.

Select Use your own server.
Enter the URL of your Collabora server, e.g., https://collabora.mydomain.tld.
If you configured your Collabora proxy host using a self-signed certificate, you will need to check Disable certificate verification (insecure). Otherwise, you should not need to check this option.
Hit Save.
If you get the message with the green checkmark, then your Collabora server is reachable.
However, you also need to make sure that the fields labeled URL used by the browser and Nextcloud URL used by Collabora are populated with the URL of your Collabora server and the URL of your Nextcloud server, respectively. If this is not the case for you, then it suggests that your Collabora server has been detected, but that it is not able to properly communicate with your Nextcloud server.
To to find out how to verify that your Nextcloud and Collabora servers are properly communicating, refer to the section below.
Verifying that everything works
To test that everything works, try to create and edit a new file within Nextcloud that has a Collabora-supported extension (e.g., .docx).
If anything has been set up incorrectly, Nextcloud should throw an error message while it’s trying to load the document.
If you are able to load and edit the document, then your Nextcloud and Collabora installations are successfully communicating behind your reverse proxy.
Troubleshooting common problems
If you are convinced that you have done everything correctly up to now, but Nextcloud is giving you error messages when you try to load your Collabora document, then there are three things that I can think of that you might want to double-check, which are based on the problems that I ran into before I got everything working.
Make sure that you have properly configured your Collabora Server Name
As stated in the above section titled Setting the Collabora Server Name, you must ensure that you entered the correct Server Name when you installed Collabora.
It is entirely possible to install both Nextcloud and Collabora and get the message with the green checkmark at the step outlined by the above section titled Integrating Collabora with Nextcloud WITHOUT actually having properly set your Collabora Server Name.
Two signs that you may have improperly set your Collabora Server Name are:
- The field labeled URL used by the browser (which you should have seen as part of the green checkmark message during the Integrating Collabora with Nextcloud step) displays either the wrong URL for your Collabora server or no URL at all.
- If you see the correct URL here but the wrong port (e.g., https://collabora.mydomain.tld:9980), did you remember to add :443 to the end of your Server Name during Collabora installation?
- Nextcloud throws an error message, mentioning that Nextcloud Office failed to load, when you try to load a Collabora document. For me, during testing, the error message that I got when I had improperly set my Collabora Server Name was:
Document loading failed
Failed to load Nextcloud Office - please try again later
Make sure that you have enabled Websockets Support for your Collabora reverse proxy
As stated in the above section titled Create a proxy host for Collabora, you must have enabled Websockets Support when you created your Collabora proxy host in Nginx Proxy Manager.
If you forgot to enable Websockets Support, you can simply edit your Collabora proxy host, enable the Websockets Support feature and save your changes. There shouldn’t be any need to recreate the proxy host from scratch.
Here is one sign that your Collabora proxy host may not have Websockets Support enabled:
- Nextcloud throws an error message, mentioning a failed socket connection, when you try to load a Collabora document. For me, during testing, the error message that I got when I didn’t enable Websockets Support for my Collabora proxy host was:
Document loading failed
Failed to establish socket connection or socket connection closed unexpectedly. The reverse proxy might be misconfigured, please contact the administrator. For more info on proxy configuration please checkout https://sdk.collaboraonline.com/docs/installation/Proxy_settings.html
Make sure that you installed Nextcloud and Collabora with the proper certificates
As mentioned in the above section titled Setting the Nextcloud certificate, it matters which certificates you use for Nextcloud/Collabora, and NOT JUST the certificates you use for your Nextcloud/Collabora proxy hosts with Nginx Proxy Manager, BUT ALSO the certificates you installed Nextcloud/Collabora with.
Again, it seems to be RECOMMENDED that you install BOTH Nextcloud and Collabora WITH a certificate. The ‘truenas_default’ Certificate worked for me. In addition to this configuration, I also found that:
- Collabora WITH a certificate seems to be compatible with Nextcloud WITHOUT a certificate.
- Collabora WITHOUT a certificate seems to be compatible with Nextcloud WITHOUT a certificate.
- Nextcloud WITH a certificate did NOT appear to be compatible with Collabora WITHOUT a certificate.


