BackupExec linux agent success installation case

For anyone interested in installing backupexec on truenas scale.

First of all to inform you that point out that backup exec is not compatible with truenas. However due to the fact that I had a huge amount of data from the previous installation I had which was on a windows server I had to find a way to backup / restore to truenas.
To be more specific: I replaced all my storage (about 0,7 PB) from 2 independent windows cluster to 2 independent truenas. Before I decided to do it I had to make sure first that I could restore from the backup exec files that I had backed up when my windows storage was in truenas. I also needed to make sure that I would be able to quickly and reliably backup my new truenas.
To make a long story short even though there is no compatibility highlighted I finally managed to have backupexec linux agent (Ralus) on truenas and it works fast and reliably.
The installation has 2-3 tips and a note to which you should pay attention. The tips are trivial and if anyone is interested I will answer in detail. The remark has to do with the peculiarity of truenas when it restarts to remove what it doesn’t like. So here too when it restarts it completely removes the agent installation. But in 2 minutes you install it again and everything works perfectly again.
Also note that if you have a fiber optic or SAS tape drive it can be connected directly to truenas and work perfectly as NDMP so you can manage your backup from the backupexec console but backup/restore is done directly in truenas on the tapes avoiding the use of the network completely.
Hello :slight_smile:

could you tell us more about it please ? TY :slight_smile:

Jeff

I’m just writing the help document about… So I’ll return back in a while.

Step 1
First you need the official backupExec linux agent installer (included at Backupexec media installation media) : RALUS_RMALS-1188.2496.tar.gz
Unzip it to a temporary folder in truenas :

tar xvfz RALUS_RMALS-1188.2496.tar.gz

Step 2
From the truenas web interface you create a group named beoper
Then you make the root user a member of the group

Step 3
At ssh terminal session run:
mount -o remount,rw /usr
mount -o remount,rw /opt
chmod +x /usr/bin/dpkg

Step 4
Edit with vi (or nano) /etc/services
Search 10000
There you need to change webmin to ndmp so that it becomes as below
ndmp 10000/tcp
Then save it

Step 5
Run the installer in the same folder (unzipped at step 1)
./installrmal

You follow the installer’s instructions by answering “yes” (default) to all of them
Done.

Now you are ready to add this truenas server at the backupexec.

OPTIONAL 1
There is 3 more patch installer from the initial revision. It’s good to running one by one after done install the initial installer
Patch 1: ralus1188.2718SP.tar.gz
Patch 2: ralus1188.2728HF525537.tar.gz
Patch 3: ralus1188.2734HF298543.tar.gz
Unzip (tar xvfz) and install them one by one.


Step 6 (Now at the BackupExec windows console)

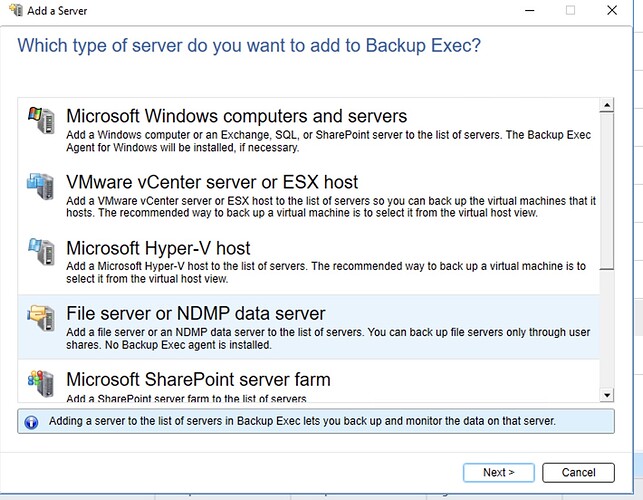
Add a “File server or NDMP data server"

Check "Allow Backup exec to establish a trust with the server”
Fill the IP address or the resolved name server.
Use “root” username (you must have already added it to the backupexec user list)
Done.

Now you can back up all your data at the server at the /mnt

Optional
If your tape drive or robotic library is direct connected to truenas you can add a storage tape library by using the ip of truenas (or resolved name server )

Step 7
Return back the file system at the original read-only mode:

mount -o remount,ro /usr
mount -o remount,ro /opt

In case restart the server you must repeat the steps 1 until 5 Plus Optional 1


Finally :

Screenshot for remote tape library (NDMP storage) :

1 Like