root@truenas[~]# zpool status -v
pool: MainBackup
state: ONLINE
scan: scrub repaired 0B in 05:27:34 with 0 errors on Sun Aug 18 05:27:46 2024
config:
    NAME        STATE     READ WRITE CKSUM
    MainBackup  ONLINE       0     0     0
      sdc2      ONLINE       0     0     0
errors: No known data errors
pool: MainPool
state: DEGRADED
status: One or more devices has been taken offline by the administrator.
Sufficient replicas exist for the pool to continue functioning in a
degraded state.
action: Online the device using ‘zpool online’ or replace the device with
‘zpool replace’.
scan: scrub repaired 1M in 10:02:21 with 0 errors on Wed Aug 21 11:30:17 2024
config:
pool: SSD
state: ONLINE
scan: scrub repaired 0B in 00:00:51 with 0 errors on Sun Jul 28 00:00:51 2024
config:
    NAME        STATE     READ WRITE CKSUM
    SSD         ONLINE       0     0     0
      sdb2      ONLINE       0     0     0
errors: No known data errors
pool: boot-pool
state: ONLINE
status: One or more features are enabled on the pool despite not being
requested by the ‘compatibility’ property.
action: Consider setting ‘compatibility’ to an appropriate value, or
adding needed features to the relevant file in
/etc/zfs/compatibility.d or /usr/share/zfs/compatibility.d.
scan: scrub repaired 0B in 00:00:11 with 0 errors on Wed Aug 28 03:45:13 2024
config:
    NAME         STATE     READ WRITE CKSUM
    boot-pool    ONLINE       0     0     0
      nvme0n1p2  ONLINE       0     0     0
I think I got it working. Not sure what did, but I suspect that TrueNAS was trying to make a partition, but since the drive was MBR it capped out at 2TB. After running sudo fdisk /dev/sdd and creating a GPT partiton (g, then n) I was able to make a 4TB partition (sdd1). However, upon replacing in the UI it did the same again? Dropping the command in CLI seemed to do the trick this time.
I’ll echo your avatar with and state that you shouldn’t need to have dropped to the CLI and manually created a GPT partition to fix it.
Can you use the “Send Feedback” smiley-face in the top right of the webUI to submit a bug for this, and leave the box checked to attach a “debug”? It should be able to capture the previous attempts by middleware and the webUI to do the disk wipe.
Yes - UI should have been able to do this - I am not sure what would have happened without the 4TB partition i.e. with an empty GPT disk/partition table, but with an existing partition the UI should have warned you about existing data on the disk and asked you if “you wanted to continue, losing any existing data”.
It should still be in the long-term middleware debug logs. If you have an approximate date and time of when you attempted to perform the expand/replace/wipe actions through the webUI it will let the team here search for them quickly.
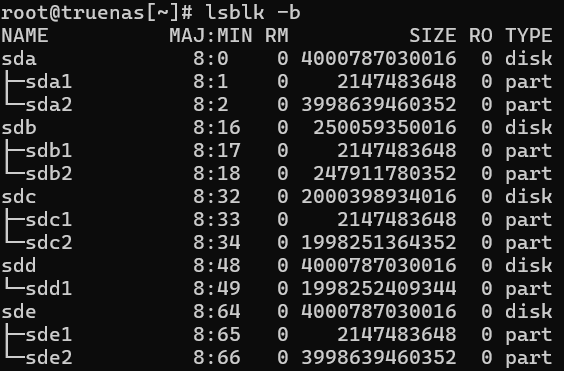
Myself, and others in the past, have experienced a strange issue where the partitions are ‘out of order’ and/or based on the size of a smaller disk. I will try to explain what happened based on a foggy memory.
In the past I upgraded from smaller disks to larger disks doing the 'ol swaparoo (replace, resilver, one at a time). Most of them went fine. One of them gave me the same ‘too small’ error. When I reviewed the partitions, I noticed all the other disks had swap as the first partition, and data as the second partition – except the disk that was giving an error. In that case, the first partition was the data partition that was sized ~(size of old, smaller disk), and the second partition was the swap, leaving a lot of space unallocated.
From the screenshot, it looks like sdd had the first partition as the ‘large’ one – very similar to the size of partition sdc2. Perhaps it’s just formatted as MBR, but I always assumed the ‘total drive size’ is used and the drive is reformatted/partitioned anyway.
Well not sure what this would’ve been, but after submitting the ticket iXsystems said this
Unsupported development tools capable of modifications to the base operating system have been enabled in this configuration. We are closing this ticket as it is outside the scope for effective issue investigation.
To focus investigation on finding and fixing issues with the default TrueNAS OS, please open a new ticket if you are able to reproduce the behavior on a TrueNAS install that has not installed OS development tools.
For what it’s worth. I had the exact same problem as the topicstarter. I have a 24-drivebay chassis with 24 SAS SSD’s running TrueNAS-13.0-U6.2
1 SSD died. Took it out and replaced it with an identical SSD.
Replace in GUI → device is too small
I then thought “hmmm that SSD is absolutely identical and emtpy, how can it say it’s too small”. Wiped it in the GUI anyway, which worked fine.
Then tried Replace again: still same error.
I openened a CLI and did:
zpool replace Pool01 6942567342803405476 /dev/da21
which worked perfectly.
Here is the “feature request”, which actually resolves a newly introduced bug.
Here is the bugfix, which only helps for new pools or new vdevs. Nothing can really be done about ZFS members that were already created before the fix existed.
Can you post the info of the drives in your pool and also for the new drive to serve as the replacement?
sudo smartctl -a /dev/sda | grep User\ Capacity
User Capacity:    12,000,138,625,024 bytes [12.0 TB]
the rest
sudo smartctl -a /dev/sdb | grep User\ Capacity
User Capacity:    12,001,339,219,968 bytes [12.0 TB]
# sudo smartctl -a /dev/sdc | grep User\ Capacity
User Capacity:    12,001,339,219,968 bytes [12.0 TB]
# sudo smartctl -a /dev/sdd | grep User\ Capacity
User Capacity:    12,001,339,219,968 bytes [12.0 TB]
lsblk -o NAME,FSTYPE,SIZE,STATE,TYPE,LABEL,MODEL
NAME        FSTYPE       SIZE STATE   TYPE LABEL     MODEL
sda                     10.9T running disk           ST12000NM000J-2TY103
└─sda1      zfs_member  10.9T         part Mog
sdb                     10.9T running disk           ST12000NM0127
└─sdb1      zfs_member  10.9T         part Mog
sdc                     10.9T running disk           ST12000NM0127
└─sdc1      zfs_member  10.9T         part Mog
sdd                     10.9T running disk           ST12000NM0127
└─sdd1      zfs_member  10.9T         part Mog
zd0                      100G         disk
nvme0n1                953.9G live    disk           SPCC M.2 PCIe SSD
└─nvme0n1p1 zfs_member 953.9G         part MogVM
nvme1n1                953.9G live    disk           SPCC M.2 PCIe SSD
└─nvme1n1p1 zfs_member 953.9G         part MogVM
nvme2n1                238.5G live    disk           SPCC M.2 PCIe SSD
├─nvme2n1p1                1M         part
├─nvme2n1p2 vfat         512M         part EFI
└─nvme2n1p3 zfs_member   238G         part boot-pool
sudo smartctl -a /dev/sda | grep User\ Capacity
User Capacity:    12,000,138,625,024 bytes [12.0 TB]
currently backing up and may have to junk the pool and do from scratch and hope that works
You can still return the new drive and purchase a different 12TB model or brand, which hopefully has more bytes in the total user capacity.
The new drive needs to have at least 12,001,339,219,968 bytes.
If you don’t mind spending extra money, you can instead purchase a 14TB drive, which will obviously work as a replacement.
Since this fix has been applied in 24.10.2 (and later), any new pools, vdevs, or replacements should attempt a 2GB buffer automatically. You don’t need to do anything differently.
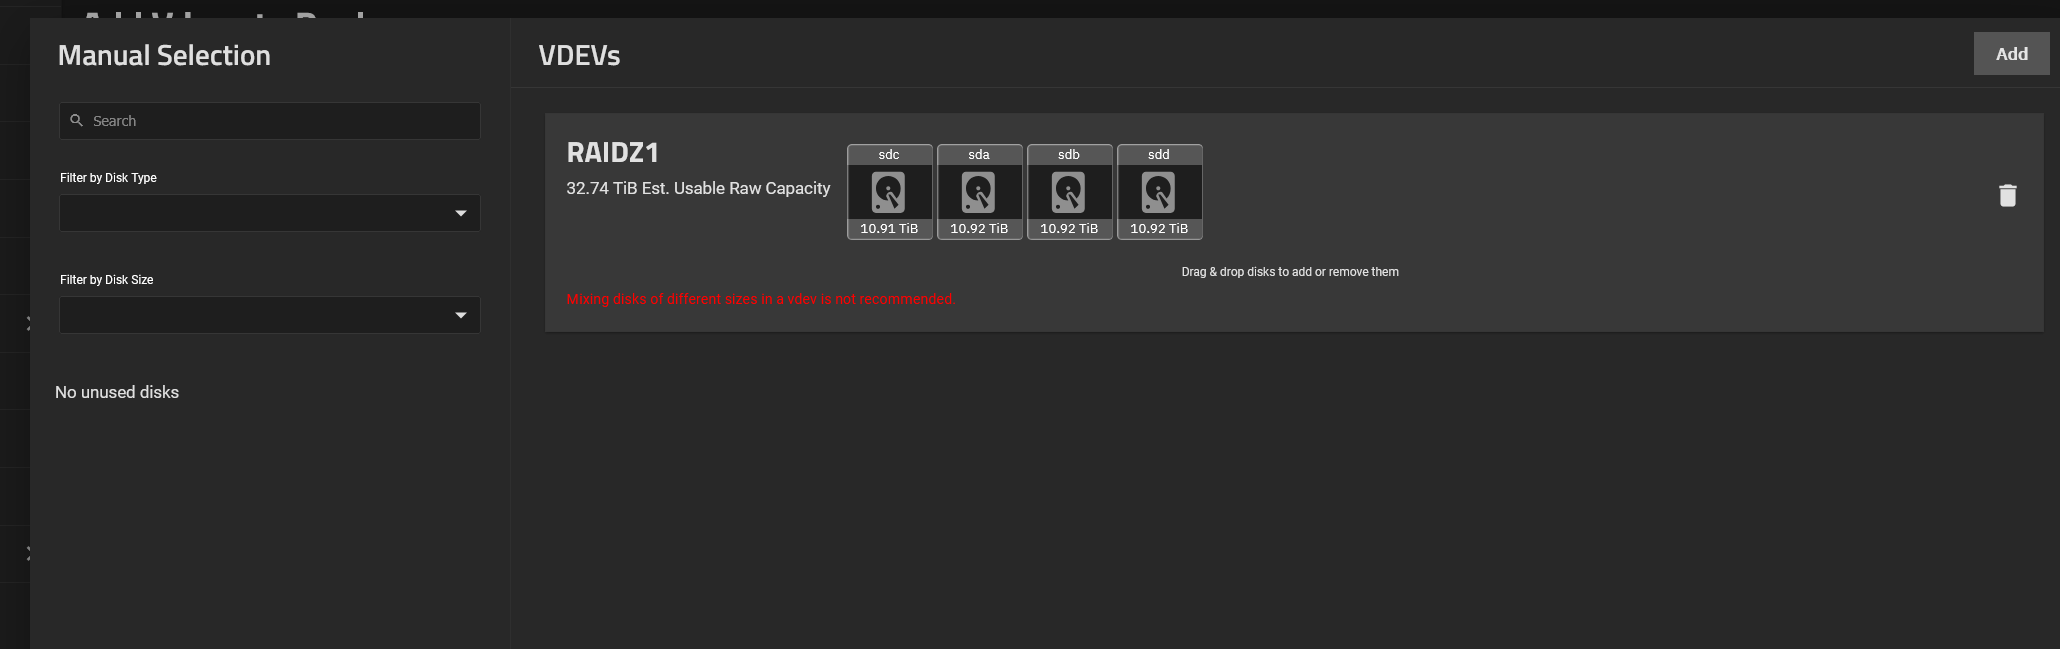
Junked the old pool, made a new one but with same name.
I had to manually select the drives. Now it has a warning, dont mix match different capacity sizes. It worked regardless of the warning. Any issues doing that? no idea. But its more or less 12tb. Its just a very minor difference in capacity (why? no idea)
so the pool is created, i rsync to restore data from backup, that works. so it just works.
But in future if a drive dies, i imagine i am not going to be able to do a simple drive replacement. I’m probably going to have to do the same by redoing the pool by scratch
based on this comment, i am assuming it wont nag about the difference in future. i hope