Mooglestiltzkin's Build Log: Truenas build recommendation am5 2024?

Those jsut thermal limit the GPU - it is similar to wattage capping, but instead caps based on the temp of the cpu instead of setting a hard limit of the wattage. So if your cooler is good enough, it’d still use the same amount of power. Similar in theory, but slightly different than what I was talking about.

Either way - don’t worry about it too much, your temps are just fine & require no additional hardware. Changing wattage caps though could lower your power consumption though & might be worth looking into further.

1 Like

ty now it’s more narrowed down i’ll look into that :saluting_face:

*update

so in mobo bios i did

  • disable pbo. afaik pbo cranks things up and keeps pushing cpu. i dont need that since im not doing gaming anything of that sort.
  • i set the power limit to the lowest it would allow me which was 40-60 watt or something?


this is the results. nas powered on, with docker containers running, and with vm fedora on with a video playback active.

Not sure about power consumption, i will have to check that when i am able to power off stuff from rack :grimacing:

and this is temps when fedora vm stop video playback (vm is still running). the temps flatten out near the tail end, so most of the time is will be under 50c most part unless i do stuff with fedora vm, or jellyfin is doing heavy indexing or some similar activity and even then it won’t be for a long duration

dont notice any issues for now. will keep monitoring.

:face_with_raised_eyebrow:

That’s what the “E” indicates.

That’s unlikely because “X670” is physically two B650 chips, daisy-chained. More power consumption is to be expected—as well as extra latency, extra contention and increased oversubsribing of the x4 link between the (pair of) chipset(s) and the CPU. All AMD5 server boards I know of use B650, or no chipset at all; none goes for X670.

The solution would be to use a server-style GPU, with power connectors at the end of the card rather than at the top.

1 Like

more testing for the build

truenas fedora vm

disk test (2 x 1tb m.2 nvme gen4 dramless. mirror). not the best ssd but it was cheap :sweat_smile:

still figuring out how to fix the minor graphics and audio delay… its minor but it’s perceptible enough to make the experience not as smooth as i would like.

i added 2 cores, 4 threads and 8gb ram. was that not enough?

ryzen 7600 = Cores: 6 Threads: 12
https://www.cpubenchmark.net/cpu.php?id=5172&cpu=AMD+Ryzen+5+7600

:thinking:

*update

tested the youtube reco, but the rdp didn’t work well. Video playback smoothness was a mix bag. It played without the lag, but i couldnt pause, or exit the video player. unresponsive.

also bluetooth was not working either.

so remote viewer though not perfect, worked more reliably despite the micro stutters every few seconds for a milisecond pause/stutter effect for video playback and audio.

still figuring this out :sweat:

would purchasing a jetkvm fix this?

I second this. Rsync makes sense in some applications but it will be way slower than a replication because replication makes use of snapshots (as should you). Snapshots automatically gather everything that changed, was added, etc. while rsync literally has to traverse every single directory and manually check every single file to see if something was changed.

Worse, unlike replication, there is no rolling back to a previous snapshot with rsync. Just stop using rsync and start using replication. Once replication works with standard SSH, upgrade to replication with netcat enabled.

1 Like

i will fit that into my schedule of things to do :sweat_smile:

was fixing dockers, npm, fedora etc. so many things :smiling_face_with_tear:

to do this i would first have to setup my 2nd truenas wouldnt i? problem is that will take a while. ordered part and moving stuff. will take time :grimacing:

important thing is i got a backup already done and tested. so i can try replication when i get a chance.

plz keep in mind, my backup isnt on 24/7 … after i manual backup, i turn it off… so im not constantly snapshot syncing all the time. so even rsync isnt something i do often. usually it doesnt take long to backup, so was never really an issue for me. though i see that snapshot is more efficient for sure.

atm im mostly testing fedora vm on truenas.

*update

actually i may decommission one of these other qnap box i have. and put the drives in a prepped spare truenas (653a) i got and use that for the ts-877 to test replications so i dont have to worry if my stuff gets messed up or not. ill do that later.

fixed the truenas vm for fedora somewhat

there was a codec issue i wasnt aware of (im beginner linux os user)

explanation here

note: you have to add the rpm fusion repo first before proceeding. do for both the free and not free.

https://rpmfusion.org/Howto/Multimedia

sudo dnf swap ffmpeg-free ffmpeg --allowerasing

sudo dnf update @multimedia --setopt="install_weak_deps=False" --exclude=PackageKit-gstreamer-plugin

also for firefox, apparently you needed to use the one by flathub which has the codecs come with it. so i removed fedora and added that, now the youtube on firefox is a bit more smoother. at least compared to before the video lipsyncs with audio when before it didn’t. big improvement.

so either remoteviewer isn’t good enough though it comes close, and maybe i need to connect monitor directly to nas to fix the issue for good :sweat:

https://www.reddit.com/r/Proxmox/comments/19ab0hr/any_alternatives_to_spice/

https://www.reddit.com/r/linuxquestions/comments/1by5qrg/why_doesnt_linux_have_a_good_remote_desktop/

https://www.reddit.com/r/linuxquestions/comments/rfsv3l/poor_performance_using_tigervnc_server_any_user/

ill try a different rdp server. i used tigervnc server it wasnt good :grimacing:

https://www.reddit.com/r/cloudygamer/comments/1gw4vgx/sunshine_completely_imcompatible_with_fedora_41/

also i may have made a mistake. when setting up the vm i think truenas used some default amd driver? but may have accidentally removed it to replace with the ones i downloaded from shell fedora. not sure.

i checked truenas vm, there is no rollback or reset for this.

*update

added VRR support. apparently its not enabled by default in fedora 41 workstation. i couldnt enable it :sweat:

there i added snapshots. i use owls youtube, but he set daily retention, but i left mine the default keep 2 weeks for lifetime, and take daily snapshots.

the 2nd part of his snapshot explanation was the snapshot replication. ill set that up later. cauz i have to configure the other 2 nas when i’m able to :cry:

resilver priority i left default disabled. not sure what to do there or if needed :sweat:

:thinking:

I wonder if you’ve seen this one… has an easter egg in it

1 Like

sorry i might have missed that. i will check it out ty :saluting_face:

lel recognize the meme. but yeah that does basically explain why to use snapshots :rofl:

truenas meme effulgent beryl

here is original template if u need it

and you can use this to edit

the reason why the img looked bad, was when u upload to imgur they probably over compress it till it becomes awful. also the same with the memegenerator :sweat:

1 Like

ooo according to your youtube found out how to create the snapshots for the vm. before i was using timeshift within the fedora os. guess i should using the truenas method instead.

u also answered a question i was wondering about.

i made the snapshots for each dataset, whereas you snapshot the whole pool but used exclusions for datasets not to snapshot for :thinking:

some confusion here

i got 2 pools

tank and tank2

tank 1 has 5 datasets. i only want to backup 4 out of the 5. But i still am okay making snapshot locally for one of the excluded snapshots.

tank2, has 2 datasets. 1 for docker, the other for jailmaker. i only want to backup docker, but not jailmaker. But i also want to still create local snapshots for jailmaker.

But based on your youtube, it said create snapshot based on pool, and exclude the datasets you dont want. But as u can see i have some further requirements for this so not sure doing that would fit with what i need.

So does that mean for my situation im better off just create the snapshots for each dataset separately rather than just only the pool with exclusion?

or maybe im over complicating it.

just data snapshots the 2 pools minus any i dont want to.

then replication, here i can exclude what not to backup up via replication. i will try that later :thinking: i was just worried it can only backup the entire pool which is not what i wanted.

1 Like

still going through the youtube :saluting_face:

2 Likes

Fixed one issue.

jailmaker wouldnt start on reboot. Apparently, when i recovered from backup, i didnt create the dataset i previously had within docker.

this was already created
/mnt/tank/docker/

but the problem was within docker, there were other sub datasets like data and stacks e.g.

/mnt/tank/docker/data

/mnt/tank/docker/stacks

so copying the folders to another dataset temporarily (i used winscp but u can do the same in shell if u know the commands), then creating those dataset names, then moving them back to there from the copies. Then delete the temporary dataset (use truenas ui to delete the no longer needed temp dataset to hold the copies) now auto start for jailmaker works on reboot.

just in case anyone had this problem but couldnt figure it out :saluting_face:

1 Like

Just an update

tested backing up windows 11 system to the new truenas. I used aomei backupper since i got a professional license for it. this particular software supports pointing the backup location to a nas (tested for truenas)

i’m pulling 584 MB/s from desktop to the new nas.

It says about 35minutes to backup 1.2tb

So yeah not quite 10g but at this speed, it was worth it for me :sweat_smile: but it’s not often i move lots of data like this, just that when you need it, you will be glad you do.

i’m backing up before i update windows just in case :grimacing:

cpu, hdd/ssd temps everything is fine after using the new build for a week or so. though i had to tinker in motherboard to make it such, no big deal.

during the backup (pushing as much throughput as it can) cpu usage is about under 5-20% or less. temps remain below 60c. During idle its usually 40-50c.

1 Like

just an update in regards to the sata ports

i disconnected pool (there was a remove config for the pool, i unticked that. becauz this removes snapshots, backup tasks etc involving that pool if u didnt do that)

then turned off nas, opened it up.

from my inspection, the 4th hdd bay slot is connected to sata port 2,


so yes i confirmed the drive bay numberings from left to right was out of order in relation to the port numbers.

But the thing is, the reason why it’s in that port, was the length between that to reach the hdd bay cage, that was the one that got the perfect length. had i tried the other sata port slots, it might have worked, but it would be very tought. anyway that was the reasoning at the time why i shoved it into that port, cause it was the right length for that port :sweat_smile:

so i gave up on that, because i would have to remove the hdd cage, remove the cabling blocking the way, remove the sfp+ 10g pcie card, remove the motherboard. Possibly removing the 2nd cage. then reinsert everything back.

And after doing all that, the sata data cable length might barely reach (wont know if it would have worked anyway till i had remove all that. but when i first installed that was my initial finding).

Anyway just wasn’t worth the effort.

So all i did was add the new sata cable for the 5th bay which i successfully did. The length was too long, so there was a bit of excess length which i just shoved into the empty bay. I tried not to let it bend 90 degrees as per warning.

So that’s all i did, then put it back into rack, booted up nas, import back the pool which it did successfully.

My pool and data seems to be in working order.

Just mention this in case anybody wanted to know how to do this BEFORE they attempted trying to reinsert the sata data cables. Make sure u backup first, followed by disconnect pool, shutdown nas, before proceeding to reorder the sata data cables.

So if in future smart reports a bad drive, i’ll just refer to the disk serial, then shutdown nas, open the drive for each bay to check which one has that serial. That will be my approach going forward.

Back when i was using qnap qts, normally it would just simply indicate which bay had the issue, and to remove that, so there was never a worry of removing the wrong drive. But this time around i just simply needed to add extra precaution that is all :blush:

*update

found this on aliexpress


so basically this was what i needed the 0.7 meters (0.5 works but i cannot put them in the proper sata slots in order because it’s not long enough to do so)

this one came in a bundle and was labelled nicely, making install much easier. may order this in future :saluting_face:

tldr; so if anyone plans to do a truenas build for this particular silverstone 4u rack case using the standard 0.5m data cable, u are better of getting the 0.7m length instead, just a heads up.

1 Like

Or use a label maker to put the serial number on the outside “ear” covering each hard drive when it’s in place. Looks messy but very functional.

1 Like

I just use the last 4 digits of the serial. And yes, I stick the label on that exterior bay cover thingy.

1 Like

i managed to fix immich docker on this new nas build.

few mistakes

  1. now i no longer use a nvidia graphics card, i forgot to edit the docker compose to remove the
    image: ghcr.io/immich-app/immich-machine-learning:${IMMICH_VERSION:-release}-cuda

the correct entry should be this without the cuda. this will then use CPU to perform the machine learning. It will be slower supposedly compared to using graphics card
image: ghcr.io/immich-app/immich-machine-learning:${IMMICH_VERSION:-release}

So now i can do the machine learning for immich so i can run a search, say cars, then it will show any pics resembling a car in the results.

The other feature feature does is the people so it takes pics of people and group images with that person so it’s easier to find pics that way.

point here is, this build without a graphics card will still work for immich machine learning and persons/people grouping.

also sharing what i did to troubleshoot this issue if you are like me and plan to remove a graphic card from your immich setup but missed a step like i did.

This is the docker compose i am using that works

name: immich
services:
  immich-server:
    container_name: immich_server
    image: ghcr.io/immich-app/immich-server:${IMMICH_VERSION:-release}
    volumes:
      - ${UPLOAD_LOCATION}:/usr/src/app/upload
      - /etc/localtime:/etc/localtime:ro
      - /mnt/Storage/Pictures/Avatars:/mnt/media/Avatars:ro
    env_file:
      - .env
    ports:
      - 2283:2283
    depends_on:
      - redis
      - database
    restart: unless-stopped
    healthcheck:
      disable: false
  immich-machine-learning:
    container_name: immich_machine_learning
    image: ghcr.io/immich-app/immich-machine-learning:${IMMICH_VERSION:-release}
    volumes:
      - /mnt/docker/data/immich/model-cache:/cache
    env_file:
      - .env
    restart: unless-stopped
    healthcheck:
      disable: false
  redis:
    container_name: immich_redis
    image: redis:alpine
    healthcheck:
      test: redis-cli ping || exit 1
    restart: unless-stopped
  database:
    container_name: immich_postgres
    image: tensorchord/pgvecto-rs:pg14-v0.2.0
    env_file:
      - .env
    environment:
      POSTGRES_PASSWORD: ${DB_PASSWORD}
      POSTGRES_USER: ${DB_USERNAME}
      POSTGRES_DB: ${DB_DATABASE_NAME}
      POSTGRES_INITDB_ARGS: --data-checksums
    volumes:
      # Do not edit the next line. If you want to change the database storage location on your system, edit the value of DB_DATA_LOCATION in the .env file
      - ${DB_DATA_LOCATION}:/var/lib/postgresql/data
    healthcheck:
      test: pg_isready --dbname="$${POSTGRES_DB}" --username="$${POSTGRES_USER}" ||
        exit 1; Chksum="$$(psql --dbname="$${POSTGRES_DB}"
        --username="$${POSTGRES_USER}" --tuples-only --no-align
        --command='SELECT COALESCE(SUM(checksum_failures), 0) FROM
        pg_stat_database')"; echo "checksum failure count is $$Chksum"; [
        "$$Chksum" = '0' ] || exit 1
      interval: 5m
      start_interval: 30s
      start_period: 5m
    command: postgres -c shared_preload_libraries=vectors.so -c
      'search_path="$$user", public, vectors' -c logging_collector=on -c
      max_wal_size=2GB -c shared_buffers=512MB -c wal_compression=on
    restart: unless-stopped
#volumes:
#  model-cache: null
networks: {}

Notice the volumes i hashed out. That was the default but i modified that part to input the location manually instead. tested as working using my edits.

There is another portion which is the .env file where u have the rest of ur edits.

If you go to GitHub - immich-app/immich: High performance self-hosted photo and video management solution. look for the .env file example as reference what to add there.

I deployed mine using dockge, so i added the .env entry manually from dockge, which then saves that into the dockge stacks location you specified during dockge config setup.

for this portion, u change it to where your media is located. had a couple of entries similar to this added.

- /mnt/Storage/Pictures/Avatars:/mnt/media/Avatars:ro

note: the pathin on the left side is what i set in jailmaker. so if you are using jailmaker, make sure it’s same as jailmakers setup, and not the actual pathing as your nas. But if you are not using jailmaker, then use the full path instead. But the right side in the immich docker compose, this is what you will be using when adding external libraries in the immich UI. Hope that clarifies

Then when you’ve got immich up and running, go to admin, external libraries, edit import paths

start adding like this and so on

/mnt/media/Avatars

and if you want to be able to browse the contents of those media locations you added, go to user settings, features and enable folders and add the sidebar.

then go to admin, jobs, then do the scan library, smart detection, face detection, facial recognition.

At this point your immich is fully setup and usable, enjoy :partying_face:

PS: for immich maintenance, check their github every now and then in case they require you update your docker compose to match their latest compose and env based on latest changes they make. Immich tend to break stuff for latest releases that require some editting to update to match their edits. Doesn’t happen often but it does happen, so if your immich which is set to auto update (i use watchtowerr to do that), and it broke, this could be why. So just a heads up

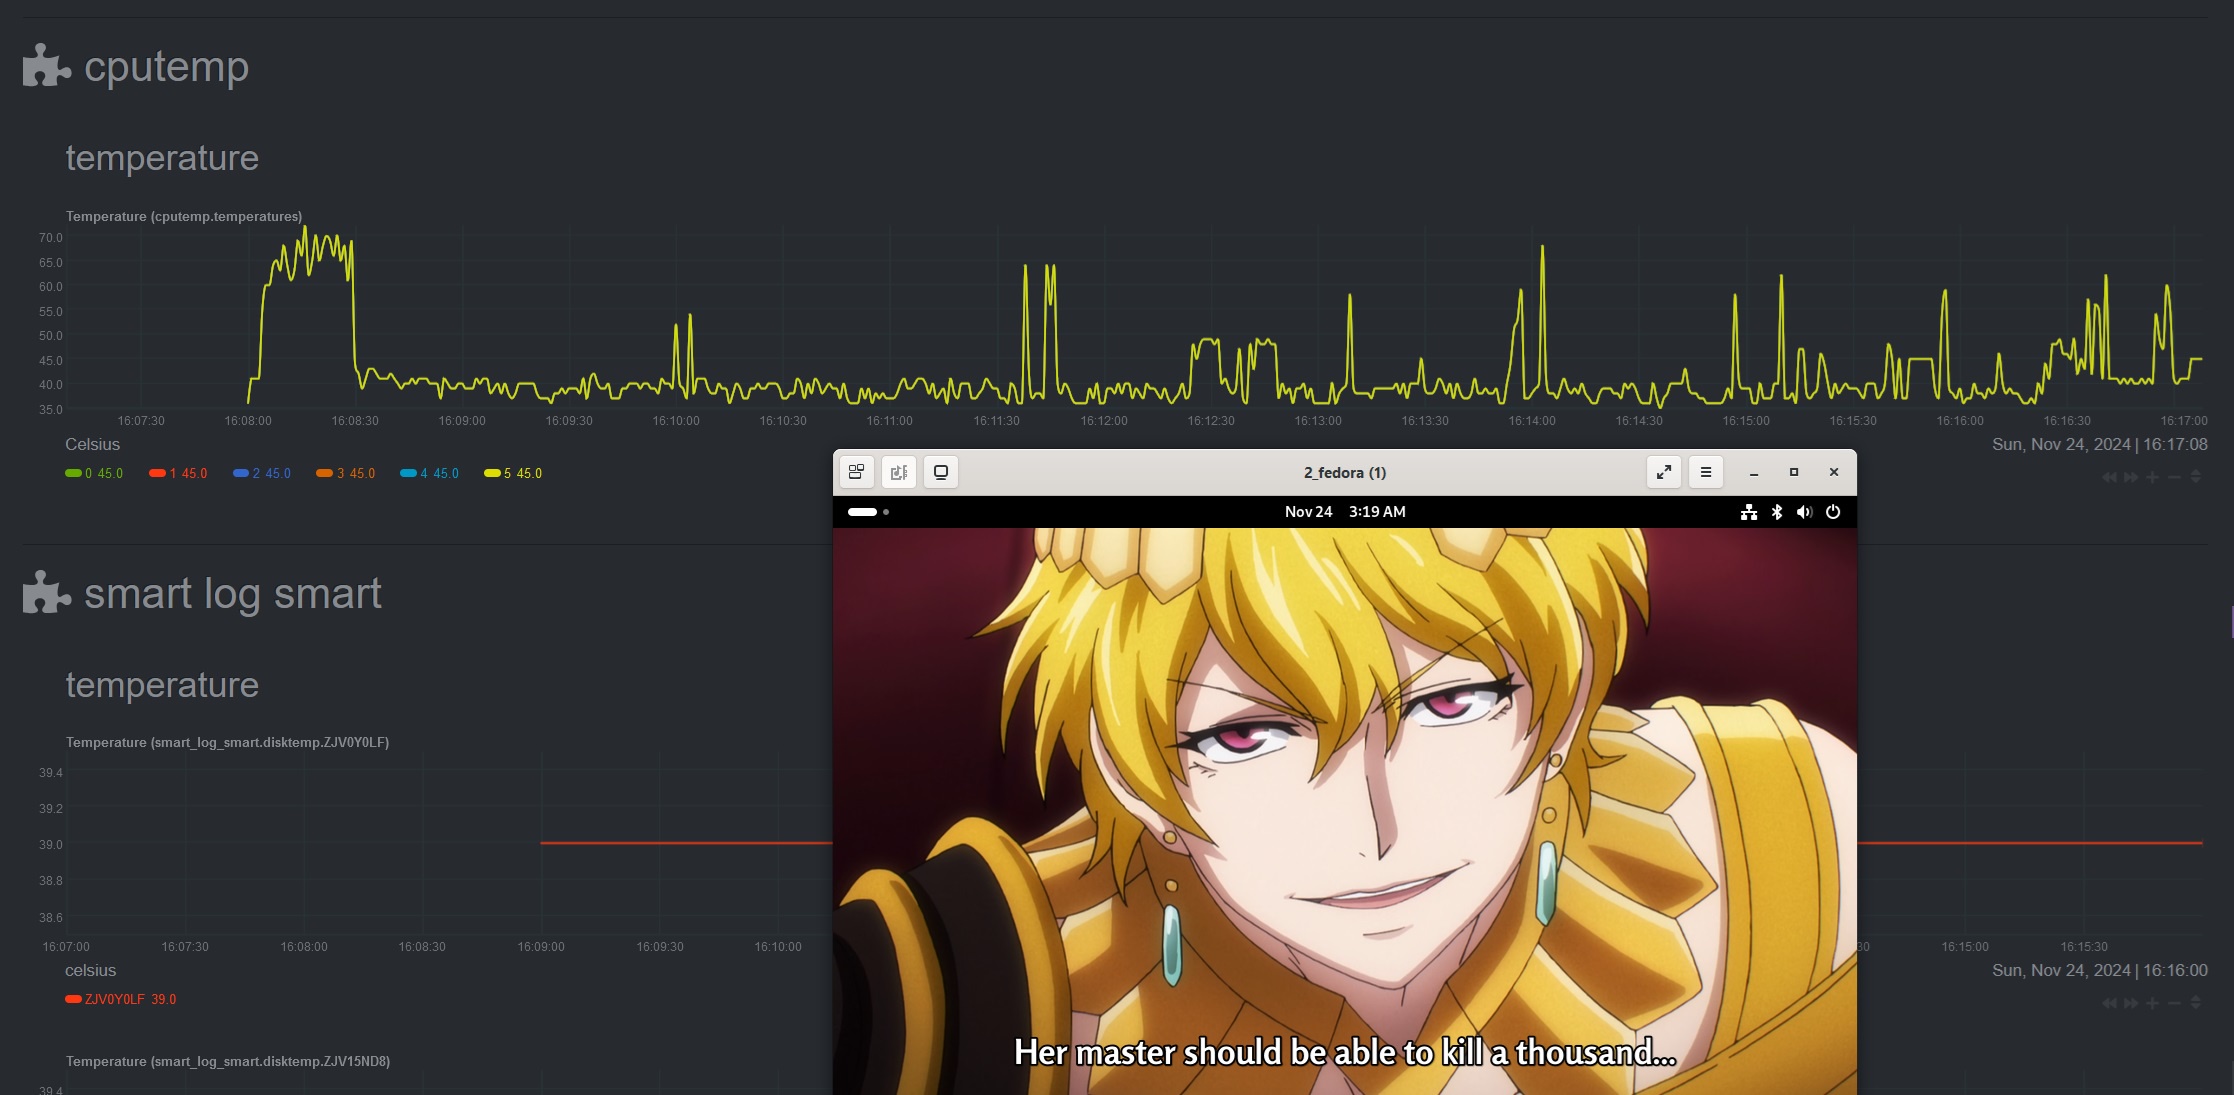
So anyway, for this nas build when running the immich jobs, cpu load is under 45% and the cpu temps hover between 60-70c at most. No issues.

Even without the nvidia graphics card (i was using a 1050 gtx before), i can still use immich and the machine learning/people/persons features just fine.

tried to get replication to work, it doesnt (for me) :cry:

Unable to send encrypted dataset 'tank/xxxx' to existing unencrypted or unrelated dataset 'tank/xxxx''.

no idea how to fix that :sweat:

truenas Target dataset does not have matching snapshots but has data and replication from scratch is not allowed. Refusing to overwrite existing data.

solved this one by set to enable the do from scratch.

i’m using run once, since backup will be offline most of the time.

will stick to rsync since i know how that works, and i got it to work just fine :sweat_smile: better to have a backup than no backup after all :rofl:

*update

tried it on a dataset that didnt have any encryption on it, it worked kind of. At least it created the folder location at the destination.

but it didn’t copy over the file i had in the dataset. so replicating did not transfer over the file, and restore didn’t do anything. No idea :sweat_smile: Maybe a different youtube is required for non schedule tasks for this?

Winnie explained somethings that the youtube neglected to mention (so i redid the pool and child dataset so they dont have the same name as the source, not sure that it matters, but i’m just following the instruction)

but obviously i must have missed a step cause it didn’t work for me :sweat: