Use replication.
(blah blah blah)
Use replication.
(blah blah blah)
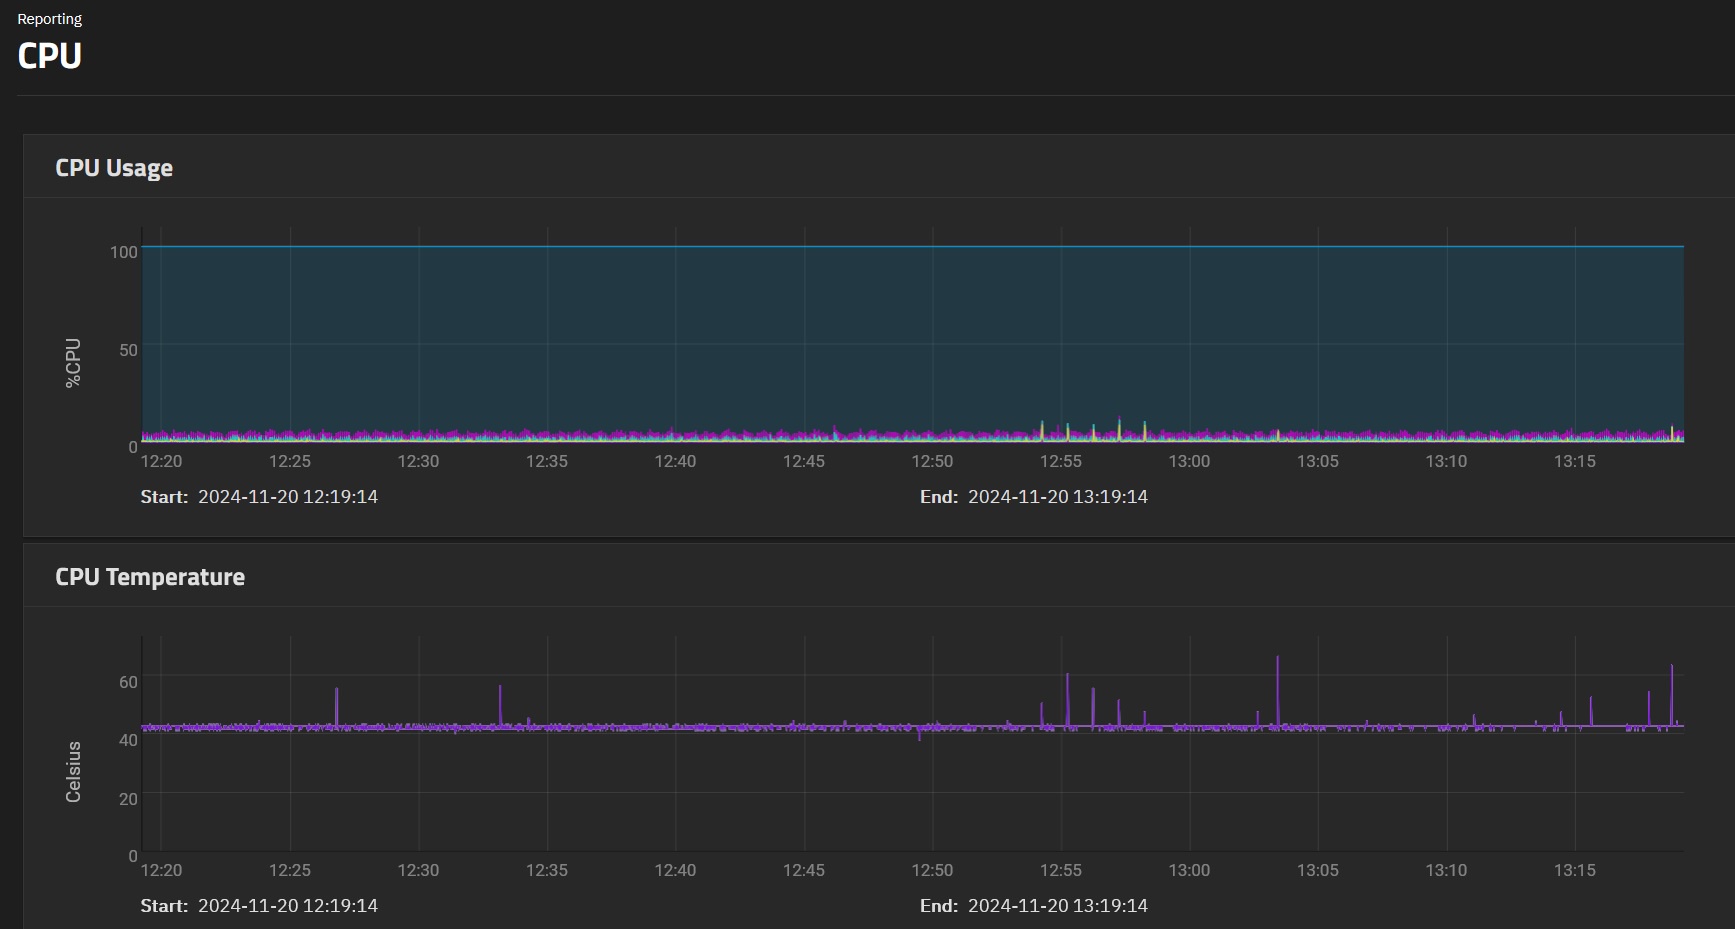
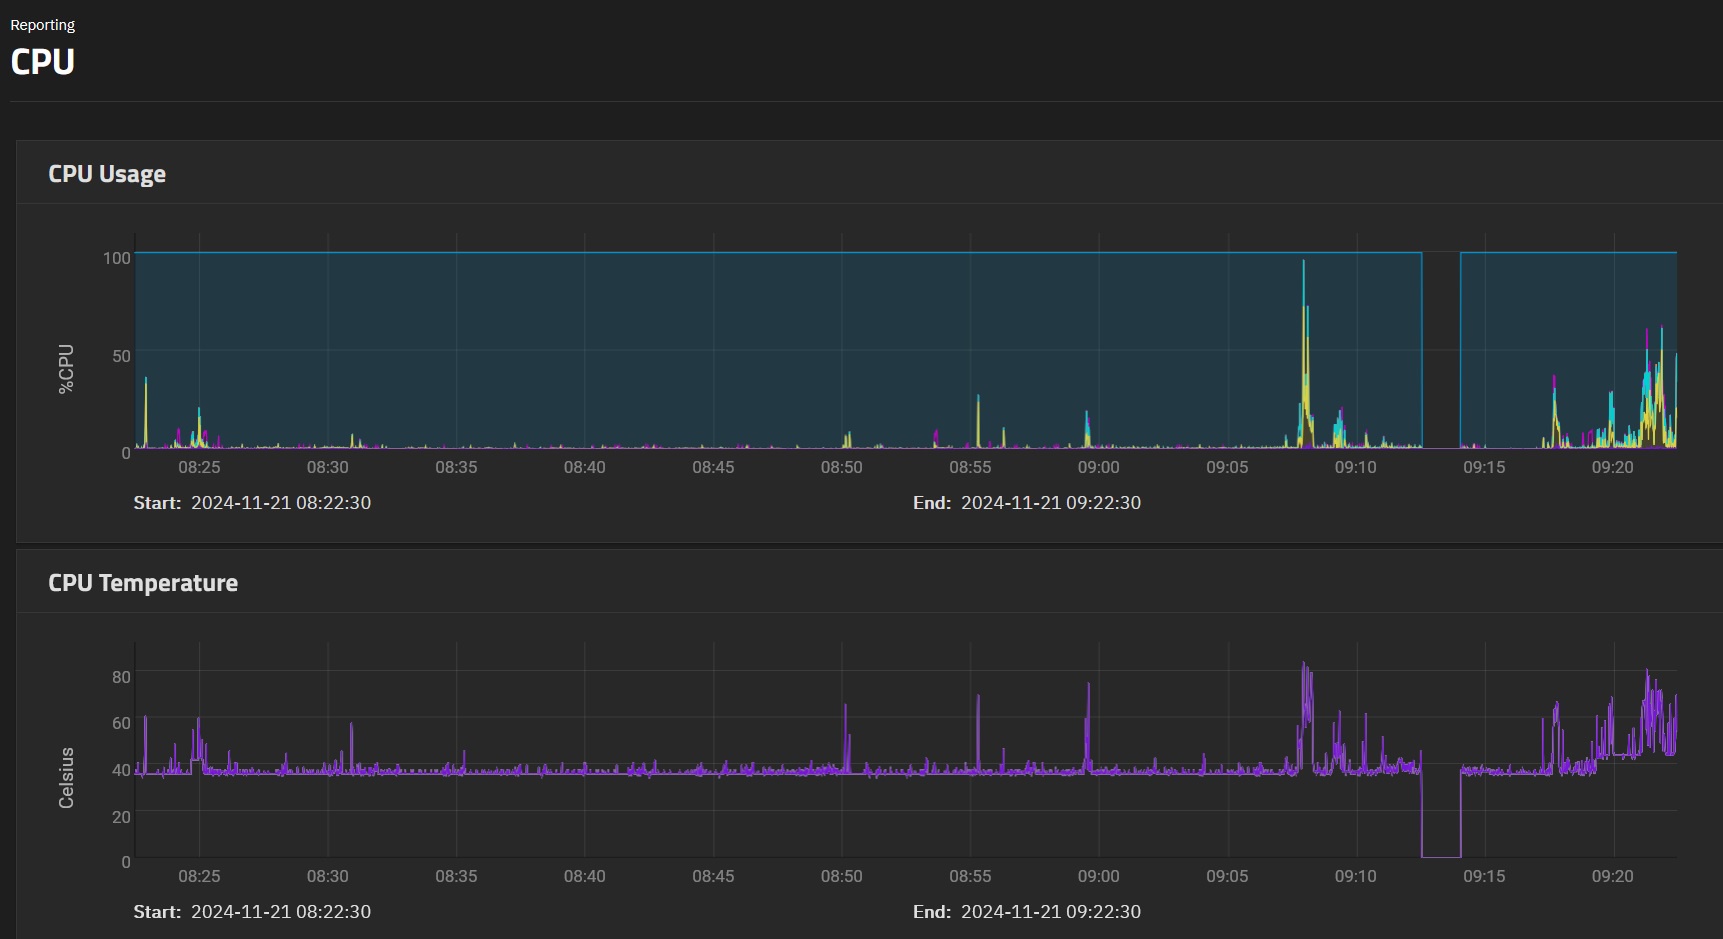
cpu temps doing good. so the noctua cpu cooler and the case fans are doing a good job. i used smart fan settings in bios.
once i add docker setup will report back, but i dont see usage exceeding 10-20% unless something like jellyfin does something intensive like index the whole digital collection. that’s usually the only rare times cpu usage ramps up.
ssd and hdd temps between 38-43c. This is even taking into account the hdds are currently doing active reads/writes for the rsync task.
browsing truenas ui is very responsive. very slight delay for loading the dashboard stuff.
Which you should cancel and replace with a replication. You are just copying a dataset from your old truenas to your new one right?
A replication beams the entire dataset across in one go, preserving all the selected snapshots.
A rsync is a file by file synchronization operation which attempts to figure out which bits of files have changed and then make the same changes on the destination.
Zfs replications knows, and since it knows it can also send updates based on the latest common snapshot.
You can’t convert an rsync into a replicated dataset later… without re-replicating the whole dataset again.
Are you planning on using your old TrueNAS as a backup? If so, you’ll be wanting to replicate back to it… and if you replicated from it in the first place there’d be nothing to copy to setup the backup, as the same snapshot is present on both systems.
ZFS replication is cloning a snapshot from one location to another.
This is a bit like starting a disk burning process before working out how to use tmux.
But whatever.
to be fair i tried, but couldnt get the multi tmux to work. im totally in agreement split tmux then run simultaneously is the way to go. but there was no answer to it after trying to get that to work, so what can i do? ![]() i can at least do block burn 1 at a time. that’s better than not using it at all ya?
i can at least do block burn 1 at a time. that’s better than not using it at all ya?
as for rsync im almost done, may as well finish. also i need to be afforded the opportunity to test it before with dummy data i can afford to lose, to understand it better and if it works for my setup or before i can deploy for production. i cant just jump straight to it without knowing how it works… we all start somewhere. i need to be afforded that opportunity to try it out first… (which i was going to do, create a new dataset called test and try with that) ![]() if im ok with it after test, i can redo it again, no problem.
if im ok with it after test, i can redo it again, no problem.
still figuring this out. im not only backing up to another truenas (the old ts-877), but i have other backups that are not zfs based, so have to account for that. all my backups i always test and verify, that’s what i’m in the middle of doing, will take a while
Anyway i am assuming replication can be limited to replicate specific datasets ya? this is what i want to test for first. Rather than replicate the entire nas from the get go
i appreciate the feedback though
anyway i cleared some space to relocate the old nas to. hopefully can move the nas case into rack soon. lots of cabling to do ![]()
i plan to order a new shelf without excessive partitioning at a later date. the one i got is too cramped ![]()
just an update
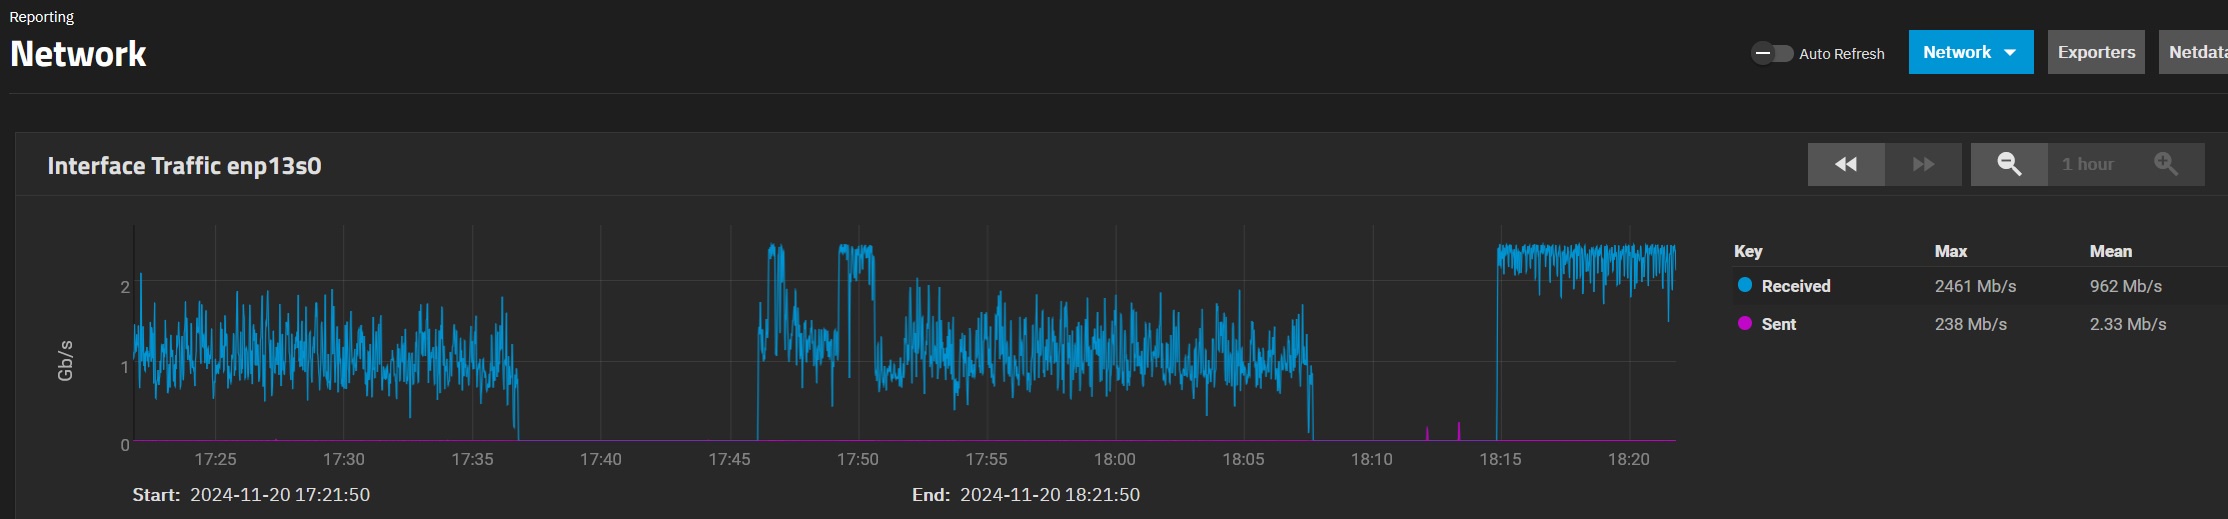
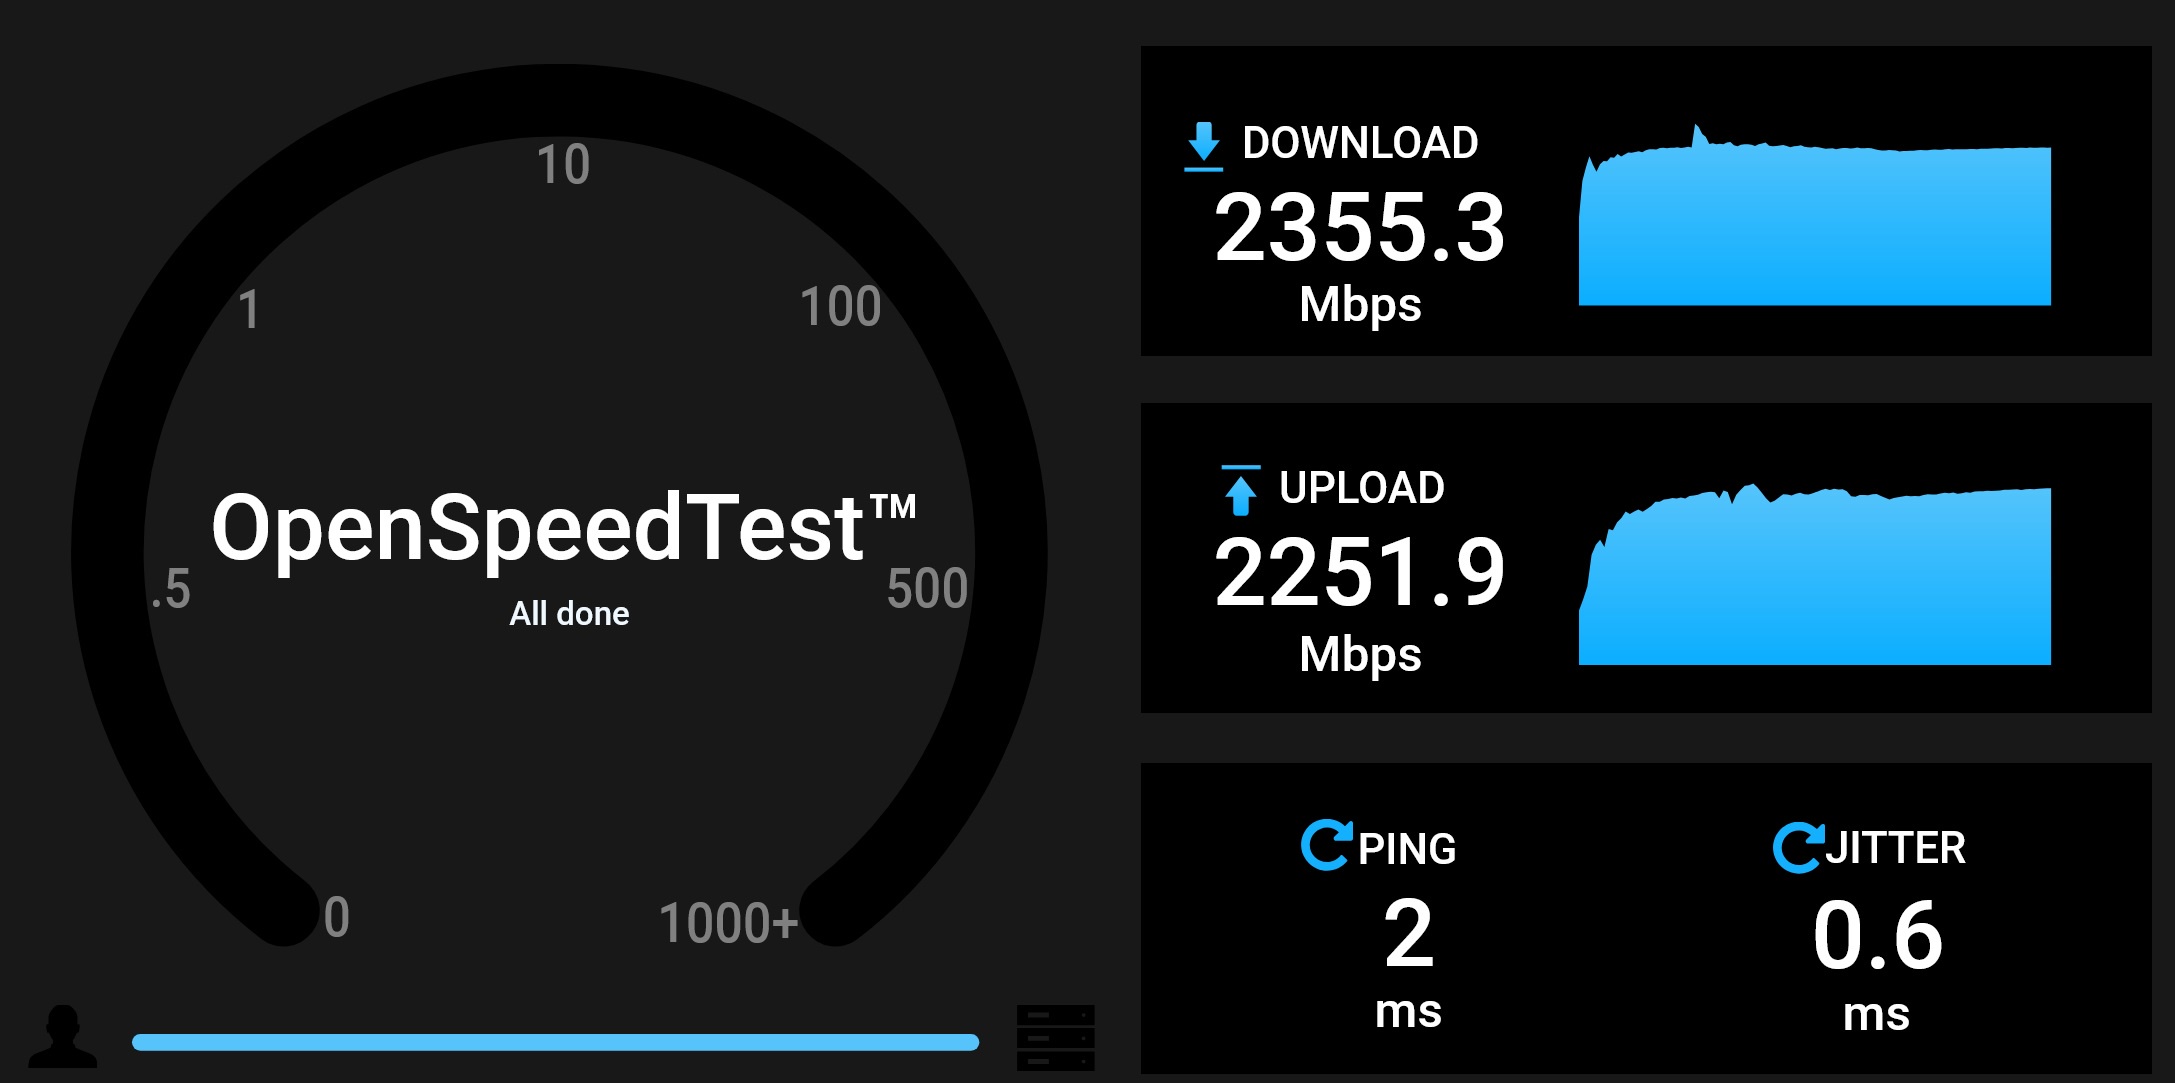
now the speeds improved. now we r sailing
2461 Mbps = 307.625 MB/s
2.5Gbit corresponds to a little over 300MB/s (since there are 8 bits in a byte). Hence your speeds are kinda close to the theoretical limits. Maybe you could get them a little bit higher with some tweaking somewhere, but don’t expect to go above 300.
the only thing i changed was in rsync. i set the user to root, disable compress (dont need that for 2.5gbe local).
I sus the compress was the culprit, but i’m not fully sure. anyway things improved ![]() anyway thx for spotting that.
anyway thx for spotting that.
mini guide by me for migrating jailmaker docker from old nas to new nas
currently in the middle of recovering jailmaker docker to new nas
just sharing the recovery process in case it helps anyone who is using this and moving to a new truenas build like i am
jlmkr stop docker *docker is my jailnamefor recovery i only copied docker dataset but not jailmaker dataset. the only thing i took from jailmaker was the config file i was using. This was then put into the jailmaker dataset.
Go to truenas shell do this
cd /mnt/xxxxx/jailmaker/
curl --location --remote-name https://raw.githubusercontent.com/Jip-Hop/jailmaker/main/jlmkr.py
chmod +x jlmkr.py
./jlmkr.py install
here i get some error message. ignored it
modify the config file. you need to pay particularly close attention to the modification. E.g.
-for the mnts make sure they actually exist.
-if you are using bridge like i am, make sure the br1 is also set
then next check this file is set correctly. change ip to your own, this ip is used by the docker containers.
/mnt/xxxxxx/jailmaker/jails/docker/rootfs/etc/systemd/network/80-container-host0.network
[Match]
Virtualization=container
Name=host0

[Network]
DHCP=false
Address=192.168.0.24/24
Gateway=192.168.0.2
LinkLocalAddressing=no
LLDP=yes
EmitLLDP=customer-bridge

[DHCP]
UseTimezone=yes
next you have to setup bridging in truenas. i used this youtube to do that

at this point you should be good to go.
One thing you should do is setup an alias for jailmaker. Refer to jailmaker github for the full explanation why you need that. Simply put, it’s so you can go to truenas shell and type jlmkr whenever you wanted to do a jailmaker command, rather than having to cd to the directory each time.
this was what i used
echo "alias jlmkr=\"sudo -E '/mnt/xxxx/jailmaker/jlmkr.py'\"" >> ~/.zshrc
now you should be able to deploy your jail. go to truenas shell
jlmkr create --start --config /mnt/xxxxx/jailmaker/config docker
here docker is my jail name. at this point it should work. if it didn’t then you probably messed up in the config file, or you didn’t setup the bridging portions yet?
to confirm its up and running, in truenas shell type jlmkr list then jlmkr status docker then jlmkr shell docker then docker ps
this confirms the jail is up, docker is working (but its empty, that’s normal).
So first thing i suggest doing is install dockge. I change directory to where i have my dockge compose located e.g.
cd /mnt/xxxx/docker/compose/dockge
then do a docker compose up -d which installs dockge using my docker compose that was already preconfigured with my own setup settings for dockge.
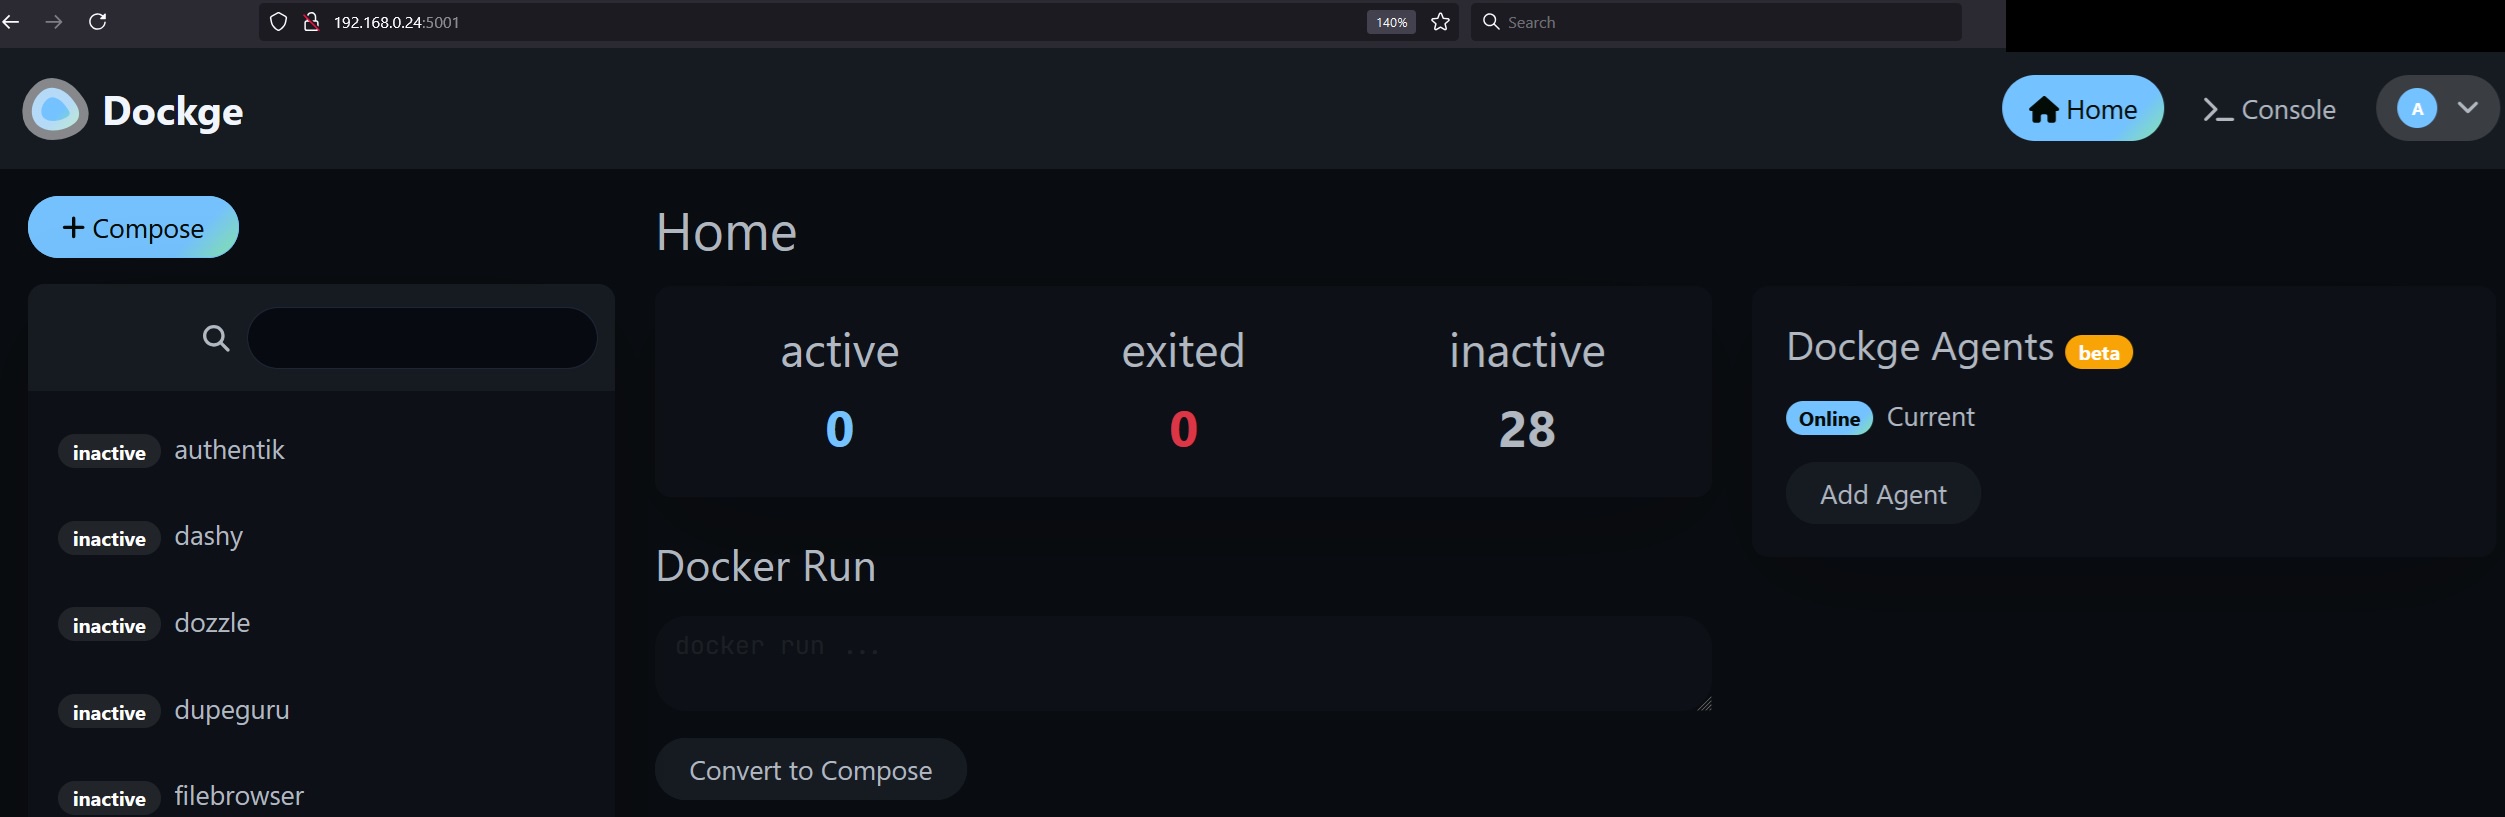
at this point, you should be able to access dockge web ui. if you did it right, it should detect your docker stacks. just start them up and it should all start working again but this time from the new nas. check each one to make sure all is working.
see proof this works (dockge discovers the stacks i recovered from my old nas. the config data is already recovered as well). just deploy the rest of them
notes: you can do what i did, or stick to the native docker (refer to stux youtube for that), or do the incus setup method (refer to dan’s setup method in the jailmaker discussion thread). I’ll probably switch over to one of those in future. but for now, this simply works ![]()
PS: you may also want to add the startup for jailmaker in truenas script. refer to the jailmaker github as to how. for myself i couldnt get it to work. either EE broke something for that or i messed up somewhere. So i have to manually jlmkr start docker whenever i reboot my nas ![]()
other tips: if you need to modify the config, just
jlmkr stop dockerin truenas shell to stop the jail first. then modify the config (either via nano, or i use winscp notepad++ then save changes). Thenjlmkr start dockerduring troubleshoot editted till it successfully launched without issue.
*some correction here. Editing the config this way didn’t work. what worked for me was to go to truenas shell jlmkr edit docker make the edit there, save. then jlmkr start docker
*update
so far the only docker container not working right off the bat was nginx proxy manager. but i think i can fix that, but will take a while going through the checklist. probably to do with the initial setup using certs is my guess. everything else seemed ok.
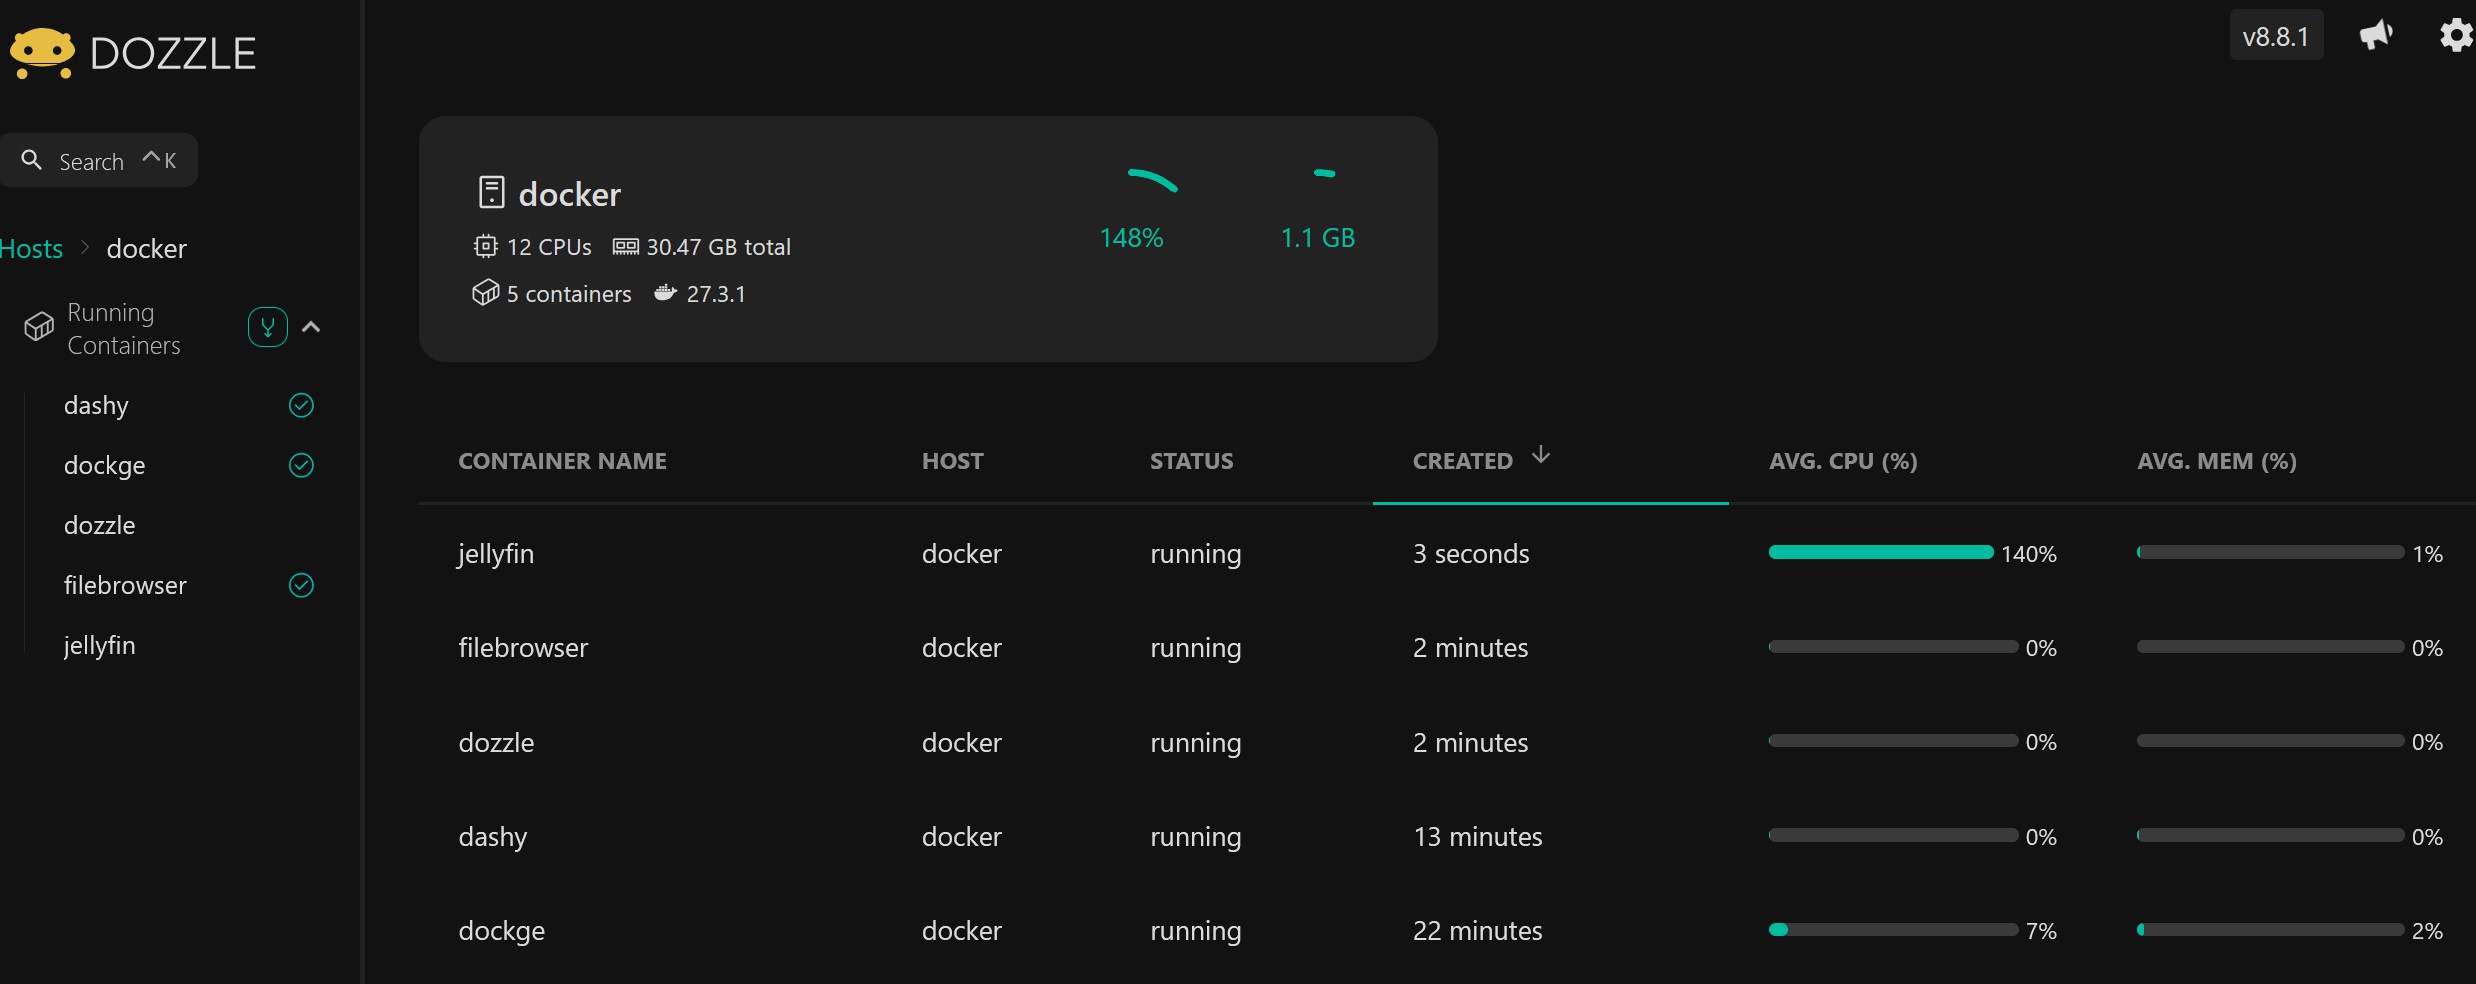
and while starting up many dockers and seeing jellyfin doing it’s indexing for first time, you can see how much cpu usage it uses as it spikes up
*update
found a 2nd container not working well. immich. the previous setup didn’t carry over, instead had to setup a new user from scratch. will figure this out later.
But jellyfin carried over fine, tested.
*update
test lan speed (desktop to new nas)
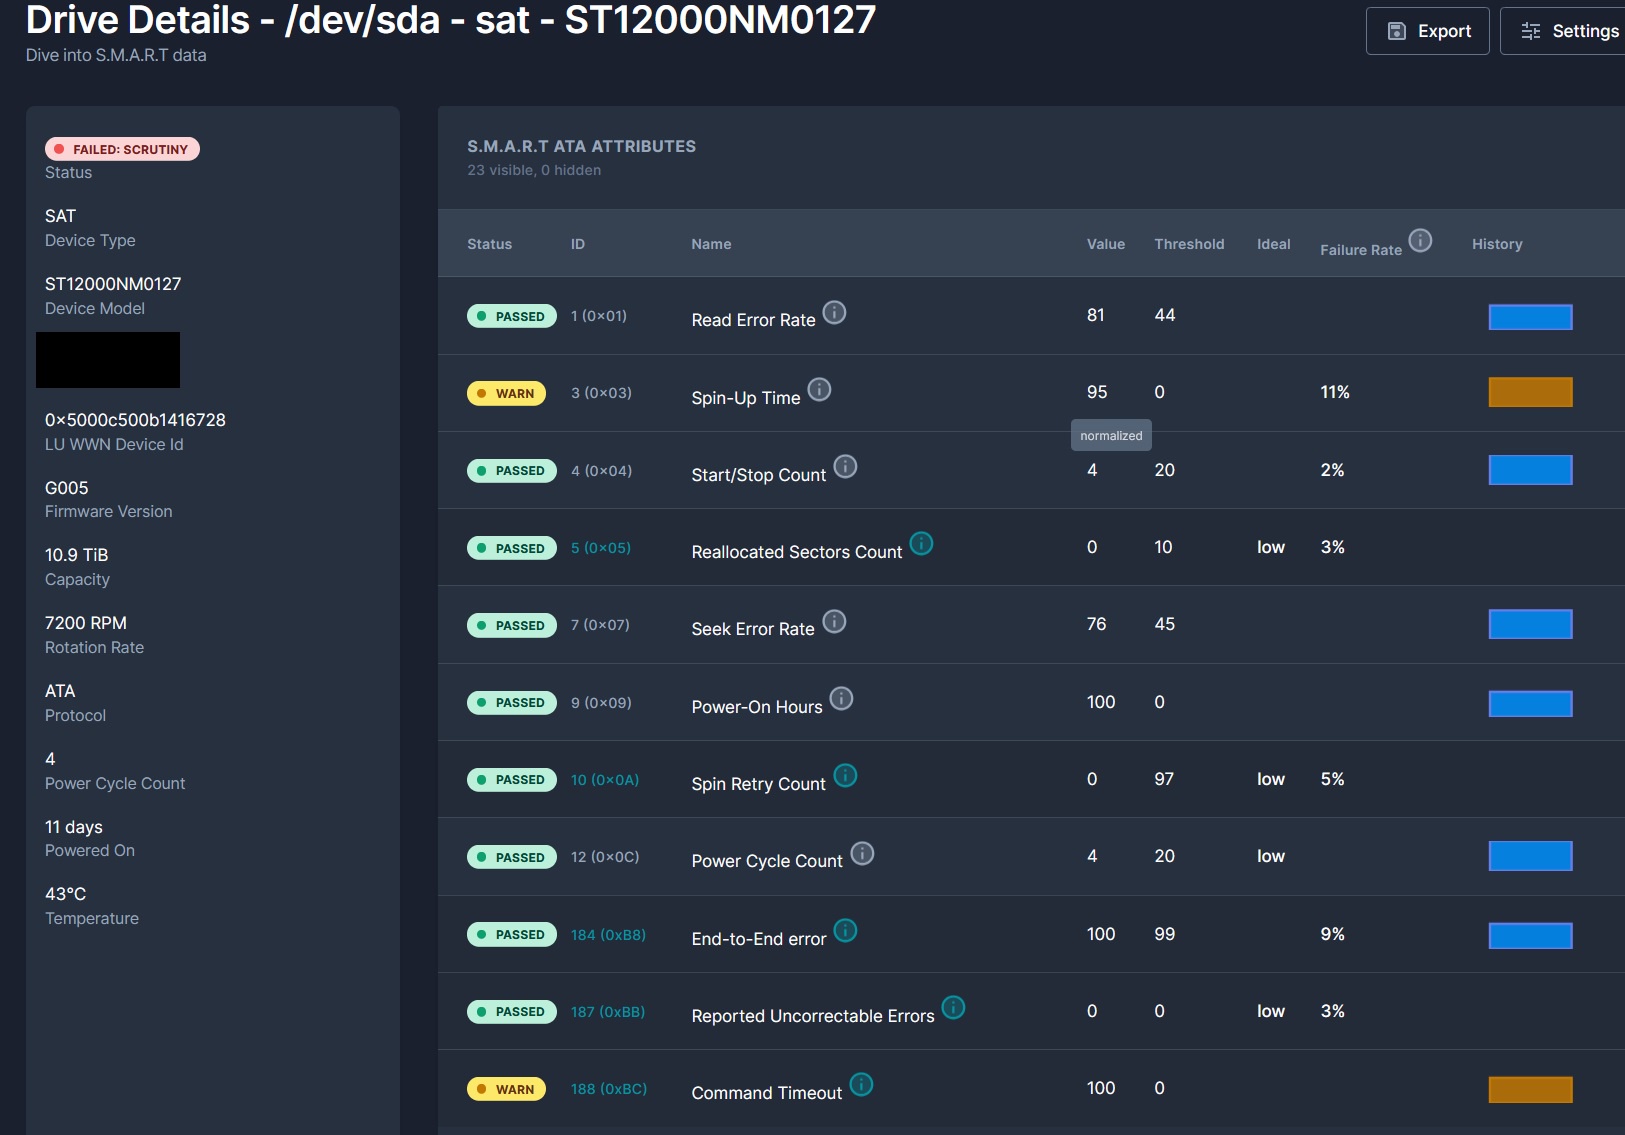
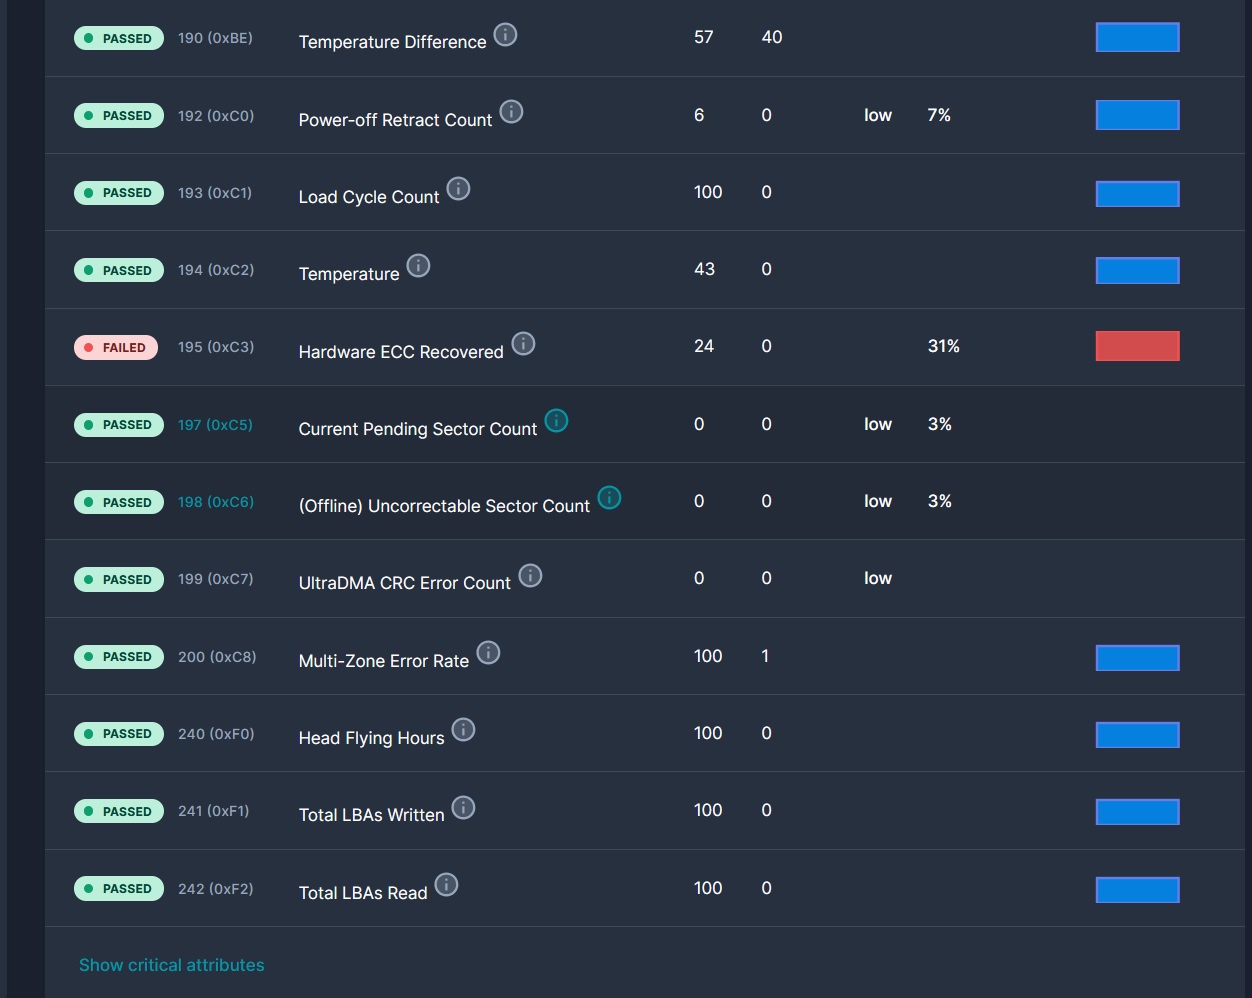
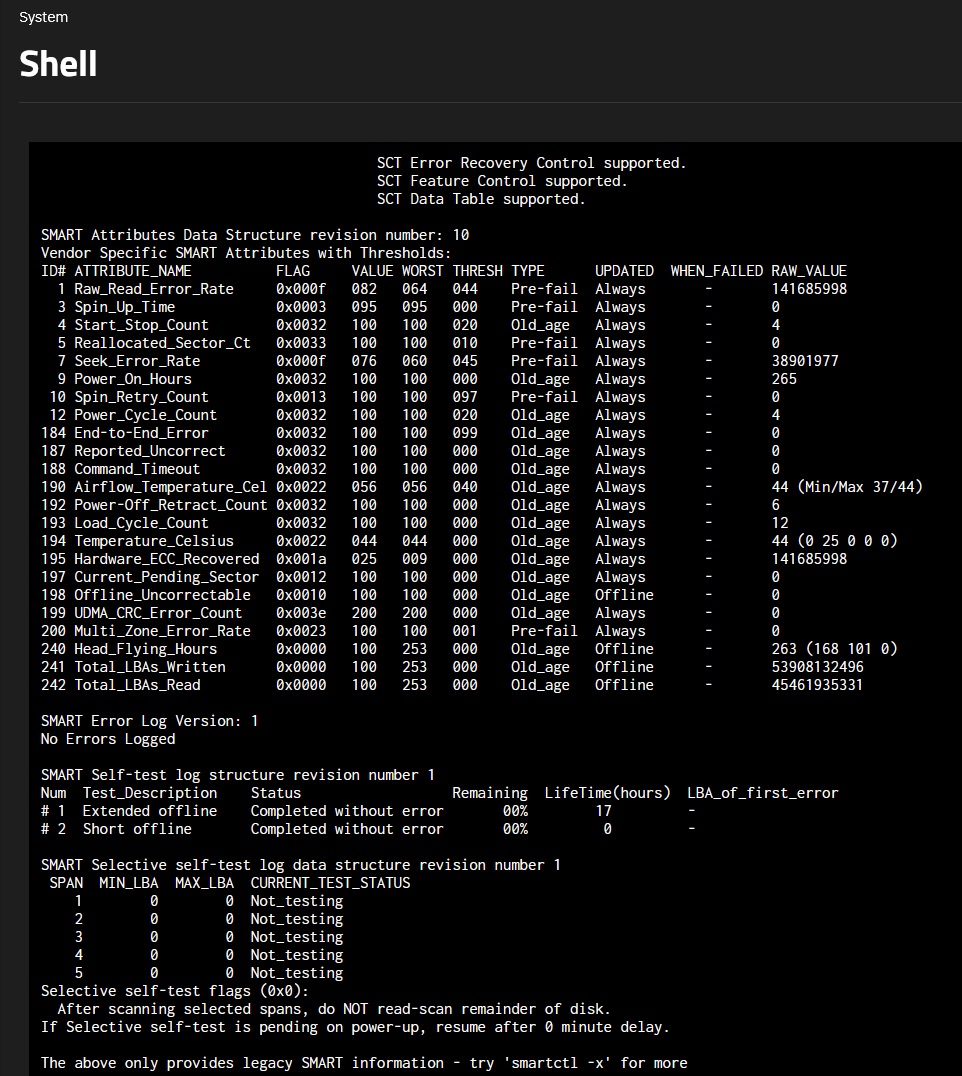
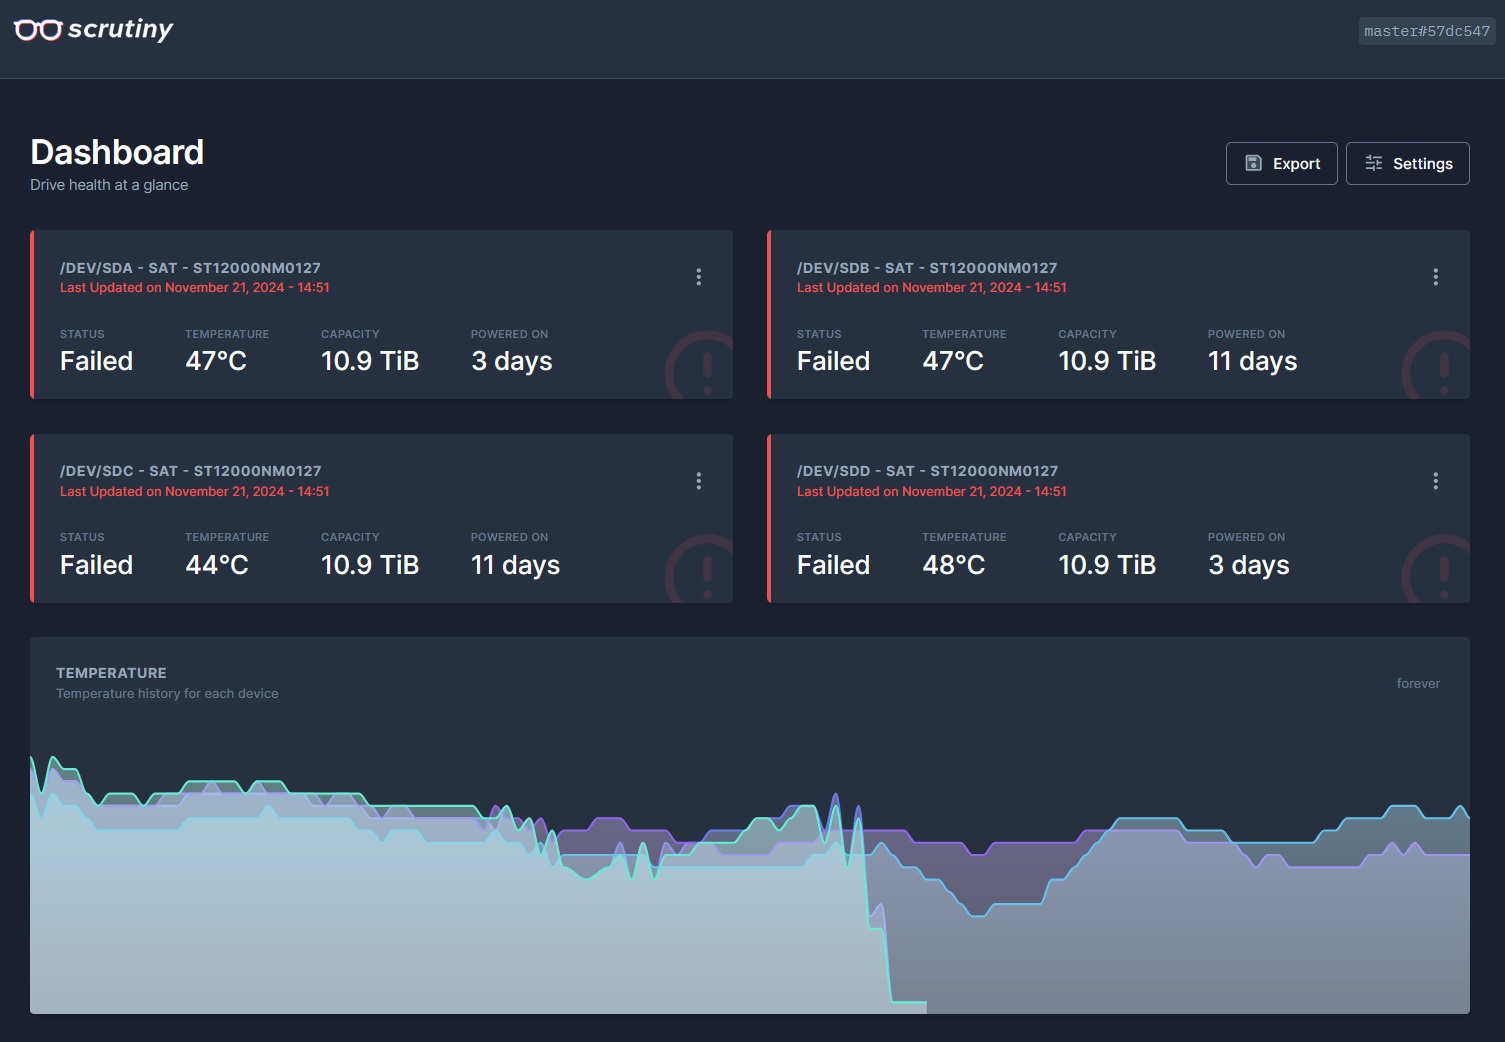
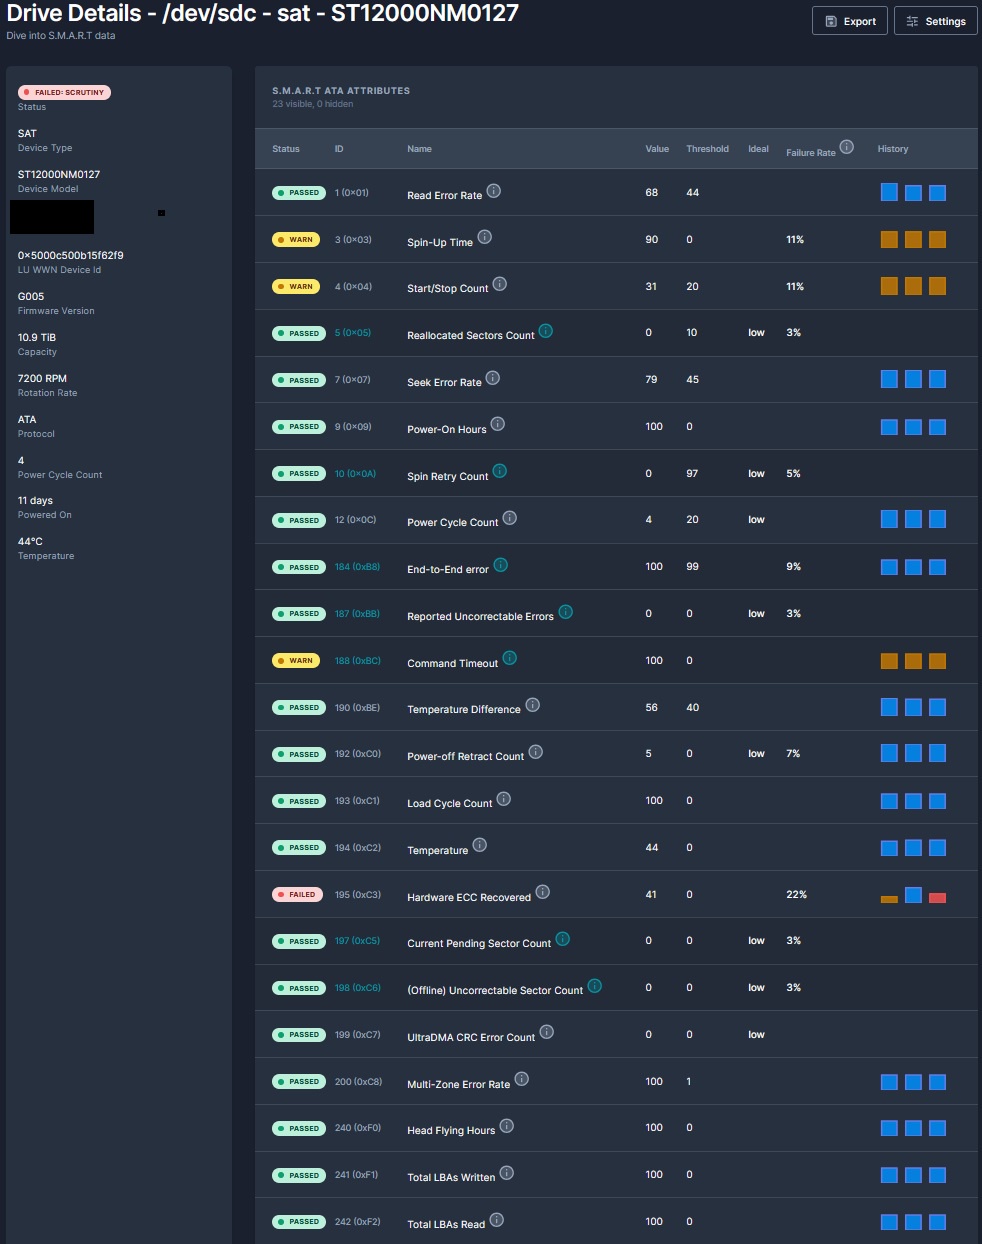
got scrutiny up and running. noticed this
but truenas smart says there is no issue
so who do i believe? ![]()
thats interesting.
Technically this result is “correct” since the Backblaze data Scrutiny uses correlates your ECC Recovered failure value (40) with a 22% chance to fail.
The larger issue is that Scrutiny doesn’t have the concept of transient failures. If any of the metrics have ever failed, then the disk will always be marked as failed (even if the ECC Recovered value resets).
This shouldn’t be incredibly difficult to implement, but it may take some time.
Thanks for bringing this to my attention!
![]()
does that mean i need to replace the drive?
*update
couldnt show all hdds/ssds (no idea y), so i had to hash out the ssds from scrutiny. then it show all 4 of the hdds
The red flag was the hardware ecc recovered ![]()
ECC recovered is not a critical error. Uncorrectable errors and/or reallocated sectors are a problem and those are at 0 so you are fine.
Just run a full surface scan or an enhanced secure erase and check the statistics after that.
This is completely normal and expected. These numbers can fluctuate (increase/decrease highly) on a Seagate hard disk and these DO NOT indicate any problems/errors or so - as discussed several times on this forum.
https://www.reddit.com/r/techsupport/comments/158g1kt/hardware_ecc_recovered_in_second_hand_hd/
https://www.hdsentinel.com/forum/viewtopic.php?t=13768
so i did that for 1 drive. this is the only one i did the most testing on in this order. short smart, block burn. long smart.
![]()

no i dont think its bad sata data cable, cause there is a tell (i checked it seems ok for that)
https://www.reddit.com/r/unRAID/comments/14seto6/yes_sata_cables_can_go_bad/
*update
did more digging found this
Hardware ECC Recoveredis reported in a non-standard format. If its not failing SMART, you can safely ignore it for now. Click the attribute row in the table to get extended details for the attribute.
moved the old nas out of rack. should be able to move new nas into open rack tomorrow once long smart completes ![]()
gonna steal the sfp+ 10g fiber tranceiver from old nas to test with new nas. if it works, ill order it, then build would be complete with that last part.
found solution for drive
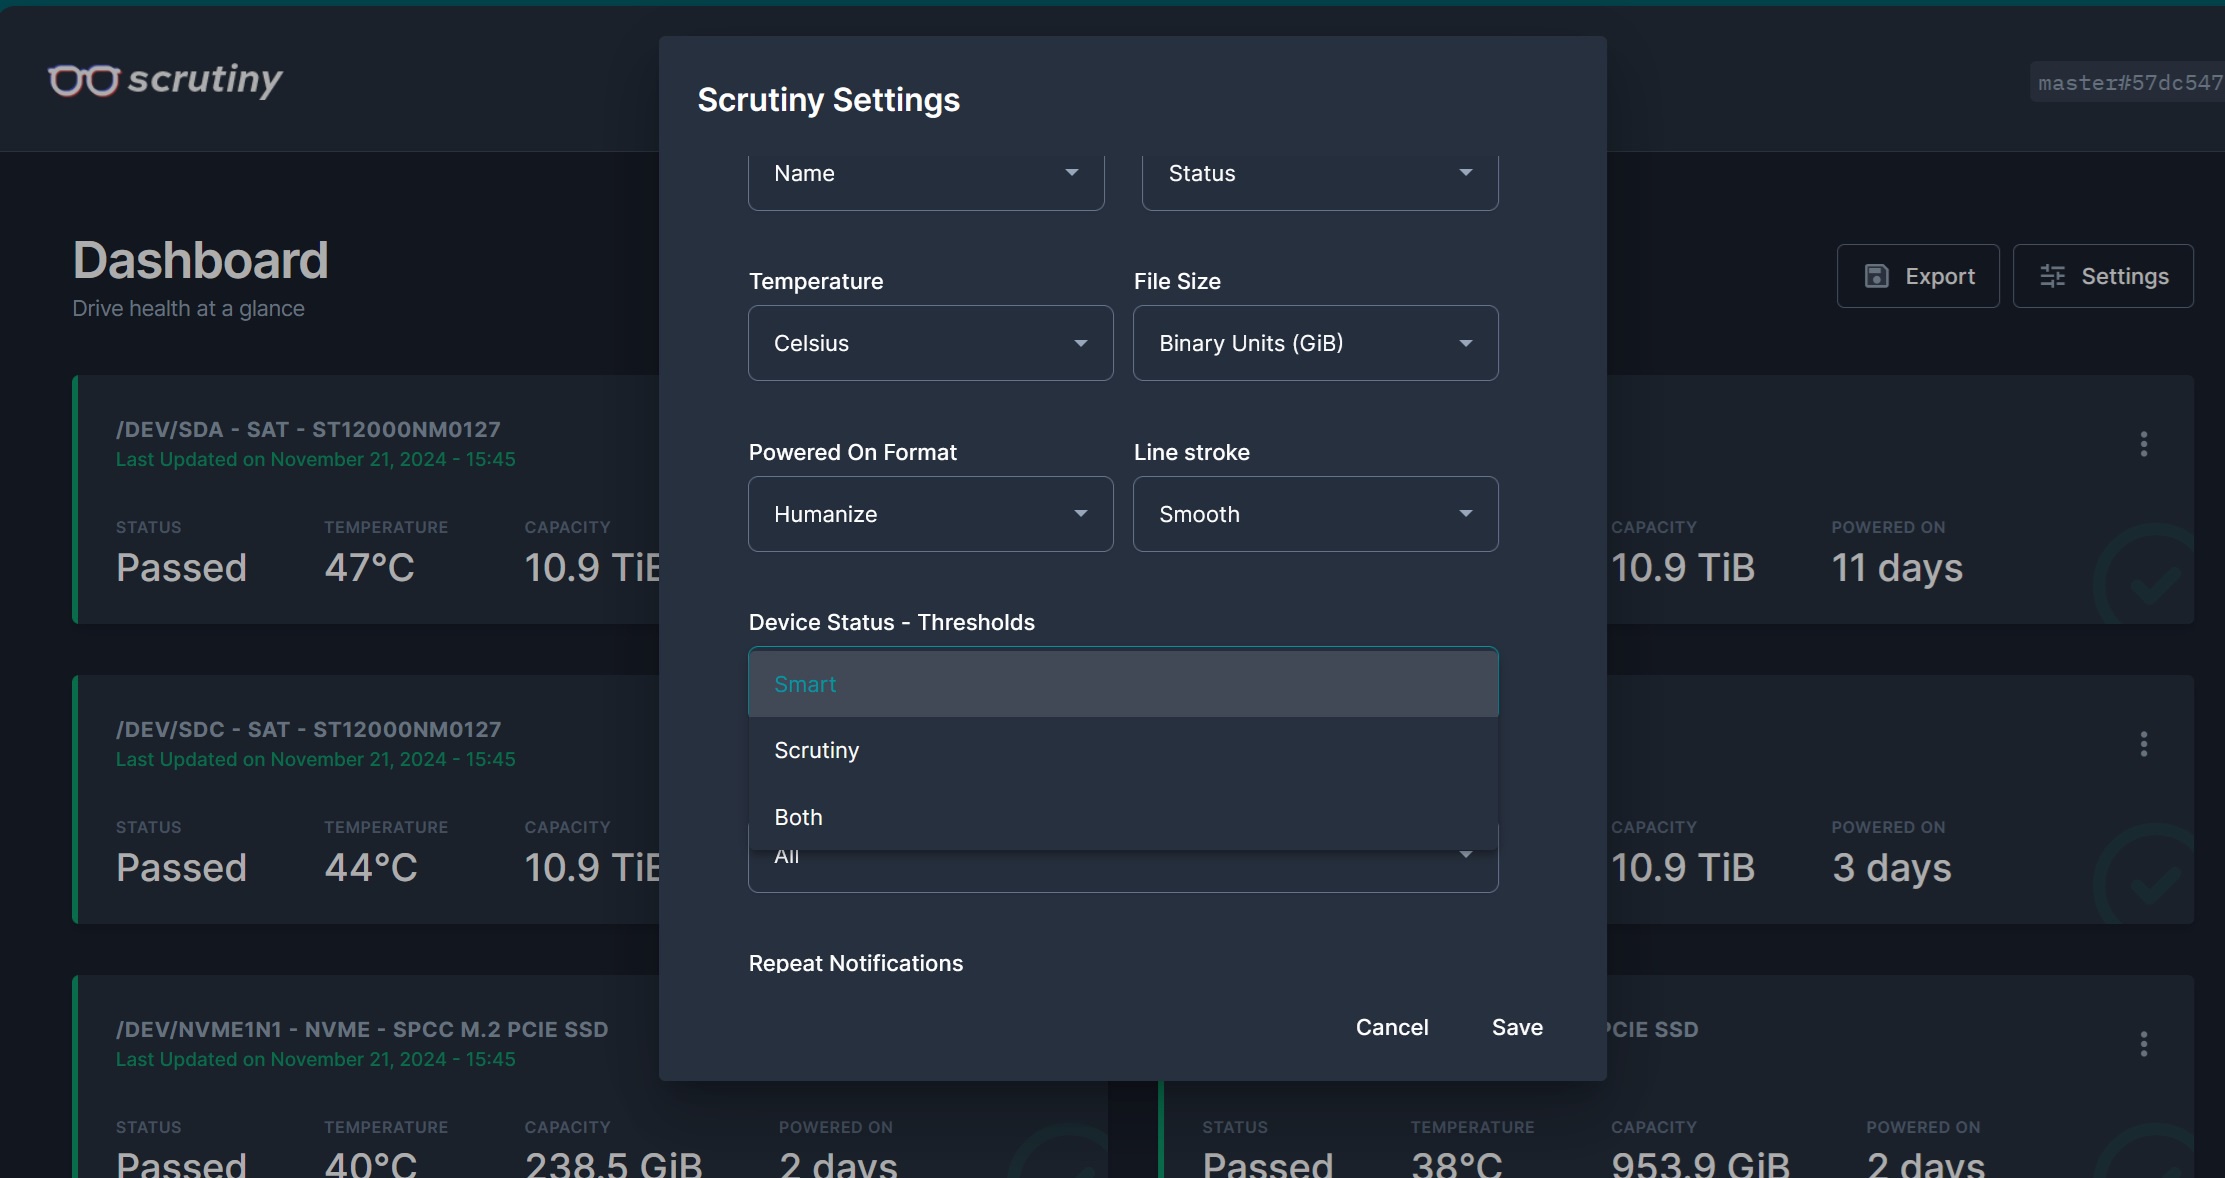
in scrutiny settings u got smart, scrutiny or both. i select smart and it passed. ill use that for now.
its 5 year warranty, ill wait till the drive has real issues (unrecoverable errors, pending sectors, etc) by smart before rmaing
cauz just seems that scrutiny is skittish about seagate drives for this particular metric. even analog the dev admitted the trigger for this could be a false warning. he said as long as smart passes it should be fine, which it did.
Took an incredibly long time, but as of
v0.5.0this functionality is now available in Scrutiny!On the dashboard settings panel, you can now change the “Device Status - Thresholds” between
Smart,ScrutinyandBoth. By default this is set toBoth.When changed to
Smart- only the output ofsmartctlis relevant, all other Scrutiny/Backblaze detected failures/warnings are ignored (in notifications & UI).The description and UI for this functionality may be enhanced in the coming releases, but it is functional and working.
I’d appreciate it if you could pull down the latest image, test it out and provide any feedback you may have!Appreciate everyone’s patience - this has been a long time coming.
i posted a scrutiny docker setup guide for jailmaker if anyone interested to use scrutiny
during recovery, the only main docker app not recovered was nginx proxy manager. found out why because the docker compose was not well done. i fixed all that (with the changes, next time the recovery will work better without having to go through this again)
using this guide easy to setup

did the lets encrypt cert, added npm admin, tested working
*update
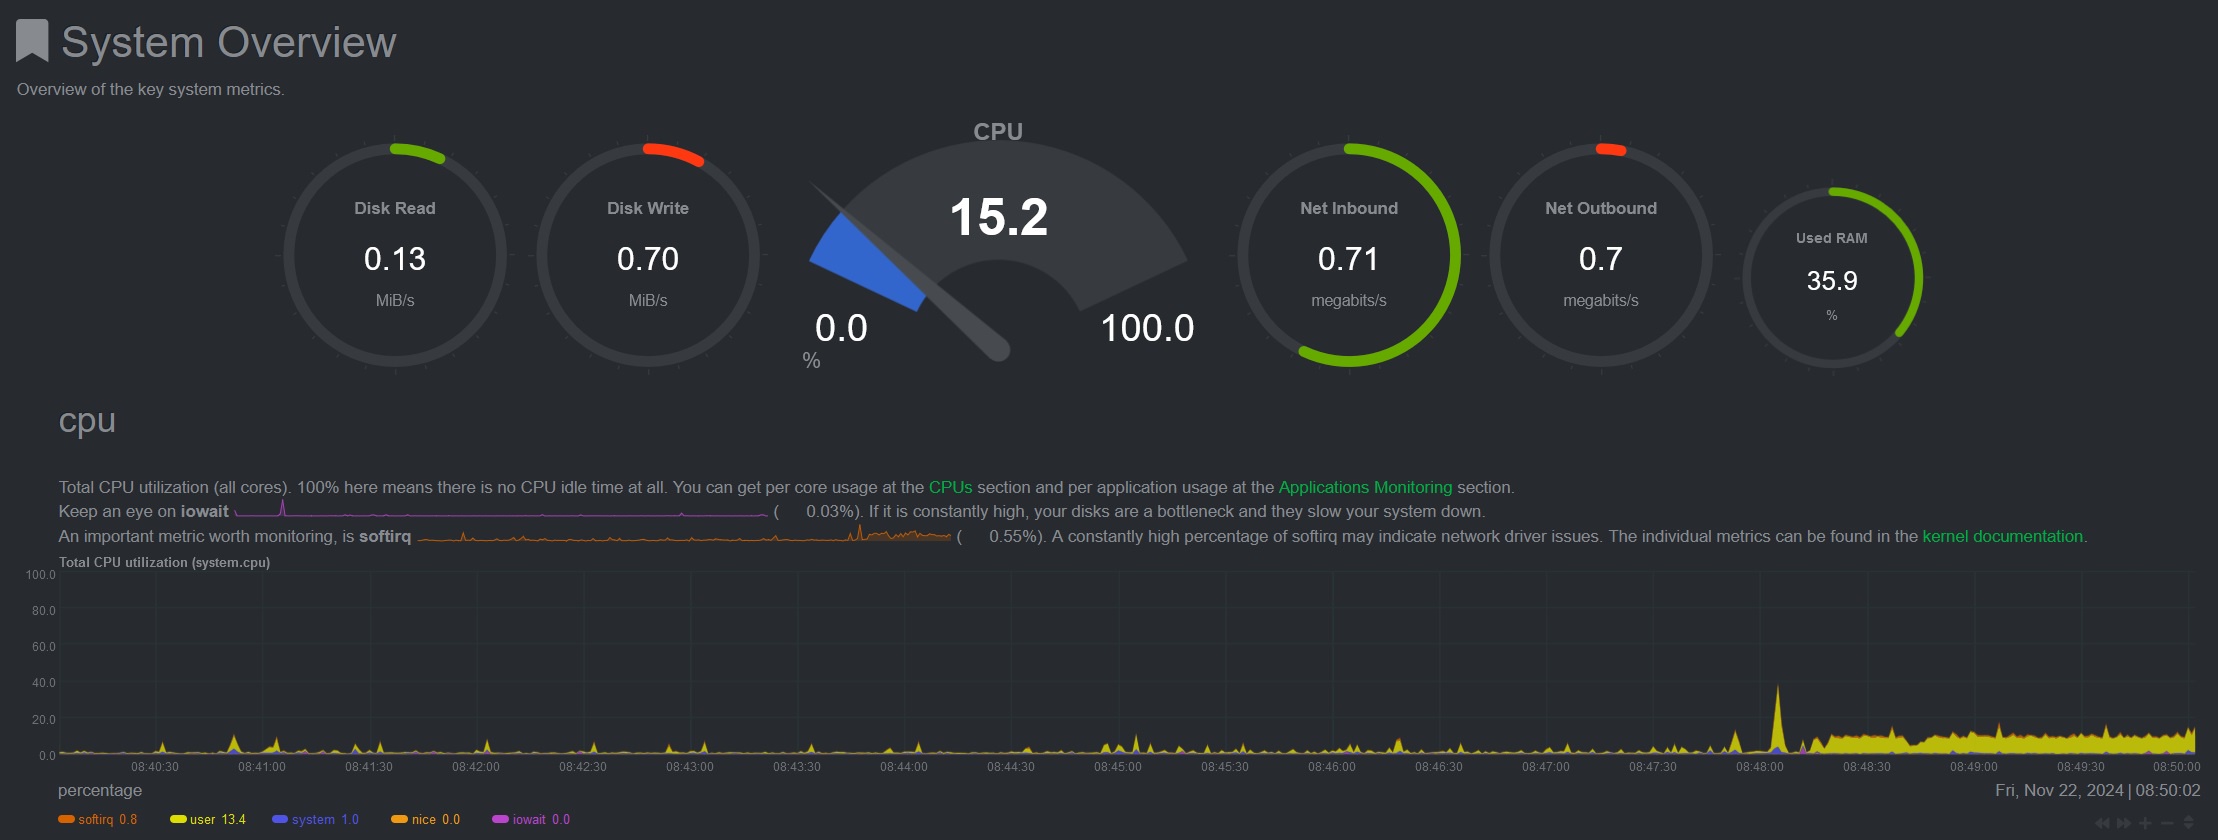
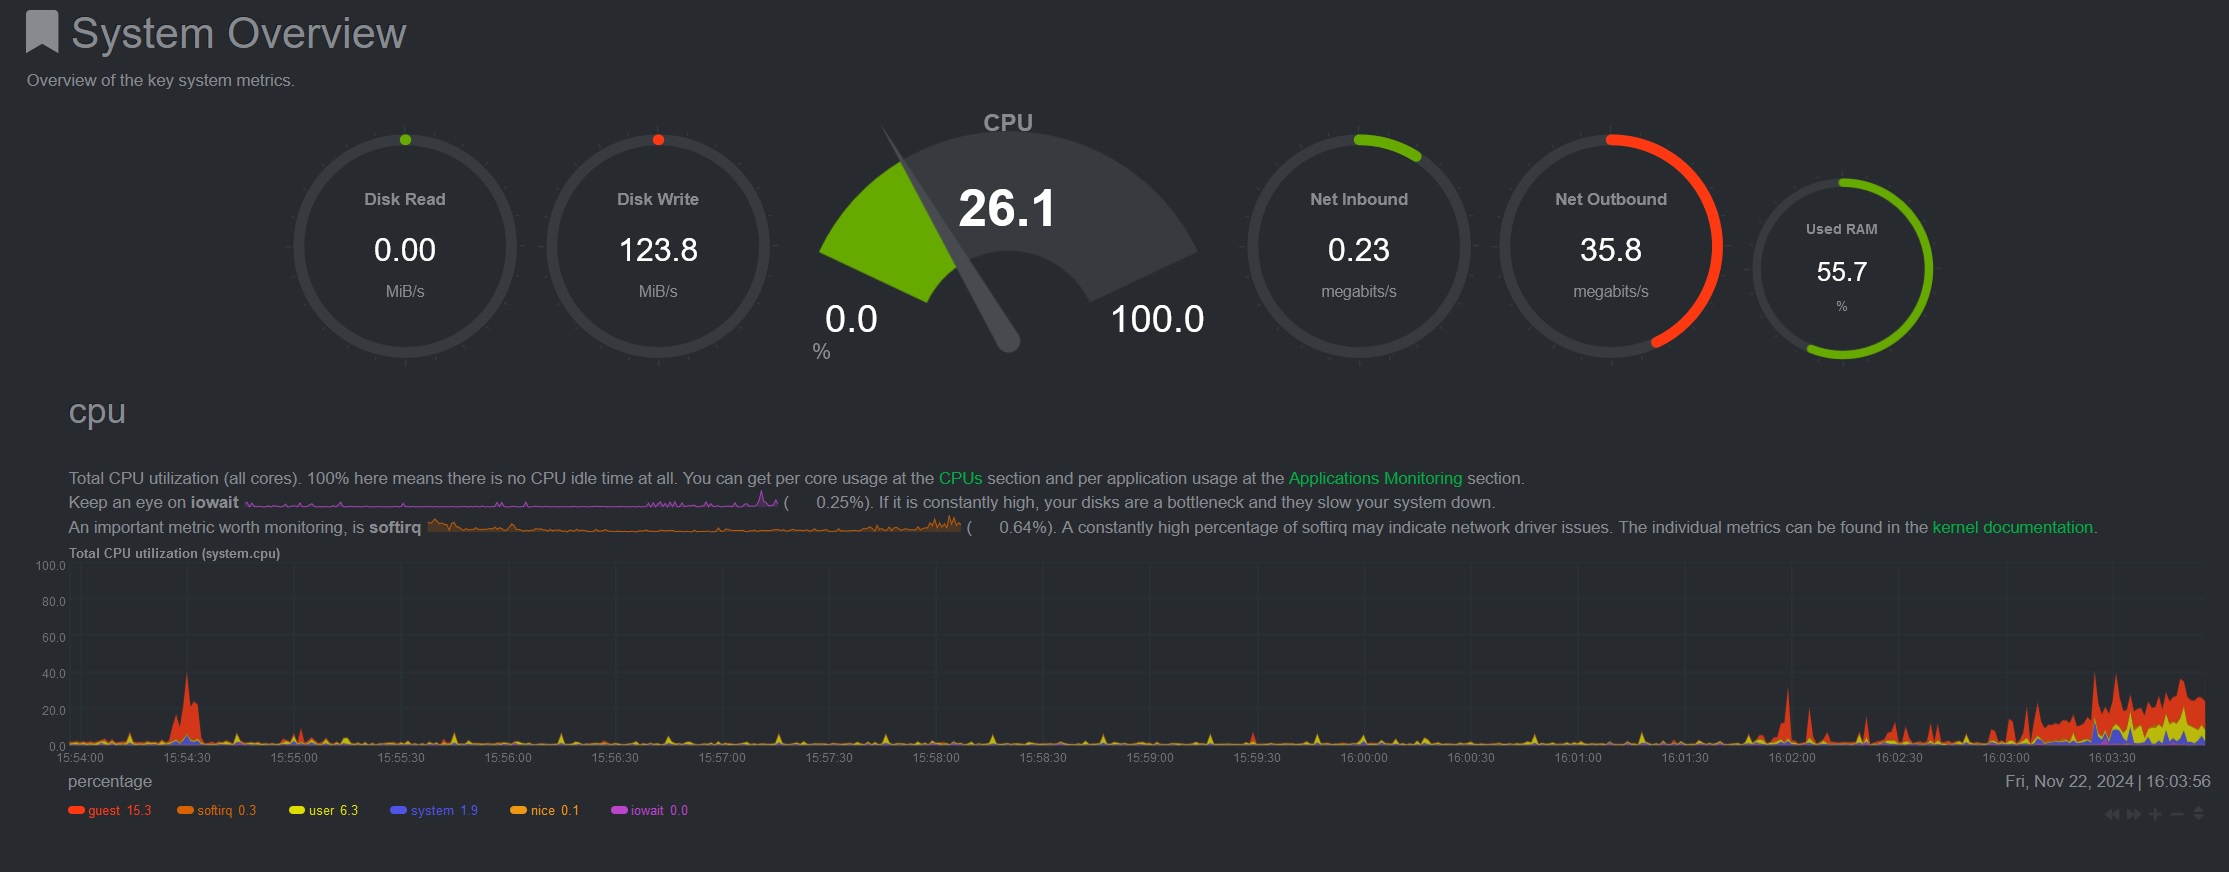
after fixing back 22 docker containers, and running a jellyseer to scan jellyfin database index, resource use e.g. cpu looks like this
troubleshoot:
If you are trying to get nginx proxy manager to work for truenas, make sure to enable websocket
https://www.reddit.com/r/truenas/comments/1ase96n/connecting_to_truenas_when_accessing_using_nginx/
finished installing into open rack. sits on the shelf and screwed into rack, no issues. there is still a bit more spacing at the back for depth, so the rack was a good fit (cept for the rails ![]() )
)
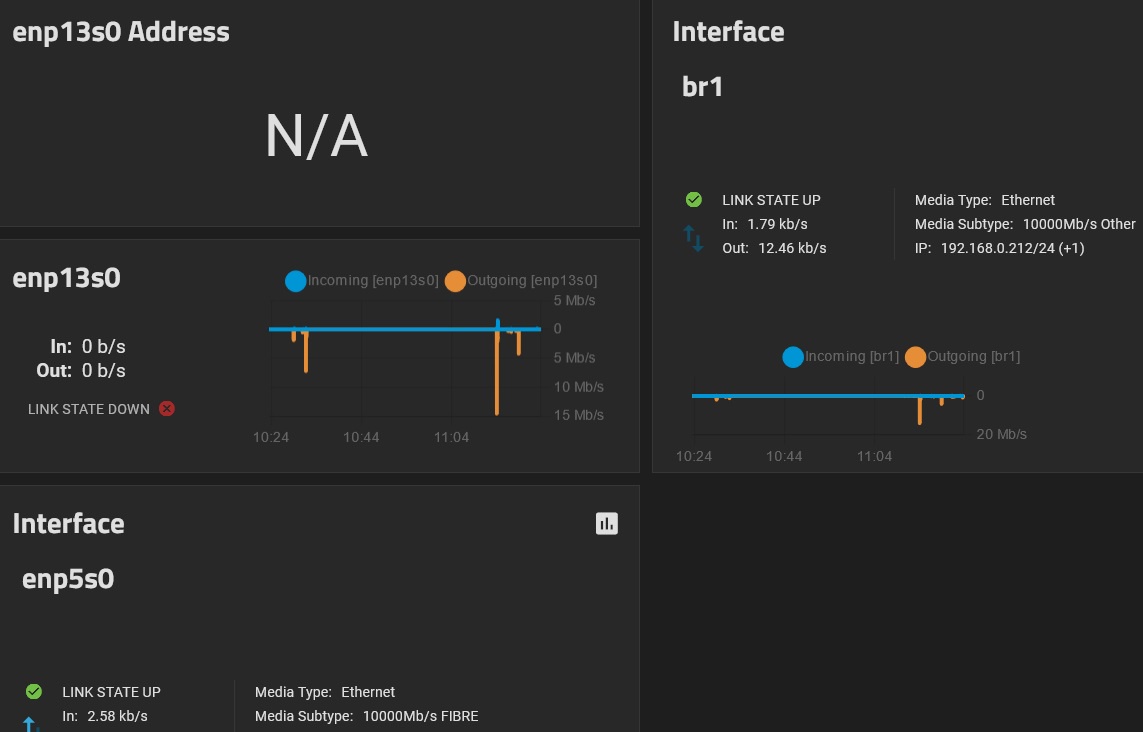
tested sfp+ 10g fiber transceiver, that also worked. i used truenas test networking while applying the changes in case i get locked out (and backup config before this).
*double checked i ordered the correct part (transceiver pair and the fiber optic cable 2 meter. $40 total ![]()
At this point i’m done ![]()
*update
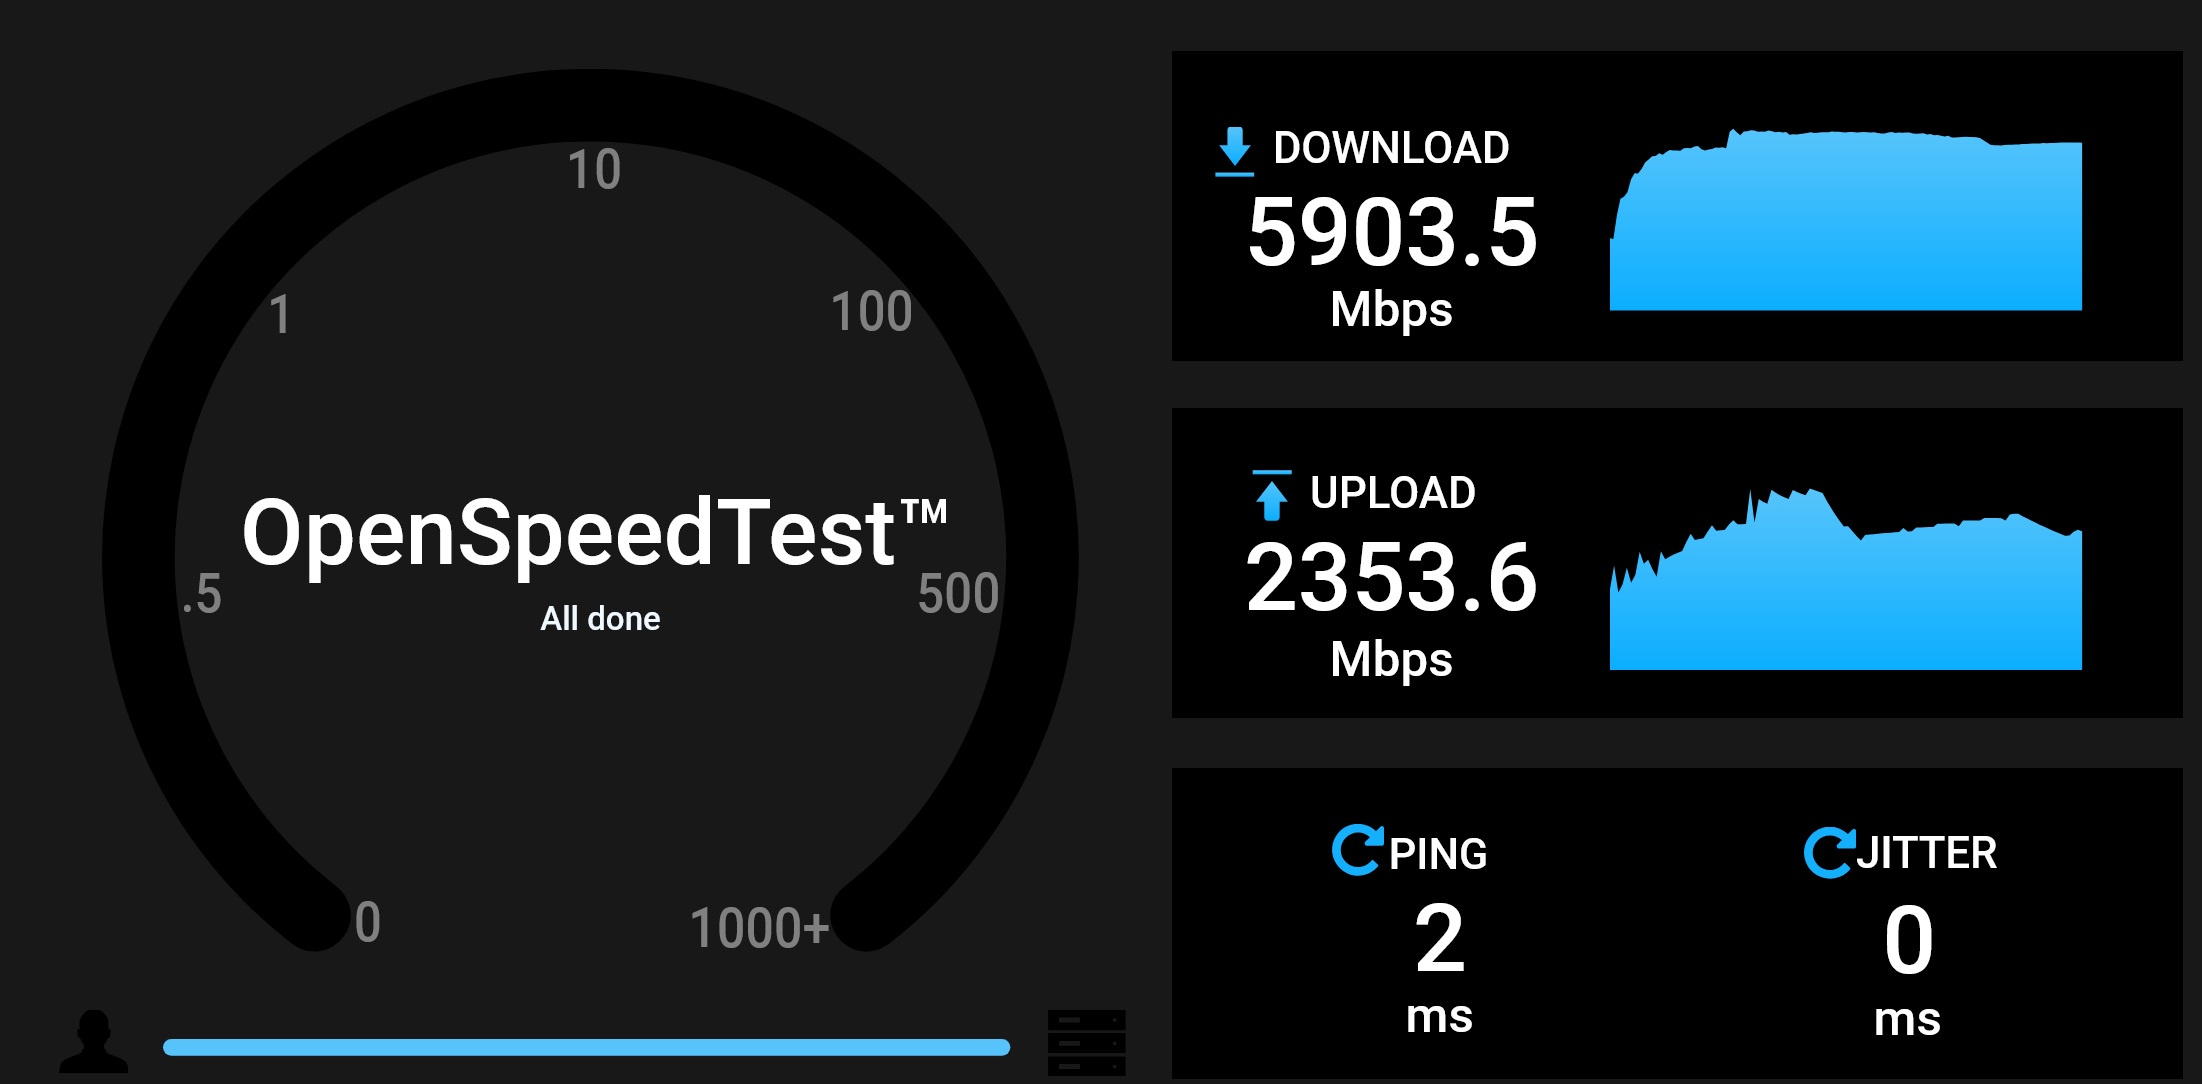
speed test. not quite 10g ![]() (desktop to new nas). if there any tips to fix this, let me know, thx. it’s good enuff for me, but wondered how can i improve this.
(desktop to new nas). if there any tips to fix this, let me know, thx. it’s good enuff for me, but wondered how can i improve this.
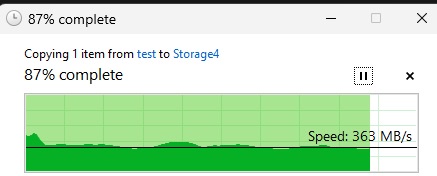
also tested real use case like copy a single 13.8gb file from windows 11 desktop to nas, and back
copy from desktop to nas
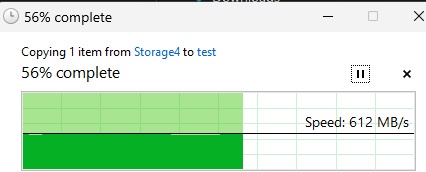
copy from nas to desktop
*iperf test (desktop to nas)
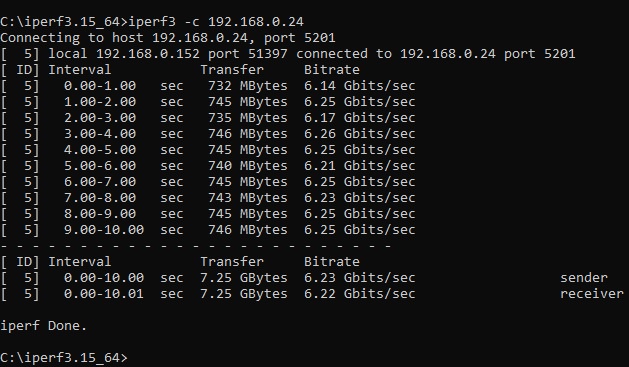
*note 100% sure but the fiber optic may have got some dust on it. when the new parts arrive, ill try test with those.
![]()
anyway hoping this build last me the next 5-10 years. in this amount of time i estimate my data usage to hit somewhere between 40-70% (it wont probly wont go up that much, but im being conservative with my estimate. point is i dont have to worry about running of disk space any time soon) usage space.
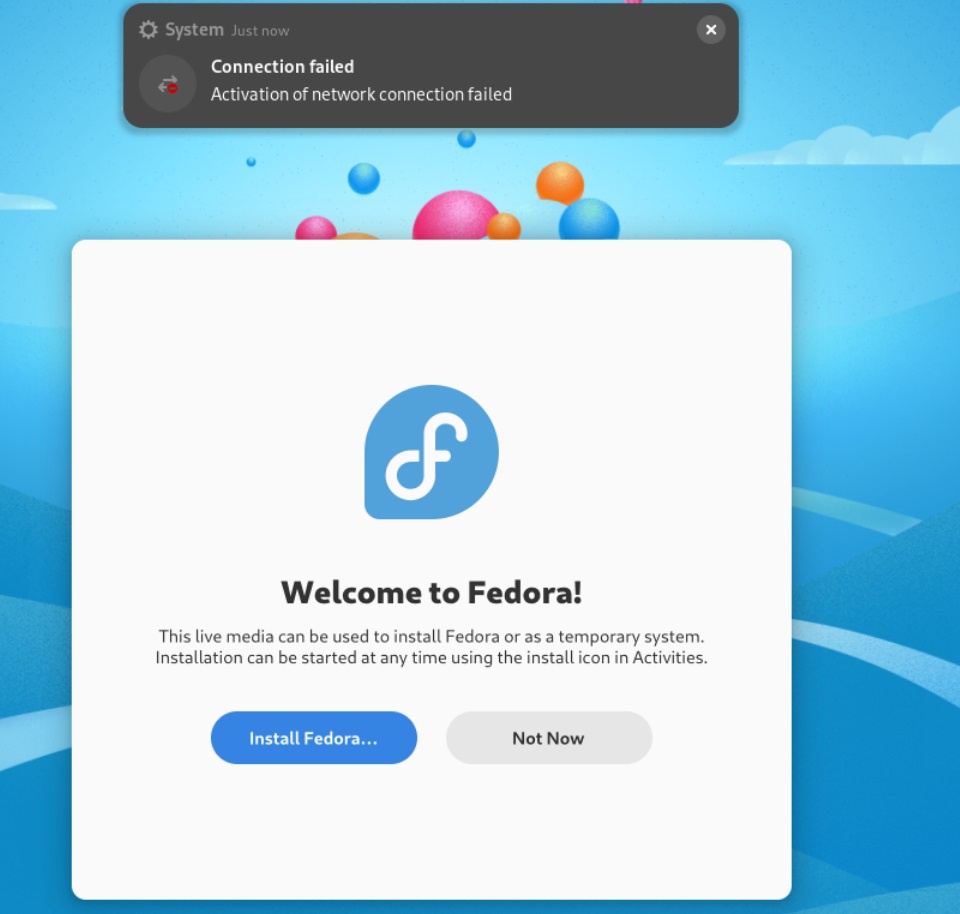
to get more use out of this nas build im setting up vm
If you want to do the same, raidowl’s guide helped. though he was setting up for windows, i was doing it for fedora linux

there are a couple of things you can do with this. like the gpu pass through. connect the cable to monitor. but im not doing that, im instead using the virtual for monitor. im only using this as a test bed to experiment with linux os. so i can prep for changing to it once ive gotten use to it.
with the linux fedora desktop os running, the cpu resource is now being used more
this is why i didnt want to low ball too much on cpu, cauz i wanted to do something like this. in future i may use gpu passthrough to connect to monitor directly and with a proper graphics card. but for now this will suffice.
*update
i’ll explain a few things for using truenas vm for e.g. fedora os
If you are not using the graphics card passthrough (i didnt), then you click on the truenas display button for spice.
The thing is, spice browser is SUPER SUPER… super slow… barely usable. Scrap that. Not usable ![]()
How to fix this?
apparently if you’re using windows desktop like i am, download the virtviewer from the spice website for windows. once installed, there is no clear thing to execute. so browse to C:\Program Files\VirtViewer v11.0-256\bin look for remote-viewer.exe and double click it.
in there add e.g.
spice://192.168.0.5:5900
Replace the ip and port to your own. To find the port, go to truenas vm, devices, display. The port is listed there. As for the IP that depends on your vm network setup. E.g. mine was 0.0.0.0 which basically means localhost which is the nas ip.
Then when you done that, it prompts you for a password. It’s also when you first setup truenas vm it asks you to put a password, use that.
Now you are logged in.
It’s not as good as bare metal (when i say this, im nit picking for a few miliseconds in responsiveness when navigating the ui. which basically isnt much of a big deal unless your fussy)but it was 1000000 (added a couple extra zeros for good measure since that was just how bad it was) times better than spice browser ![]()
hope that helps someone. Anyway someone really needs to make a youtube explaining this. all the youtubes were old which explained vnc (which got removed in favor of spice). And also they skip out the part that spice browser is awful without explaining a solution.
PS: once installed, dont forget to delete the cdrom device. or else everytime when you boot the vm it will bug you to install it anew.
*update
if you need a quick intro to fedora, this helps

The main part is how to add your truenas shares to the fedora workstation desktop
Head to files. in the address bar, type smb://192.168.0.5
replace the ip for your truenas ip
then it will prompt you for
the default domain is SAMBA, leave that as is (assuming you are accessing truenas samba share)
then the credential is whatever user has access to the share. Once done it is connected.
Done
*update
craft covers how truenas fares for vms 2024

it seemed ok for my simple needs, but craft goes in and nitpicks on where it’s weak at, and where it did fine.
i 200% agree the spice browser was bad. but i found a solution to that which made it usable again.
tldr: craft reckons if u need vm, then setup proxmox as host, then run truenas as a vm using it.
for myself, the vm isn’t my primary use case. and what i tried so far, works. so i’m not too bothered about that. (i did not test graphics pass through)
anyway my point is, setup this sort of build for proxmox host, truenas as vm under it. or do what i did (truenas baremetal) if your use case is basic and not really for vms.
Why not use Remote Desktop Connection if you’re on Windows to access the VM? Is Virtviewer actually any better?
tbh i dont know. i just google why spice is bad (craft pointed it out, so it wasnt just me experiencing this), and someone suggested virtviewer, i tried it and it worked fine. i’m not sure if there is anything better.
virt-viewer uses libvirt to connect to domain graphical console.
as virt-viewer --help suggests, it takes a DOMAIN-NAME|ID|UUID as argument.remote-viewer is the same client, but doesn’t use libvirt, but a URI
instead. A spice URI is just like what you imagined, spice://server:port.
https://spice-devel.freedesktop.narkive.com/2bHrbNG4/can-t-connect-with-virt-viewer-on-windows
all i can tell you is, i didn’t feel laggy, so to me it worked fine. when i adjust screen size it auto adjust resolution as well. it detects my mouse and keyboard, and there is a display for monitor.
there is no audio, not sure what to do about that. I got bluetooth headphones was wondering if i could connect to it that way, still researching.
anyway i’m just locally accessing it on homelab, so virtviewer for that purpose.
*new video

before starting to build your homelab, watch this first ![]()
PS: just a correction. i said use virtviewer, but actually the one im using is an accompinent app that came with it called remote viewer, located in the folder where virt viewer was installed.
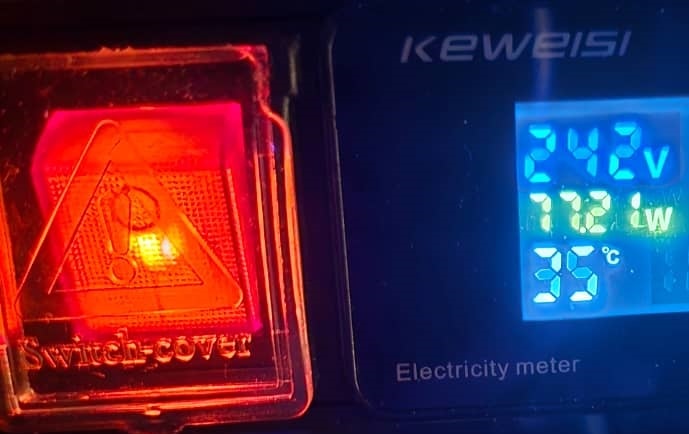
i unplugged everything cept the new nas. this is the nas with 4x 3.5’’ hdds, 3x m.2 nvme ssds, with 22 or so docker containers running, 4 fans in the nas u4 casing.
router, switches, desktop pc not tallied in.
but yeah… this is a far cry from the low power nas builds out there. but the ones i see often quote, 15 watts? surely that is without hard drives installed yet? ![]()
i was aiming for 50w or less, but 77-80w is ok… ![]()
most of my 10g stuff is using sfp+ 10g fiber optic transceivers (passive). So less power for those components at least for 10g ![]()
So what does the build cost for electricity?
$2.55 monthly in electricity assuming it’s 80w per hour and i didnt mess up the calculations (dont think i did since i followed all the steps). For me this is ok
sauce
about 10w per 12tb drive. so lets call it 40w. so the rest of the parts were sipping the other 40w ![]()
compared to other user builds
That’s not really a home lab, is it?
I measure the total consumption of all my machines which is a nice round 200 W at the moment. 1 TN CORE, 1 ESXi with a hybrid TN SCALE, 1 OPNsense, a TuringPi I, switches, DSL modem …
That’s about 45€ per month - if I did not forget to update my energy fee in the monitoring settings, which I need to check tomorrow.
But to repeat myself, a NAS with any real value, private or business, and a bunch of spinning drives, 60 W is in my experience as low as you can get. And pretty good, anyway. Think of standard tower machines two decades ago that served as workplace PCs … we have so much computing power at our disposal today, it’s mind boggling.
since he is tallying other stuff (router, switches, workstations etc), mine is 300w total ![]()
but based on his comment (only for the nas), mine is 20w higher than the typical 60w nas builds ![]() so i don’t think i did too bad for my first diy nas build.
so i don’t think i did too bad for my first diy nas build.
for the truenas vm i got it setup. i posted what i did to get bluetooth to work
so i have total remote local access to truenas vm on the new nas build, meaning i got display on monitor, mouse, keyboard via (remoteviewer spice), and for audio using bluetooth (headphones).
![]()
im new to truenas vm. but ive used qnap virtual station before. with qnap we could create snapshots for the vm to save certain states. i dont seem to see that in the vm options ![]() becauz i wanted to try experiment, then recover back to a snapshot where its in a more pristine state, but i dont see any buttons in truenas vm ui for this. so im assuming there is none?
becauz i wanted to try experiment, then recover back to a snapshot where its in a more pristine state, but i dont see any buttons in truenas vm ui for this. so im assuming there is none?
*update
for the truenas fedora vm
after adding truenas share, and getting audio to work (using bluetooth), then next step was getting anime to video playback.
you have to install the fusion repo
https://rpmfusion.org/
add both the free and non free for your fedora (mine was fedora 41)
to get h265 to work i had to go fedora shell and do this
sudo dnf install --allowerasing ffmpeg ffmpegthumbnailer
after that playback worked. credits to nmariusp youtube channel for explaining this.
i also did this though not sure if needed or not
Hardware codecs with AMD (mesa)
Using the rpmfusion-free section This is needed since Fedora 37 and later… and mainly concern AMD hardware since NVIDIA hardware with nouveau doesn’t work well
sudo dnf swap mesa-va-drivers mesa-va-drivers-freeworld sudo dnf swap mesa-vdpau-drivers mesa-vdpau-drivers-freeworld
so with the new truenas nas build, i got a working linux fedora workstation accessed via local remote, for me to experiment with.
And i got my own desktop pc running windows.
the nas wont have access to my radeon rx 7800 xt graphics card… but something like that could be possible in future. but for now im just testing fedora as my possible desktop replacement for windows. windows is just keeping worse and worse (especially recall being adding back soon)
![]()
so anyway besides the data hoarding, docker containers and now linux os vm, is how im using this build for. my desktop has ample space for games, but if not i may consider using it as a steamdeck as well. my point is, my new nas build has more room for utility in future ![]()
*update
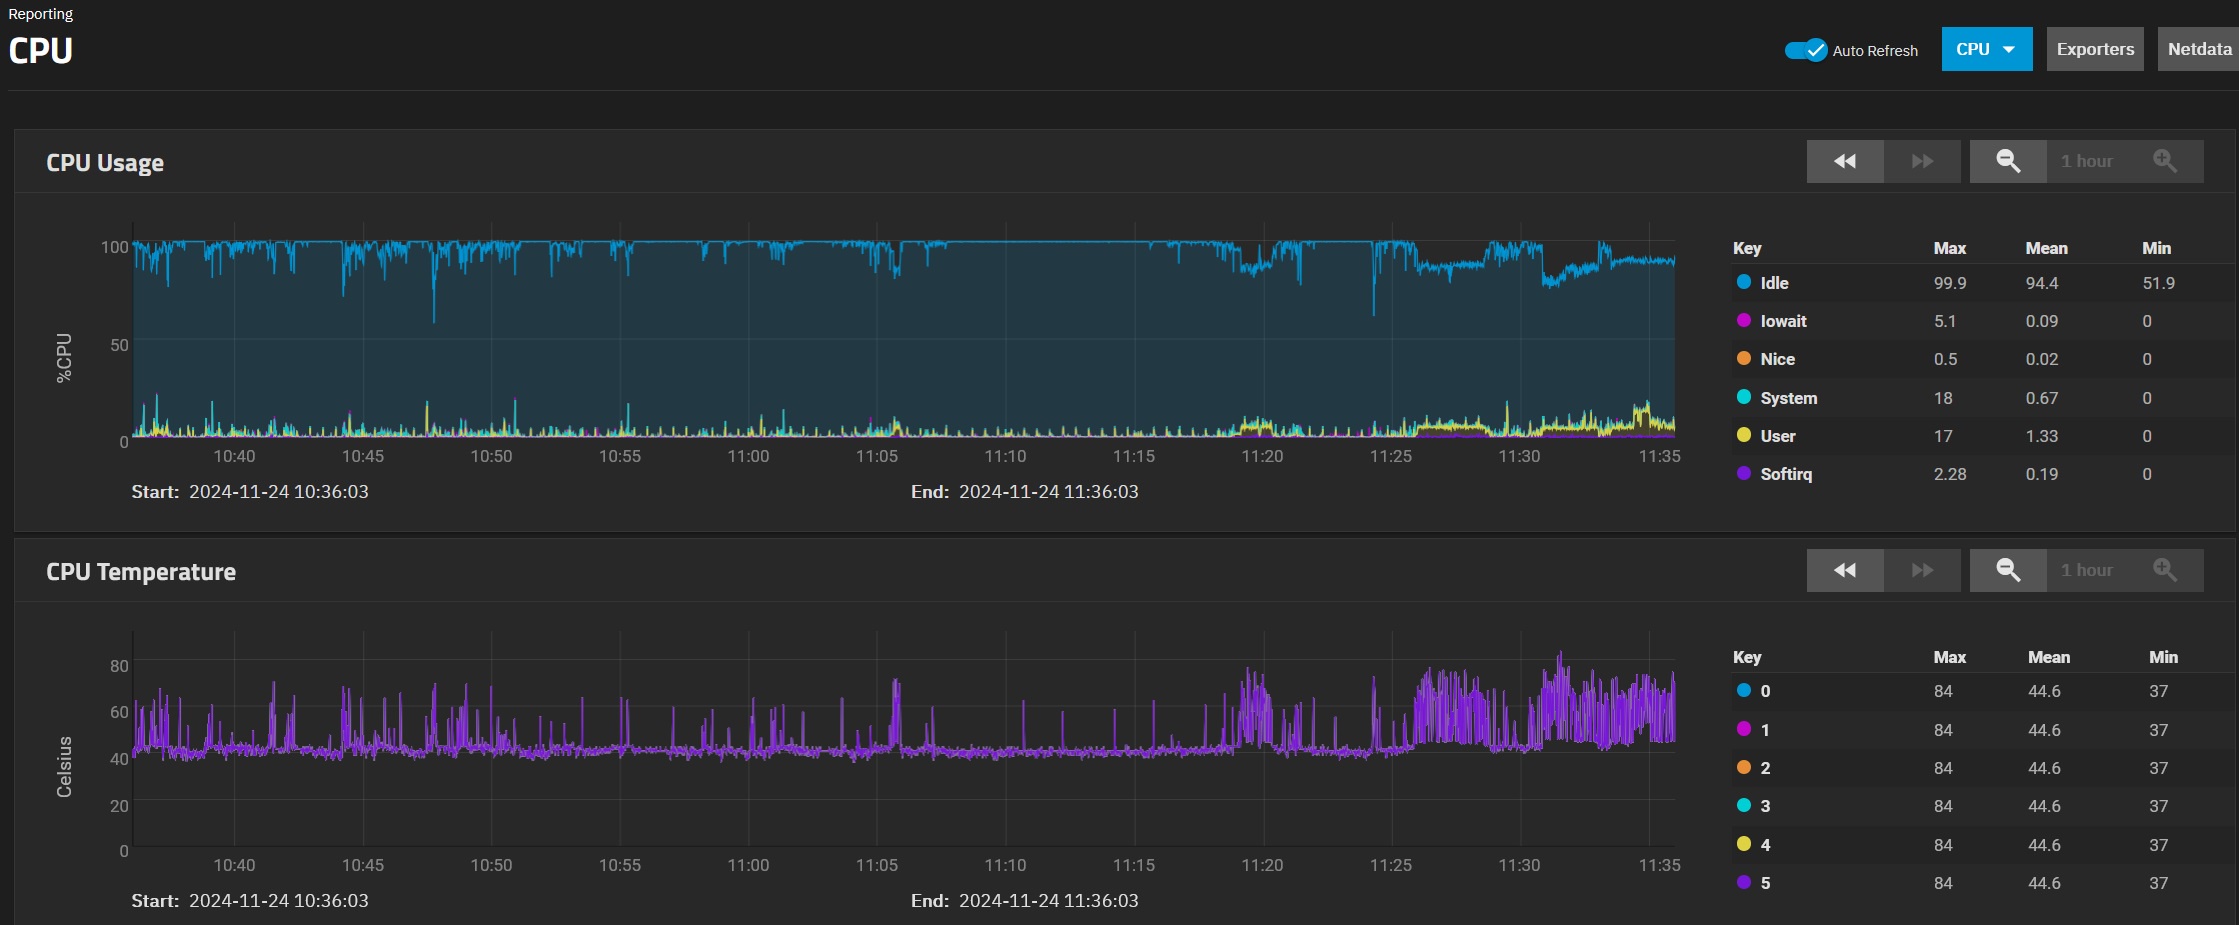
tested running fedora vm (ontop of docker containers)
it shows this
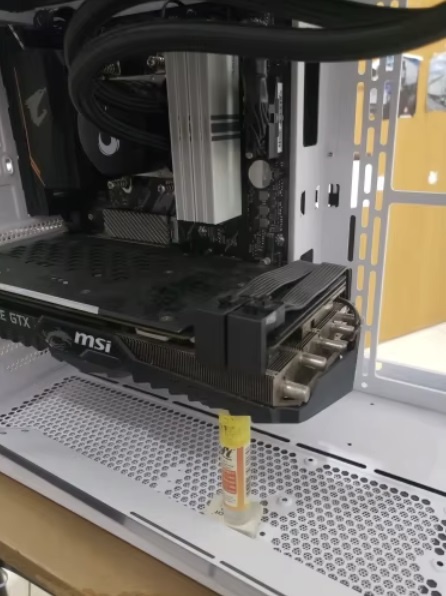
peaked 84c but during vm usage. temps steady roughly around 65-74c
Not really sure what i can do to improve the cooling issue. Undervolt? i’ll have to do more research (it’s possible to add a 2nd fan to cpu cooler if i really need to). But still seems to be within the safe limits. ssd and hdds were fine for temps.
but without vm fedora running, temps are 40-45c sometimes peaks 60-70c. so this will be what the usual temps will be most often.
It’s not overheating, it is intended behavior of the 7000 series.
They will continue to boost voltage and frequency up to 95°C
You can actually get better performance as well as run cooler by following tips in that video.
If you prefer not to touch BIOS then I suggest you ditch the box cooler and buy one that is better.

![]()
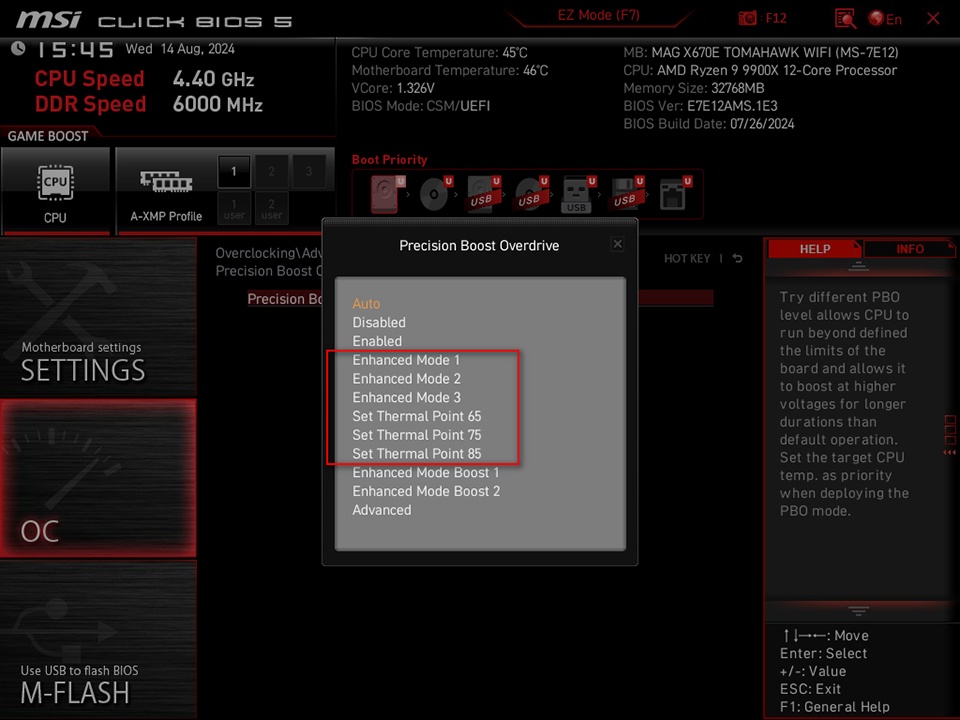
found this more specific to my mobo but i’m not sure about some of the settings. so i’ll check a different source just in case. britec’s video is good, but he is setting for an asus mobo so…

but i’ll be adding a thermal throttle limit of 70c
VMs (without a gpu or igpu passed through) will rely on your cpu to transcode the video output when you connect to then using remote view. This is VERY cpu intensive.
Edit: Undervolting is very time consuming to find something that is 100% stable & actually provides any real temperature benefits; I’d skip entirely as you’re not on intel 13/14th gen & don’t need to manually set voltage curves to undo intel’s failures. This is a server for 24/7, undervolting generally is hard to achieve for that. Check bios if you have wattage limits instead for AMD - I remember something like this for Zen 3 being in the bios.
Otherwise, get more aggressive with the fan curve. Realistically though, your temps are more than fine & you really shouldn’t worry unless you’re stuck in the 90s *c

I was re-examining some of the components i used for my build. for the mobo
Asrock X670E Pro RS could be an alternative (not sure if its a good one)
unlike my Msi B650 Tomahawk Wifi, it has pcie gen5
![]()
https://www.reddit.com/r/HomeServer/comments/yixk37/for_reference_x670e_and_b650_chipsets_use_the/
the only problem though is price. i got my mobo+cpu in a bundle deal. So the Asrock mobo mentioned was rather pricey (but you get what you paid for).
also pcie slot options for it
CPU:
- 1 x PCIe 5.0 x16 Slot (PCIE1), supports x16 mode*
Chipset:- 2 x PCIe 4.0 x1 Slots (PCIE2 and PCIE3)*
Just thought i’d mention for others if you are looking for something similar.
So far i dont have much of an issue with the msi b650 tomahawk wifi. It can support 6 sata ports, can install m.2 nvme gen4 ssds, supports wifi/bluetooth (got bluetooth working for my fedora vm and through this i got audio using my headphones).
Maybe i will change my mind later if i reach a point i want to install a graphics card for pcie passthrough to connect it directly to a monitor. Maybe i will regret getting a mobo that is pcie 4.0 then for the x16 slot. But for now there is no issue for my current setup
if u r planning to install graphics card (the big one) into rack nas case, then spx is the right channel to watch for this stuff

for myself i think the graphics card (rx7800xt nitro + )might fit. yes based on this i will need to remove the front cage.
https://www.silverstonetek.com/en/product/info/server-nas/RM41-H08/
Expansion card
Length w/ 5.25” drive cage: 278mm
Length w/o 5.25” drive cage: 426mmLimitation of CPU cooler
Height w/ expansion card retainer: 130mm
Height w/o expansion card retainer: 148mm
3 slot, ATX
Dimension: **320(L)**X 134.85(W)X **61.57 (H)**mm
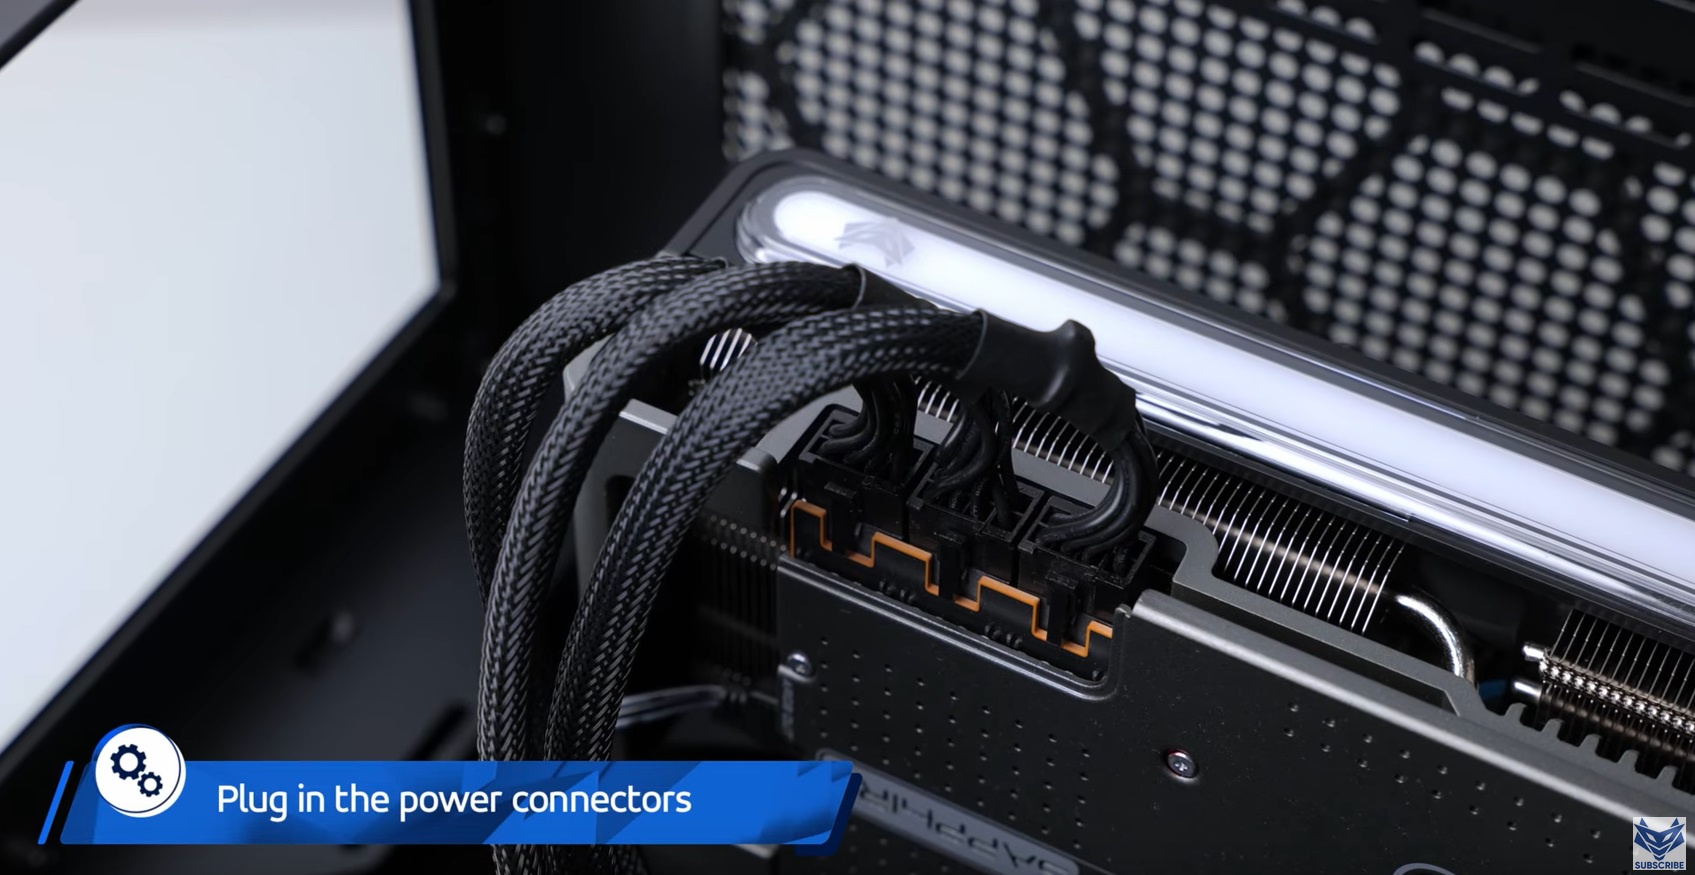
my main concern is whether the power connector will fit at an angle ![]()
im not sure but maybe something like this would solve that
1-3PC ATX 8PIN 6pin PCI-E 8pin Male to Female 90/180 Degree Angled >Connector for PC Desktops Graphics Card Power Port socket
Product sellpoints
Portability:Lightweight at 50g, this adapter is compact and easy to carry for on-the-go use.

Stability & Safety:Equipped with a four-layer circuit board and thick copper foil for stable operation and safety.

Compatibility:Designed for versatility, supports ATX 8Pin and 6Pin connections for a wide range of graphics cards.

Graphics Card Cable|Batch Atx|Material Quality:Crafted with a durable ABS plastic shell and all copper tin plating for superior conductivity.

Design & Ease of Use:Features a 180-degree angled design for easy installation and a secure ABS back shell.
this is how that would look like