Looking for some guidance here please. I have a TrueNAS system built on an old office PC. This was running fine for a few months using the original 2TB drives. I recently got hold to two Toshiba MG07ACA14TE (new old stock I think).
The new drives tested fine in a PC, running their short and long self tests. I didn’t want to tie up the PC for days runing badblocks, so decided to rely just on this.
I only have the two motherboard SATA ports. So I replaced the old drives with new ones one at a time in the NAS, allowing them to resilver in between. This worked though I still do not see the extra capacity despite clicking Expand a few times (but that is a separate question).
Now a few days later I see my VDEV is degraded, with one of the drives “DEGRADED” with 50000+ UltraDMA CRC errors. In understand this can be due to a bad SATA cable, motherboard issue, PSU problem, etc. But the old drives ran fine…
Anyway, my plan to diagnose is:
- I have backups.
- “Offline” this drive in TrueNAS.
- Power down and replace the SATA cable with a new one that I have.
- Go to the debian shell in TrueNAS, and run badblocks on the suspect drive.
- Bring the drive back online (or Replace?) in the VDEV and let it resilver again.
Does this plan make sense? How should I monitor - just by watching the UltraDMA count and see it it increases? I understand it will never be reset, even though it could be caused by cables or other issues outside the drive.
I have 30 days
I am guessing you are TrueNAS Scale. Did you check the results of SMART Long tests on the drives and check for any issues?
You can start by running the following and posting the results back using (</>) Preformatted Text mode. This will give the current status of your pools
sudo zpool status -v
Thanks for the quick response! yes, I checked the SMART results after the long tests and they looked OK.
Here is the output of “zpool status -v”.
  pool: Pool1
 state: DEGRADED
status: One or more devices has experienced an unrecoverable error.  An
        attempt was made to correct the error.  Applications are unaffected.
action: Determine if the device needs to be replaced, and clear the errors
        using 'zpool clear' or replace the device with 'zpool replace'.
   see: https://openzfs.github.io/openzfs-docs/msg/ZFS-8000-9P
  scan: scrub repaired 8.20G in 10:11:26 with 0 errors on Tue May 19 10:11:30 2026
config:

        NAME                                      STATE     READ WRITE CKSUM
        Pool1                                     DEGRADED     0     0     0
          mirror-0                                DEGRADED     0     0     0
            c22e85dd-bd20-4651-ad92-478b88c203dd  DEGRADED     0     0     0  too many errors
            ddd44f77-6b63-4fd3-8f54-04a37a8fe1c7  ONLINE       0     0     0

errors: No known data errors

  pool: boot-pool
 state: ONLINE
  scan: scrub repaired 0B in 00:02:53 with 0 errors on Sat May 16 03:47:56 2026
config:

        NAME        STATE     READ WRITE CKSUM
        boot-pool   ONLINE       0     0     0
          sdc3      ONLINE       0     0     0

errors: No known data errors
EDIT: Yes, TrueNAS Scale 25.10.3.1.
The SATA data or power cable could be an issue. You can try powering off and reseating the cables. If your pool hasn’t expanded and still reports the smaller size of the original disks, you could add one or both back as additional mirrors, making it a three or four way mirror. This would give you additional redundancy while you sort out if it is a bad cable or drive. Members can be added and removed from a mirror VDEV so you can make it a four wide mirror VDEV and then put it back to a two way in the future.
Unfortunately I only have the 2 SATA ports on the motherboard so I am limited to 2 SATA drives. Otherwise I would have built the new pool alongside the old one instead of replacing the drives one by one and resilvering.
This is also why I plan to take the suspicious drive offline from the pool and test it. This NAS has no new data being added to it at the moment, and I have a backup, so this should be low risk.
I am wondering if I should just start my pool from scratch with the new drives rather than resilvering and trying to expand it. I was hoping to avoid that so I don’t have to set up my apps again, though I am sure there is a way to back them up as well.
Thanks again.
You understand correctly. It could be as simple as unplugging and plugging the SATA cable back in. Even Locking SATA cables can be problematic but I still prefer to purchase this type of SATA cable.
The UDMA CRC ERRORS will never reduce the count, it will always be retained by the drive, so just watch the SMART data count and if it continues to increase then the problem has not been fixed. You don’t need to wait until the drive generates errors again.
In my signature in a link to Hard Drive Troubleshooting Flow Charts. It will guide you on the proper path to resolve this problem.
Thanks joeschmuck for confirming. I have switched to a different SATA cable, locking this time, and will run a scrub tonight. I’ll check if the count increases from the current value of 56800.
With recent usage, the NAS has had very little user data written to it. Resilvering and scrubbing would have been when the CRC errors occurred.
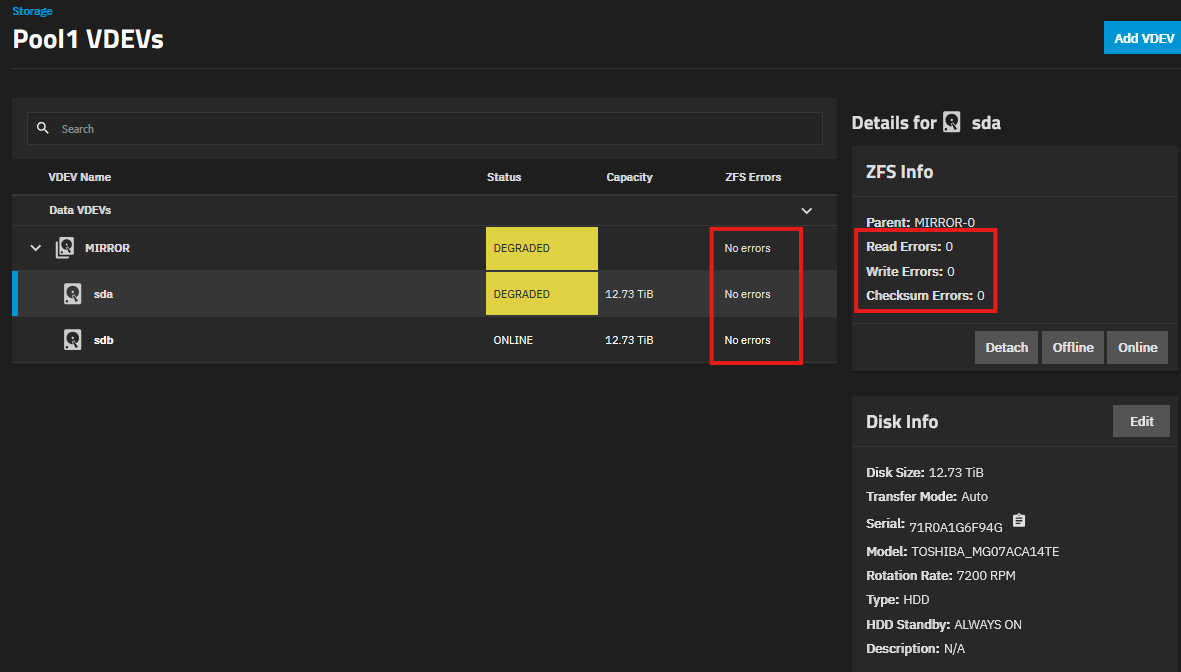
Can you explain the reporting I am looking at? If I go to Storage → View VDEVs, expand the mirror, I see “No errors” though the drive is still degraded. Previously I did see errors. Does this screen just show recent errors, or since the last scrub or something like that?
Scrutiny tells me the degraded drive has PASSED status despite the UltraDMA CRC errors.
Scrutiny also refers to this drive as sdb rather than sda - that has become switched somehow.
I am typing from my phone so excuse any typos.
You have two problems, the UDMA CRC errors and a ZFS error.
- You have replaced the SATA cable so hopefully that corrects the first problem.
- The errors reported by ZFS need to be manually cleared. They will not go away on thier own. Read the flow chart to clear the ZFS errors and all your pool errors shouls be cleared well before you run a scrub.
So read the ZFS flow chart to address those errors.
You would only need to restore your data if the zpool status -v reports errors in a file.
Good luck
1 Like
To follow up on the GUI screen capture… while it does not indicate specifically a ZFS error, you more than likely do have ZFS errors. I don’t always trust the GUI. It was good that you posted your question, it will save you a lot of time chasing a problem.
Thanks Joe. This is very helpful and I find what you write clear and logical.
I figured that a scrub might not find issues if nothing had been written since things were corrected at the last scrub, so I first wrote a few hundred GB of data to the NAS to try to provoke CRC errors.
I had already started a scrub when you posted, so I stopped it and cleared ZFS errors using “zpool clear” as per your flowchart. This removed the DEGRADED indication for the VDEV and drive in my screenshot.
Is there a GUI way of clearing ZFS errors? Othersise non-shell users would have drives staying degraded forever.
I checked SMART using “smartctl -a /dev/sda” and saw that the UltraDMA CRC errors had increased to 56939, from 56800. However Scrutiny was still saying 56800. Restarting Scrutiny brings it into agreement with smartctl, 56929. The NAS had been restarted when I changed the SATA cable so the 56800 was probably accurate before the scrub, meaning the count has increased.
Anyway, I have written more data and will scrub again. It’s late so I’ll check in the morning.
Since your flowchart has generously suggested that people ask if they have questions:
Should a Toshiba “enterprise” drive spin down after being inactive for a while? I would have thought not. This drive has a power cycle count of only 7 but a start/stop count of 43. The 43 shows as “Warn” in Scrutiny. The other Toshiba has a power cycle count of 5 and start/stop count of 10. I did test the 2 drives separately so I don’t expect the counts to be the same.
For the GUI question about clearing ZFS errors… nope, not that I am aware of. It is a manual operation.
As for if the toshiba drive should spindown, that depends on the drive firmware and the TrueNAS GUI settings.
When i return home i can go into more detail.
The scrub completed with no further increase in UltraDMA CRC errors. Maybe the SATA cable was the cause? I have actually replaced cables to both drives now.
I will do some further testing and monitor for errors.
Thanks again Joe, I appreciate the help.
1 Like
Odds are the SATA cables, it is rare when I see it be the motherboard or drive itself.
Glad to have helped.
As an update: I ran badblocks on this drive and have the results - 6 days later!
sudo badblocks -b 4096 -w -o bb_out -s -v /dev/sda
No errors were found by badblocks, and no additional SMART errors either. So I will conclude the problem has been fixed by switching the cable and will trust the drive.
2 Likes
Glad you are happy that the drive appears to be operating normally.
You didn’t need to run badblocks, if the problem wasn’t corrected, the count would continue to increase. But there is nothing wrong in running badblocks either, especially if it gives you peace of mind.