Mooglestiltzkin's Build Log: Truenas build recommendation am5 2024?

Optimised for airflow or static pressure. Noctua has a nice page about that and their different 120 mm fans (F12 pressure, S12 flow… and A12 being the better middleground):
https://noctua.at/en/nf-a12x25-performance-comparison-to-nf-f12-and-nf-s12a
For the drive cage, a P8 might be better than a F8. But we hardly ever see these “P/Q” curves in fan spec sheets, only the end points (max. airflow with no resistance, and max. static pressure with no airflow), and don’t know about the impedance curve of our chassis, so it’s a shot in the dark.

For the sake of simplicity get a pack of 5 Arctic F8 to use everywhere and call it a day if the drives are cool enough.
If you feel like experimenting (and repeatedly dismantling and remounting), get a P8 for the drive cage and see if it improves drive cooling over the F8 (and the stock fan).

1 Like


should be up by next week hopefully… cooler expected to arrive in few days.

will add fan and 1 sata data cable at a later date.

It’s about the journey, not the destination… :grinning:

1 Like

saw some alternative rack nas cases if anyone interested

Rosewill

And Sliger

and on aliexpress i saw innovision. There a lot more there.

But looking at the options, Sliger seems to be the best because its well built, can fit full size graphics card using riser, and has multiple rail length options which is nice. They even have optional noctua fan installs if you want. That said it’s pricey.

But so was that silverstone i ordered… :sob: But i would have gone for the Sliger if i were being honest. Problem though it’s free shipping for US, which is problematic for me, cauz shipping wont be cheap for elsewhere :sweat:

for aliexpress cases i would consider (video below is a good example), though probably not motherboard. when wendel tested those, he spotted some quality issues :grimacing:

Also this video showed some wiring tips using molex connectors.

I’d not buy sliger now. They are planning new NAS cases in February/March. Hopefully.

1 Like

someone shared this

meets a lot of tick boxes, also it has actual hard drive trays. the silverstone i got has no trays, you simply slide the drive in (not sure if that worse or not).

This case even came with dust filters. also the dept isn’t too long so may fit in some rack cases easier.

Found it on aliexpress but the price when include shipping is about same as what i paid about $250

It is also sold on Alibaba by the manufacturer for better price and shipping.

There is also a 9 bay version of it.

I tried to get it myself but paypal rejects my payment :angry:

1 Like

It saves you from plunging for a pseudo-rack for non-rack users…
A bit above 6U in height (!), but very short: It looks like it might get cramped inside with a full-ATX motherboard (while real rackmount chassis have no issue taking EEB).
Basic backplanes without expander, so 12 ports needed. And I suspect that 92 mm fans will have a hard time sucking enough air from behind these backplane strips.

Tool-less beats screws any time. Sturdy tool-less trays are good—but these come with expensive chassis. Flimsy, plasticky, trays are bad. Screwing drives to trays is a pain, only alleviated by knowing you won’t do that every day—which then begs the question why you thought you needed trays in the first place…

1 Like

6u+ ? way too tall :grimacing: that’s a no go for me.

even the 4u i felt was a bit much (my original plan was a 2u). but for my rack it fits.

i’m no expert, u tell me. any difference tray or no tray? I’m assuming without hdd tray it may rattle? that’s my guess/worry.

guess ill have to google see if its an issue or not :thinking:

this is my first time just inserting drives as is, without a tray to click or screw into a hdd tray :face_with_raised_eyebrow:

*double checked manual, no trays mentioned.

https://www.reddit.com/r/pcmasterrace/comments/z0meui/my_case_doesnt_have_a_tray_for_my_hard_drive/

oof :sweat:

It’s not about trays, it’s about the build quality of the mounting solution.
Bad trays may still rattle (Silverstone DS-380 and your plastic trays I’m looking at YOU!)
Trays may badly obstruct cooling (Silverstone DS-380…)
Backplanes obstruct cooling if they are perpendicular to airflow—as is generally the case (S…).

Lian-Li PC-Q26 puts the drives on thubscrew mounts (still screws, but faster to place than the regular variety which requires a screwdriver). Then the drives slides into rails, lock into the backplane and a bar with a single thumbscrews locks everything in place. No rattle. Easy. Great mechanical design. (@Constantin had pictures.)
The drives are held in the open, just behind a wall of quiet and effective 120 mm fans. The back plane is parallel to airflow: No obstruction. Great cooling design.
No bays (take the side out, and then slide the drives), no hot-swap (no capacitors on the backplane, so the electrical quality could be better) but very convenient.
Great small storage case… except it’s out of production and out of stock since about a decade.

It’s all about good thinking and good execution. Trays or not.
But in my experience if you want a quiet NAS for the home rather than what goes in (and requires) a dedicaded server room, trays are mostly an annoyance because of their impact on cooling.

3 Likes

well good news. the cpu cooler and the case fan arriving either today or tomorrow :innocent: can power up soon hehe.

i’m mostly worried whether mobo will boot up or not (cauz i tried to do the bios flashback method without knowing if it succeeded or not)… :grimacing:

or whether i inserted wrong cables (i dont think i did. tripled checked everything. used the manual, youtube, google)

We are almost a third of the way to 1000 posts. Mooglestiltzkin, you better finish up quick :grinning:

3 Likes

:saluting_face:

The Q26 is the best small NAS case ever made. It’s too bad one can almost never find it anywhere anymore.

2 Likes

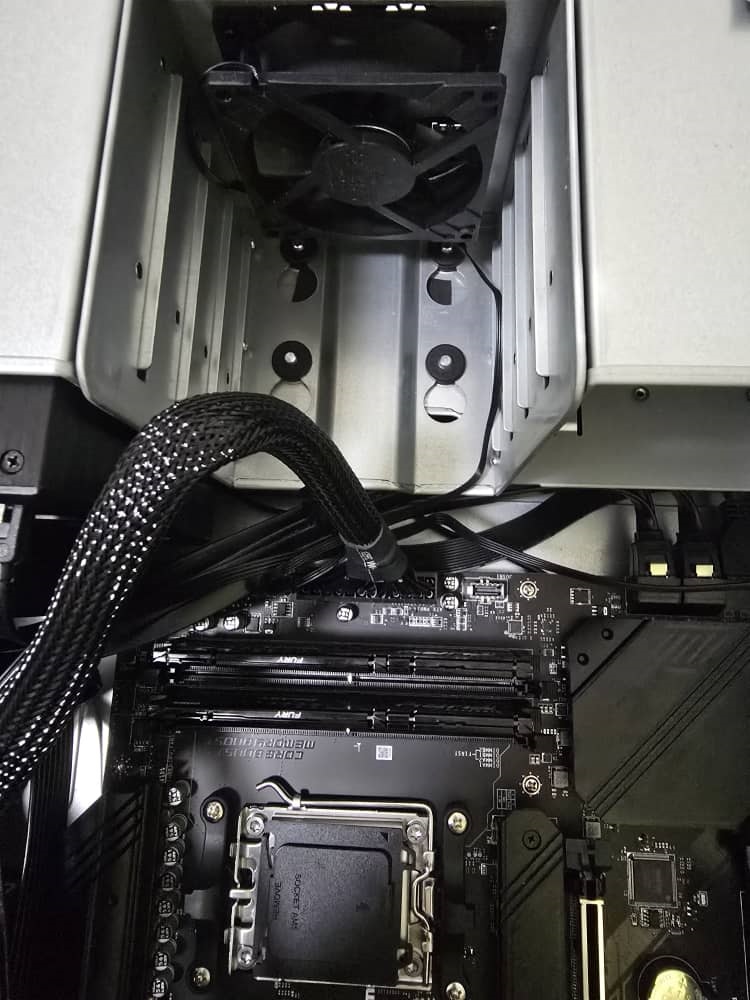
just installed the arctic fan. i had to remove the middle cage to install the fan on it, but thkfully i could do so without removing the motherboard (or that would have been hell :sweat: )

i watch this to get an idea for direction

but when i saw the case’s 2 exhaust fans, it seemed to me like its done in reverse. if i were to use the youtube guide, it would seem to me the rear fans were installed blowing air from outside to inside the case from rear, which would be incorrect.

i’ll check the airflow once i boot up. i’ll use a cheat sheet (use a thin strip of paper, and see which side blows). but i suspect they may have preinstalled fans in the wrong directions :face_with_raised_eyebrow:

anyway the fan came with the 4 screws. the case also had some fan screws, but i went with the screws that came with fan and that worked fine, no issues.

i’ll skip the fan grill. would be nice, but didnt seem crucial especially when the fan is inside so you have no risk of touching fan blades to begin with.

the right side cage has no drives populated in it, but does have a dust filter. the m2 heatsink is on this side, and doesn’t quite have a fan blowing directly at it… (ill check temps later)

anyway i think front and rear have enough fans and ventilations for now :blush:


see there is the mobo power wire sticking out. i dont dare bend that than it already is :grimacing:

looped excess wiring around the fan, then laid it like that. there is one unplugged socket for the fan, i think its some sort of female socket for extender. i just left that unplugged. only plugged in the 4 pin header for pwm (i checked the manual)

also checked that there is the cpu fan header and 1 more pwm fan header (2 total) for the cpu cooler. the one im using only uses 1 fan (though u can add another fan if u want to), so that is sufficient.

well they do sell a tray version of it
https://www.silverstonetek.com/en/product/info/storage/FS305-E/

just an extra expense :sweat:

ill make do with what i got :sweat_smile:

installing cpu cooler today or tomorrow not sure.

was reviewing the install process

Here though they explain what the offset bracket is for

by that logic i should be using the offset bracket since i’m installing an AM5 ryzen 7600 which would benefit somewhat.

Though not sure why in the first video they didn’t do that :face_with_raised_eyebrow:

also doesnt look like i have to do anything for the motherboard backplate, so i am assuming it uses stock back plate (some people told me some cooler for am5 would still require switching out the backplate, so some confusion on that).

some additional research
https://www.reddit.com/r/Noctua/comments/1aqdgsn/be_careful_with_the_noctua_am5_offset_bracket/

https://www.reddit.com/r/Noctua/comments/1ahcte1/do_i_need_an_offset_kit/

https://www.reddit.com/r/sffpc/comments/1fbisd9/please_install_your_noctua_coolers_on_am5/

*update

ok got an alert seems its shipped today :blush:

Am5 has a 7mm offset kit that you can buy separately (I’m thinking it’s like 5-12 usd to buy on amazon) for the noctua NH-D15 and the NH-U12 coolers. I bought both because I initially wanted to use a D15, but it felt too cramped and so I moved down to the U12A for more room between components so air could flow.

Edit: the 7mm offset is supposed to move the cooler more centered over the Hotspot on AM5 chips, but it is not necessary to mount the cooler. Just a bit to add on, if you want to take the extra precaution with your cooling. The Included (non-offset) AM4 brackets that come in the box with cooler will absolutely work and be okay to use. The offset kit is an option, but not needed if you don’t want to wait for a separate part to ship before building your system!

huh… the offset is an optional? they don’t give you that by default? … dang, guess i’ll just use whatever came in the box (and that explains about the first video) :sweat:

NOCTUA NH-D12L CPU air cooler dual tower

Product Description

  1. Socket compatibility: LGA1851/700/1200/115x/2066/2011/AM4/AM5

  2. Max rotational speed: 2000RPM

  3. Max rotational speed with L.N.A.: 1700RPM

  4. Min rotational speed (PWM): 450RPM

  5. Max air flow: 102.1m³/h

  6. Max air flow with L.N.A.: 84.5m³/h

  7. Max noise intensity: 22.6dBA

  8. Max noise intensity with L.N.A.: 18.8dBA

  9. Supply power voltage: 12V PWM

  10. Current: 0.14A

  11. Rated power: 1.68W

  12. Power supply interface: 4-pin PWM

  13. Cooling tube material: Aluminium heat sink fins and copper base and 5pcs heat pipes

  14. Fan dimensions: 120mm x 120mm x 25mm (mounting hole spacing 93mm x 83 mm)

  15. Dimensions: 125mmx113mmxH145mm

  16. MTTF: 150,000hours

  17. SSO2 bearing

18. Package list: 1 x Cooler, 1 x Fan, 1 x Low Noise Adaptor (L.N.A.), 1 x Thermal paste, 1 x Black SecuFirm2™ Mounting Kit, 1 set x Noctua Metal Case-Badge

:thinking:

doesn’t mention offset (there is a separate video for that) :cry:, so guess this is the one i’ll be using for the install

tldr

double checking, i probably got the wrong fan

The correct one should have CO e.g.

F8 PWM PST CO
https://www.arctic.de/en/F8-PWM-PST-CO/ACFAN00206A

This is designed for 24/7 usage. perfect for a nas.

Extended Life Span with Dual Ball Bearing

well it’s too late. I’ll try make do with the current fan :smiling_face_with_tear:

https://www.reddit.com/r/buildapc/comments/15kpqv1/dual_ball_bearing_or_fluid_dynamic_bearing/

Curiously, Arctic’s isn’t advertising the MTTF (mean time to failure, or how long 90% of a product from any given sample will be fully functional).

Noctua isn’t actually valuable because of their warranty in this case (although it is undeniably fantastic), they along with phanteks and some other high end contenders offer fans with a 150,000 hour MTTF, meaning 17 YEARS of uninterrupted use. The warranty is just so that you get a new one if you accidentally break it, the actual expected lifespan is in the multiple decades.

I expect the realistic lifespan of arctic fans is more in line with the TT toughfan (40k hours, 4.5 years) and they thought that most users wouldn’t be pushing their fans 24/7, easily stretching that 4.5 years of use into 10+, but enough power users did so, and they went down to a more conservative/accurate 6 year warranty so that even users who maxed out the fans from day 1 would start killing their stuff just outside of the warranty period, instead of during the last few years of it.

https://www.reddit.com/r/hardware/comments/14kiogq/has_anyone_noticed_that_arctic_silently/

so seems the fan i got should be fine, but for maintenance have to reoil later. this is how

tbh… if fan dies, i rather just use this as a learning experience and get the correct one the next time. doing mcgyver surgery on parts isn’t my thing :sweat:

i only ordered 1 fan so not that big a deal.

For for preliminary research, the F8 got phased out. P8 might have been the successor. Also if you use their site filter the only one with dual bearing was 3 options, the P8 PWM PST CO being one of them

ARCTIC | Cooling, Mounts, Equipment | The Cooler Way | Cooler than ever)

says it can cope with high pressure for dust filter/radiators, don’t think its a problem using these simply for case airflow is there?

@mooglestiltzkin I’ve been passively interested in your build for the past several weeks. Help me help you :crazy_face: I would appreciate a miletone post with what you’ve actually done already and what you’re working on now.

It’s getting a little hard to follow which will make it harder to help. I got a chance to jump in earlier about NVME but I’m getting lost trying to keep pace.

2 Likes

well im almost done. dont worry about it. at this point i can handle the rest.

thought i’d comment on some of the mistakes i spotted for others trying to do their own diy (mostly for the people my tech level or lower. so if u already know, then this wont be of benefit to you :smiling_face_with_tear: )

ill recap for u the progress

  1. parts to order - done (most of my issue was here. not knowing exactly what to get cpu+mobo+other parts)
  2. all parts to arrive - all done cept cpu cooler. should arrive today
  3. when can nas be completed - by today
  4. self reflect build - ongoing (just checking what i did wrong and could have done better. mostly for myself, and maybe others would learn from this as well hence the commentary)
  5. main hardware install step to complete build - install cpu cooler. replace the bracket (never done this before), install cpu, thermal paste and cpu cooler (done this 3 before, shouldnt be a problem).
  6. install into rack - will have to remove old nas to make space
  7. software install step - install truenas. will do fresh build, will first try and copy docker container to set that up first before doing the rest.
  8. non critical parts can do whenever - 1x sata data cable.
1 Like