Mooglestiltzkin's Build Log: Truenas build recommendation am5 2024?

u were right about the noise

yeah… thats WAY too noisy. none of my stuff is nearly as that bad. no wonder his gf was pissed :rofl:

will see how the new nas fares. it uses 3 stock fans. may add another 80mm though not sure which to get. Noctua is pricey but i don’t see any good ones i’d user over that as a 2nd pick. To get an idea how pricey noctua is, there are fans half the price of it when i checked :sweat_smile:

maybe like this? price is good


https://www.reddit.com/r/sffpc/comments/1awab5v/id_cooling_8010_fans_leaked/

that poor rack server case does not even have a proper rack mount case to sit in :cry:

but to be fair u need a place to put the rack. so i guess depends on ur circumstance :sweat_smile:

sfp+ 10g pcie card arrived. installed it


it didnt quite go right in, and i was wondering why. then i recalled the heatsink right beside it was the issue. it did finally install, seemed properly seated, but as u can see it’s a narrow fit against the m2 heatsink. it might be leaning right against it, but im not fully sure :face_with_raised_eyebrow:

also that is what it looks like at the back. lots of i/o. front case has usb 3.0 (outdated), but the back has access to most of the new standards so, should be alright?

one use case would be to hook up the jetkvm into the usb type c and hdmi behind for the remote local access to bios, also an easy way to install truenas (though you can still plug in a usb drive to install truenas while still having access to monitor + keyboard + mouse, local remote)

the psu can be set into a smart fan use, where fan doesnt turn on until needed. i guess that is one way to save on power and be more efficient. i like that.

can install wifi antenna there, though i’m not sure there is any point to that. besides i got an EAP-773 wifi7 6ghz 320mhz ap on the same network, if i need wireless i’d use that :sweat_smile:

left the pcie 4 x16 for graphics card alone. probably do nothing with it, or leave it for a future project if later i need to add something :thinking:

there is a x1 pcie slot there, doubt i will ever use that. if i did, it would be impacted due to populating all 3x m.2 nvme ssd gen4 slots. One of them impacts that particular pcie slot for bandwidth according to the manual. Can’t imagine what i’d be using that for anyway.

PS: it took 8 days to arrive since i ordered from aliexpress. Ok i guess, since it shipped from China. Shipping price was reasonable. Normally i order local stock, which can arrive much faster. But 10gtek shutdown their local ecommerce platform presence, so what to do :cry:

1 Like

watching video to familiarize with msi bios :face_with_monocle:

reddit says this mobo has a slow boot up. have to do the following to solve that

Today I solved the slow booting of windows 11 on the motherboard MSI Mag B650 Tomahawk Wi Fi.

My rig: Motherboard: MSI Mag B650 Tomahawk Wi Fi
Processor: AMD ryzen 7 7800x 3D
DDR 5: G. Skill Flare X5 6000 Cl32-38-38-96 1.35V
GPU: Sapphire nitro+ amd radeon rx 7800 xt gaming oc

Downloaded and installed the latest version of the bios from the MSI site (version 7D75v1A). When I bought the motherboard, version of BIOS 7D75v17 was installed on it.

It’s a relatively new version of the bios, but I still installed the latest version of a few days ago. Set Up AMD Expo 1, DDR RAM go on 6000 MHz (without that go on 4800 MHz native).

On BIOS (overclock settings) I put Memory Context restore from auto to enable. Everything else is original bios settings.

Before that, boot to windows 11 lock screen it take 1 minute and 20 sec, with these settings 20 sec. (5 times faster).

At the end, everything works perfectly, no crashes, no blue screen. I tested more than 5 times booting, working on PC, gaming, even stress test CPU and everything went without a problem.

Best regards.

sauce
https://forum-en.msi.com/index.php?threads/msi-mag-b650-tomahawk-wifi-slow-boot-solved.390768/

Asrock had the fastest boot up time. Gigabyte and Asus came 2nd. Msi was last :cry:

The other thing to do is disable PBO. I’m doing that merely for power saving purposes. You don’t have to :sweat_smile:

not really sure what to see for fan. Maybe smart? and just test if that works, if not then manually set it and adjust the fan curves? some advise would be appreciated on this.

PS: this is the next step to do. Install cpu cooler, and install truenas using usb stick. At that point i can insert the 4x hdds to setup the truenas pool (pending testing hdds block burn :sweat: )

some interesting ideas for this build

he swapped out fans, and also added sound dampening foam. big difference. i’ll have to wait and see what it’s like powered up before i opt for something like that.

but just adding foam to the inner side and top cover, that is doable :face_with_monocle:

Arctic F8. In 80 mm size, these are actually better than Noctua.
A 10 mm thin fans won’t get you anywhere, unless you really have to get some airflow in a space that is too tight for regular fans.

TrueNAS doesn’t support WiFi. No drivers!

4*M.2 on adapter cards. CPU lanes not shared with anything.

Perfect for a boot device.

Whoever did this benchmarking has certainly never used a Kontron motherboard. :rofl:
Anyway, boot time is essentially irrelevant for a server that is on (idling) 24/7 and hardly ever reboots.

Start simple, keep an eye on temps while using the NAS and see whether a more aggressive or sophisticated approach may be of use.

I suppose that foam cannot hurt, but Noctua fans inside a rackmount are a Very Bad Idea: Quiet fans do not provide enough airflow and pressure. The drives will just cook in their own heat.

1 Like

my 4u case spec says 80x80x25

ill look into the fan you recommended ty. i’m leaning toward getting it. feels like that itsy bitsy fan for the cage fan might not be enough :thinking:

oof

assuming i plan to add more m2s. right now im fine with just 3, but yeah maybe in future i could do that, assuming i need it (probly for vm and stuff)

boot drive already using the m.2 nvme gen4 slot. with a nice heatsink on it… 250gb … overkill :rofl:

good point.

right now for my qnap, im forced to set to max, cauz smart doesnt seem to work well. this was another reason why i wanted to switch nas xd. that said despite max, the sound was fine…

not sure how smart will work, but i know how temp ramps work. if it reaches a certain temp, the fan goes to the rpm u specified. i may just go with this. watched the youtube there is a tool in bios for the fan curves. As long as u install the fan wires to the specific fan connectors on mobo, it allows to adjust the fans using that.

:grimacing:

*double checked my case spec says this

*update

the one u recommended couldnt find, but i saw this listed

ARCTIC F8 PWM PST 80MM CASING FAN (BLACK) - ACFAN00150A

Size & Weight

Lenght : 80 mm

Width : 80 mm

Height : 25 mm

Weight : 81 g

My bad for the number…

Consider moving that elsewhere and/or use a smaller heatsink if it interferes with the NIC.

1 Like

the block burn completed for 1 drive.

as soon as it finished i see it started on the other drive. noticed other drive was hitting 250MB/s + writes

so anyway the result was zero errors for the first drive. Guess i need to do a long test? though i already ran one before?

but anyway took almost a week to fully test 1 x 12tb drive :grimacing:

Guessing that since 1 drive came out ok, odds are the rest shipped fine since they were all in the same box and packed similarly. Maybe that is a dangerous assumption, but i did run a short and long test at least on each of them, and it came out ok.

Only one drive did the complete test so far, that came out with result pass.

Would’ve been worth solving your tmux issues before starting the burnin, if you had, you’d be done.

You can skip the burnin of the other drives if you want

1 Like

i ask just in case,

but is it safe to turn on the server if there is no cpu or cpu cooler installed?

i got the ssds, ram, fans, sfp+ 10g pcie card, psu all installed onto the motherboard. only thing missing is the cpu and cpu cooler (didnt install yet).

according to youtube, you can update the bios using msi flash back buttons at the back of the mobo, even without a cpu installed.

so is it safe? i’m just only trying to update the bios first, while waiting for the cpu cooler to arrive :thinking:

Do not run a CPU without a cooler. Modern CPUs may survive, older CPUs could destroy themselves in seconds.

No CPU should be okay I think. Worst case it beeps at you, but it might not even be able to do that.

You didn’t end up with IPMI did you?

1 Like

no ipmi.

was considering jetkvm but havent ordered. my issue with it is it’s a kickstarters. never done kickstarters but i heard bad things about it. also some software features haven’t been completed yet (will it ever?)

waiting for if they actually deliver first :thinking:

for now i’m using a hdmi cable to connect to mintor to do bios and install truenas.

tbh i feel that should be fine for me. my server rack isnt particularly far from my monitor to begin with :sweat_smile:

Anyway i just ask to avoid ending up like this guy who fried his cpu/mobo then ended up lying through his teeth for a refund :rofl: im newb myself but at least im trying my best and doing the due diligence.

There are fun projects that use a raspberry pi as an IPMI - would require some elbow grease, but I mean you’ve figured everything else out up to this point :slight_smile:

Personally I’d figure out your tmux issues & test the rest. But I’ve likely had more issues with drives that are almost dead on arrival than the average person :frowning: So maybe my paranoia isn’t justified. On the other hand it seems that delivery to you takes like 10,000 years per part - so better find out & RMA sooner rather than later - no?

2 Likes

considering the source of the drives, i dont think u can be careful enough. but so far it’s good.

1 Like

Flashing the BIOS without a CPU installed is generally not possible because the BIOS needs to be executed by the CPU to perform the flashing process. The CPU is responsible for initializing the motherboard and executing the code required to update the BIOS.

However, some motherboards may have a feature called USB BIOS Flashback or similar, which allows you to update the BIOS without a CPU or RAM installed. This feature typically requires a compatible USB drive with the BIOS file on it and a specific button on the motherboard to initiate the flash process.

If your motherboard supports this feature, you can follow these general steps:

  1. Download the BIOS File: Get the latest BIOS version from the motherboard manufacturer’s website.

  2. Prepare the USB Drive: Format a USB drive to FAT32 and copy the BIOS file to the root directory. Ensure the file is named correctly, as specified by the manufacturer.
    
  3. Connect the USB Drive: Insert the USB drive into the designated USB port on the motherboard.
    
  4. Initiate BIOS Flashback: Press the USB BIOS Flashback button (if available). Some motherboards may require you to power on the system while holding the button.
    

Make sure to consult your motherboard’s manual for specific instructions and compatibility, as the process may vary by manufacturer and model.

sauce

ill just double check the manual. just to be extra safe :saluting_face:

https://www.msi.com/Motherboard/MAG-B650-TOMAHAWK-WIFI/support#manual

*update

ok it says this

but what if i already have ram, other pcie card added, and psu cables connected to mobo beside the one they ask to connect? is it still safe to boot up to do the bios flashback?

or do they expect me to unplug all of those things, to do just as mentioned as the requirement?

maybe i’ll just wait for cpu cooler. no rush :sweat:

“ Connect the power supply to CPU_PWR1 and ATX_PWR1. (No need to install CPU
and memory.)”

This means you don’t have to install, not that you must not install.

1 Like

understood ty.

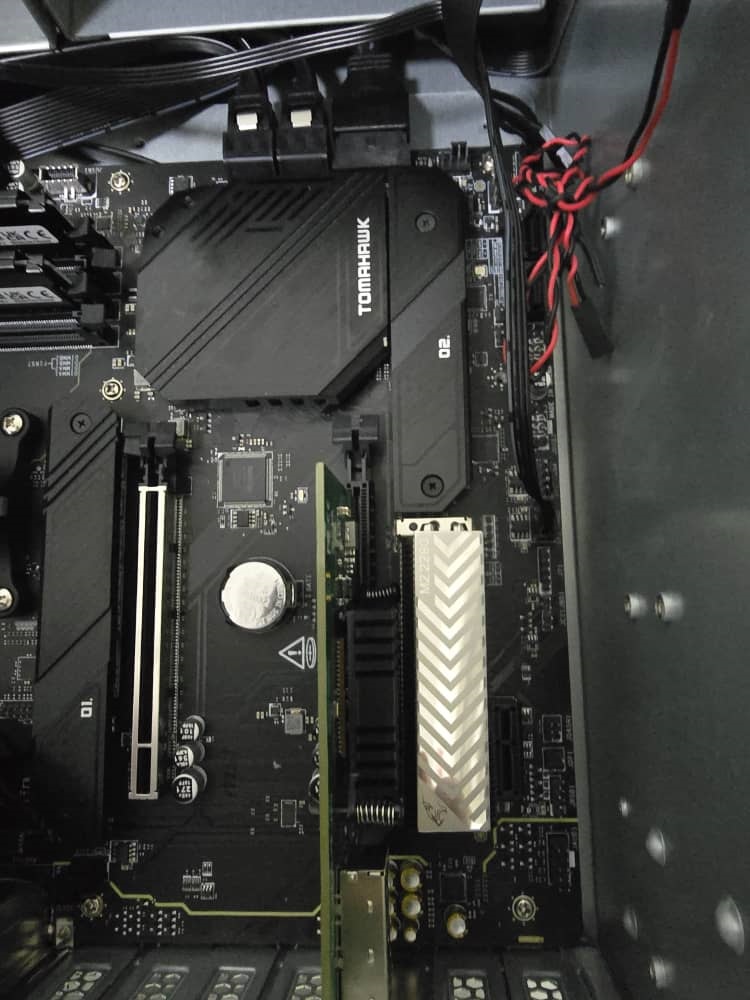
but beside the cpu pwr1 and atx pwr1, the rest of the psu cables are all plugged in. does that matter?

got the usb drive. tested it, looks original (It came in the original box and from the legit seller).

guess i should yolo try it ? :saluting_face:

https://www.msi.com/Motherboard/MAG-B650-TOMAHAWK-WIFI/support#bios

the normal way is this (then you can see whats going on)

the way im trying it (flash back method)

*update

ok i see the deal here

download the bios. extract folder, put onto usb root. rename to MSI.ROM

When renaming, make sure you are able to rename the file extension at the end as well (you might not realize the mistake), if not it wont work.

note: renaming only applies if you plan to use the button flash back bios update method. If you do the first video method via the bios UEFI, you don’t need to do that

insert usb drive into mobo, do as manual suggested etc. plug in power cable, turn on power if not on already.

NO NEED to press power button for the case. Not needed. As such i’m not too worried about lack of cpu or that my other cables are connected since i am not going to power on the case.

press the flashback button. it flashes color.

supposedly your usb led will constantly flash. But my usb does not have a activity led. So i can’t tell whether it’s working or not.

But if you did and there is no blinking, means something is wrong and it didn’t work.

But if it was blinking with activity, means it worked, and u have to wait till it stops blinking.

Seeing as i already pressed, im just gonna be extra cautious and just wait it out. I set a 30 minute timer count down on my samsung Galaxy Ultra smart watch. So letting that count down before i remove use drive and turn off the power.

And when cpu cooler arrives, and is installed, i can checked then whether it booted up, and if its using the bios i presumably flash back to.

*cross fingers :sweat_smile:

*update

the youtube said press hold 2-3 seconds. But i may have just press and let go. though i did see some white light flash for the button, not sure if that counts, because it did that for a short while then was no longer blinking again.

So after 30minutes ill try a 3 second press just to be sure.

for future reference, look for a usb stick with a led light for activity. thought this did, but it doesn’t (but its cheap, original, works, so not complaining overly too much) :sweat:

times like this you wish you had a rgb mobo. this has no lighting whatsoever so cant tell whats going on. all i saw was a white led at the flash back bios button, but it went away after 2-3minutes :thinking:

and for those wondering why the heck am i being so paranoid about bios update, refer to this :saluting_face:

Is this the correct method for applying thermal paste to am5 cpu?

unlike am4, they got these sort of odd shapes sticking out. can i still do the 5 dot pattern for middle? and for the odd parts sticking out, that i do a small tiny spread like in the youtube? would that be ok?

i think the bios is updated, will confirm later.

now i prepped the usb stick with truenas

Not english but you can see what to do. I used rufus

balena etcher messed up my usb stick. i had to do this to recover

staying away from balena :grimacing:

had to remove, reinsert until it finally detected to fix that :sweat:

so i tried rufus, did not work. then i found out and fixed the issue. it was windows defender for folder control. had to whitelist rufus

this time it worked.

I used
TrueNAS-SCALE-24.10.0.2.iso

did more research on the 80mm fans

what is difference between pst and non pst fan
https://www.reddit.com/r/buildapc/comments/ebe1i2/difference_between_pwm_pst_and_normal_case_fans/

so for the single fan in front, guess i only need the regular pwm fan (non pst), cause it’s only using 1 cable not multiple split.

i singled out this COOLING FAN ARCTIC P8 PWM PST / BLACK / 1 x 80MM

Size & Weight

Length:

80 mm

Width:

80 mm

Height:

25 mm

Weight:

81 g

any issues with this one? says it’s 3k rpm :thinking:

That previous youtube was bad (not an actual review). removed it

I suggest Arctic P8/P12/P14 Max fans. They don’t have RGB but have good reviews.

:thinking:

if nobody finds issue with this choice, i’ll order at the end of this week. cause really 2 exhaust fans, 1 cage fan (this is for all the 4 x 3.5’’ caddy bay where hdds r located)… i strongly doubt thats enough :grimacing:

so this new fan would go at front near middle.

ill also have to order a fan grill, cauz doesnt seem as if this fan comes with any.

could not find F8. I’ll try again but… :sweat: ill also google whats the diff between a F8 and P8 :face_with_raised_eyebrow:

How do the different fan series differ?

There are two categories of ARCTIC case fans: P-fans and F-fans. While F-fans are used where airflow is required, P-fans work in such a way that they generate high static pressure. This makes P-fans particularly suitable for use on heat sinks, radiators or dust filters. The BioniX fan is a gaming fan available in both series and different sizes. Its extended speed range and special optics make it the ideal fan for gamers. The product name shows whether a fan has PWM. A “PST” in the product name identifies our popular PWM sharing technology, in which the PWM signal of a fan is shared with other fans. A “CO”, on the other hand, indicates that the fan is optimised for continuous operation. Thanks to a double ball bearing, this has a longer service life and can be operated for years without interruptions.

*update

ok i found it

Arctic F8 PWM 80mm Casing PC Cooling Fan - 8CM Black Fan

says it maxes at 2000 rpm. The P8 is 3000 rpm.

I don’t think i will use dust filters? so i’ll just go with your recommendations. thx :blush:

TWO WAY INSTALLATION

  • Blow warm air out of the case
  • Draw cool air into your case

SPECIFICATION:
Dimensions: 80 (L) x 80 (W) x 25 (H) mm
Weight: 71 g
Speed: 300–2000 rpm
rpm Control: Pulse Width Modulation
Static Pressure: 1.0 mm H2O
Airflow: 31 cfm | 52.7 m³/h
Bearing: Fluid Dynamic Bearing
Cable Length: 400 mm
Connector: 4-Pin Connector
Current/Voltage: 0.16 A/12 V
Starting Voltage: 5.5 V
Noise Level: 0.3 Sone
Ambient Operating Temperature: 0–40 °C
Warranty: 6 Years

i only ordered 1 fan. the case came with 3, so i’ll just use those since they are already paid for :sweat_smile:

price was half that of noctua :innocent:

Found a review for the artic F8

44dba at max 2000 rpm which is an acceptable level of noise.

and looking at the airflow, seems good. feeling better about the purchase :blush: