NVMe SSD critical temperature alert question

My boot drive is a Samsung NVMe SSD.
I have a high temperature alert setting on 60 degrees celsius, but occasionally get alerts.
Smartctl -a /dev/nvme0 shows: Warning Comp. Temp 82 celsius.
I always get both 2 alerts for the same time.

Today I looked into it, because I am worried that this will result in future system failure.
To my surprise Reporting Disk Temperature NVME | Samsung SSD shows that the disk temperature is consistently around 40 celsius. I know the report measurement is every minute, but that would mean that the high temperature lasts for about 30 secs maximum between the reporting periods, but this quick rise to 82 and fall back to 40 seems very unlikely to me.

My question is whether this is a real issue to be concerned about.

Do you see more than one temperature sensor listed in the UI graph? Does the TrueNAS UI allow you to specify which sensors to monitor and graph? I know with Core it does not. This is why for some NVMe’s, you will get alerts for exceeding a “critical temp” that is tripped by Sensor 2 instead of Sensor 1. Sadly, you can only see Sensor 1 in the graph.

If not, check with nvme:

nvme smart-log /dev/nvme0 | grep Temperature\ Sensor

Run a full scrub and repeat the command while the SSD pool is scrubbing. See which sensor increases more than the other.

You can use watch to have it automatically update every second:

watch -n 1 "nvme smart-log /dev/nvme0 | grep Temperature\ Sensor"

My guess is that I/O activity on the SSD pool is causing Sensor 2 to exceed 60C, but the UI only shows you the temperature of Sensor 1.

I am of the belief that all NVMe drives in your NAS server should be installed with a heat spreader. They’re cheap and easy to install[1] and make a significant difference in temperatures, especially under load.

If you’re feeling bold, ask the moderators to re-open this feature request.


  1. The reason each one comes with multiple thermal pads is because you’re supposed to stack them on each other if using only one is too thin and does not make proper contact between the heatsink and NVMe. While you don’t want it to be extremely tight and hard to screw in the top plate, you also don’t want an air gap between the pad and top plate. ↩︎

2 Likes

@winnielinnie hit the nail on the head. Some NVMe drives have multiple temperature sensors. Using smartctl -x will let you see what the drive is capable of sensing. With that said, look at ID 194 if you have it. This it the sensor that you should probably use.

If you provide the entire output of smartctl -x /dev/nvme0 then we can offer better advice.

Edit: I just reread your posting. Are you saying you get a temp alert at 60C?

The 82C and 84C are maximum thermal limits. If you reach 86C then you warranty is void. It is too hot.

If your GUI is set to 60C and you get an alarm message, that is a warning. It likely occurred during a SCRUB. Priperly cooling an NVMe can be difficult but it can be done.

Maybe I read your posting wrong. But some NVMe drives just get hot fir short periods of time.

My Samsung SSD 980 temperature section output of “smartctl -x /dev/nvme0” is:

Warning Comp. Temperature Time: 6
Critical Comp. Temperature Time: 0
Temperature Sensor 1: 40 Celsius
Temperature Sensor 2: 44 Celsius
Thermal Temp. 2 Transition Count: 777
Thermal Temp. 2 Total Time: 375

I understand there are 2 temperature sensors 1: NAND flash and 2: SSD controller.
It reports he count sensor 2 exceeded the high-temperature threshold 777 times for 375 ???

I read that in case over overheating the SSD controller thermal throttling is triggered.
The Power On Hours: 11,929
So is this a (big) issue, since it occurs for about once every 15 hours?

About the question of @joeschmuck I have set a 60 degrees warning through the GUI (see the Edit disk screenshot), that is one of the warnings (in the Critical alert screen shot). I did not set another alert. The second Critical warning reports “Temperature 84 Celsius reached critical limit of 60 celsius (Min/Max 43/84)” warns that 84 degrees was reached.

The temperature increase probably sustains during a scrub or constant disk I/O.

Did you test this?

EDIT: You should install m.2 heat spreaders anyways.

I just started System / Boot environments / Scrub Boot Pool
It completes very fast: Started: 2026-01-22 18:26:28 Finished: 2026-01-22 18:26:51
Running watch -n 1 “nvme smart-log /dev/nvme0 | grep Temperature\ Sensor” the highest temperature I observed was 70 degrees celsius.

In my Odroid system there is very limited space, I fear if I install a heat spreader the I Bloch the airflow…

Is the Odroid so compact that an m.2 heat spreader will touch the inside of the top of the case?

Since this is only a single drive for your boot-pool, it does not hold any important data. If you’re fine with it running warm on idle or hot under load (rare for a boot drive), then I guess the alerts are a nuisance to live with.

The syslogs and System Dataset could be writing to it 24/7, which can also keep the temperature (Sensor 2) sustained at a level that might cause long-term wear.

Until your drive decides to drop off the PCIe bus due to exceeding the controller temperature threshold for too long, and the drive firmware says HARDWARE_RESET … :grimacing:

If you cannot add a heat sink to the NVMe drive (you might need to purchase a new case), then there are a few things you might try…

  1. Can you lower the PCIe speed of your NVMe drive in the computer BIOS? The specs I looked up said it was PCIe3, so if you can lower this to PCIe2, that will slow the transfer speed down significantly and lower the maximum temperature it would heat up to. That is the goal, if you can change that in the BIOS.
  2. Look for a Crucial P3 M.2 NVMe drive. The maximum sustained temperature is around 58C because this drive pulls less power and does not have DRAM. Or you can search the internet yourself and try to locate an M.2 NVMe drive of your choice that sips power. You only need 32GB, anything over 128GB is overkill, but is a 256GB version is cheaper than 1 64GB version of the same drive, purchase the less expensive one.

Good luck.

@joeschmuck I have been searching for a Crucial P3 M.2 NVMe drive, but the smallest I can find is 500 GB. Do you know alternatives with low maximum sustained temperature, is the Silicon Power - P34A60 (256GB) a good option?

You are going to need to search the internet for information about that drive. Silicon Power is a relatively “cheap” a.k.a. (not high quality) company. With that said, I bought a SSD from them probably 10 years ago, it is still working when I need to use it. And this is a SSD, not NVMe for my drive. For you, would it run cooler? I don’t know.

I’d give GhatGPT or Google Gemini a check, and I’d enter something like “I am looking for an inexpensive NVMe m.2 PCIe module, that stays cool under heavy load. PCIe 2 to PCIe 4 are acceptable. I’d prefer the smallest capacity available. Please list the power consumption of each.” or something like that. My current drives can consume some power, but there are drives significantly worse.

You are using TrueNAS SCALE, correct?
If yes, run these command (cut and paste is likely easiest)

  1. For the current power level of the drive: nvme get-feature /dev/nvme0 -f 2 | cut -c1
  2. For the power consumption of this power level (replace the ? with the power level number from the previous command): nvme -id-ctrl /dev/nvme0 | grep "? :" | grep "W" | cut -d ':' -f 3 | cut -d 'W' -f 1

Also, it wouldn’t be bad to post what you power levels are from smartctl -a /dev/nvme0, look for something like this:

Supported Power States
St Op     Max   Active     Idle   RL RT WL WT  Ent_Lat  Ex_Lat
 0 +     8.80W       -        -    0  0  0  0        0       0
 1 +     7.10W       -        -    1  1  1  1        0       0
 2 +     5.20W       -        -    2  2  2  2        0       0
 3 -   0.0620W       -        -    3  3  3  3     2500    7500
 4 -   0.0440W       -        -    4  4  4  4    10500   65000

My NVMe modules run in power level 3 most of the time, basically when idle. They run in power level 0 when active, like a scrub. SCALE (Debian) will reduce the power state if the drive supports it. This is not true for CORE (FreeBSD), that power level must be set manually every time.

I know this isn’t what you wanted to hear, I wish I could give you a solid answer but I only do that if I’m positive that it is 100% correct. Hardware is a tricky beast.

I don’t have tested them personally but there are very thick heatsink like this:

I have 3 of this simple kind:

And despite the very low price (1€ each) they do theyr job pretty well.

1 Like

I had two Samsung SSD 970 EVO Plus 2TB in my TrueNAS, bought at different times, two years apart. The older one had temperature issues like what you are seeing. I bought a heat spreader and increased airflow and that helped get the temps down, mainly due to the spreader. Eventually the SSD failed early. It was bought 7/30/2022 and failed 11/2025, so it lasted about 3 years. It was under warranty (5 years). Their warranty support was phenomenal. They sent me a Samsung SSD 990 EVO Plus 4TB as replacement with no cost to me. Yes, newer model, twice the capacity. They even sent me a shipping label for the bad SSD to send to them for analysis first. It was a quick process, a few days to a week.

Get a spreader on there, keep using it, make sure you have redundancy, and if it fails before your warranty period ends you should be in a good spot. Take pictures of the SSD before you put the spreader on in case there is damage to the stickers with serial etc. I did not have issues with that but it can be iffy if you don’t have serial numbers on the chips when it goes through RMA.

@joeschmuck I ran the command:
root@truenas[~]# nvme get-feature /dev/nvme0 -f 2 | cut -c1
g
That does not look like a power level number???

So I tried:
root@truenas[~]# nvme get-feature /dev/nvme0 -f 2
get-feature:0x02 (Power Management), Current value:00000000

root@truenas[~]# smartctl -a /dev/nvme0
….
Supported Power States
St Op Max Active Idle RL RT WL WT Ent_Lat Ex_Lat
0 + 5.24W - - 0 0 0 0 0 0
1 + 4.49W - - 1 1 1 1 0 0
2 + 2.19W - - 2 2 2 2 0 500
3 - 0.0500W - - 3 3 3 3 210 1200
4 - 0.0050W - - 4 4 4 4 1000 9000

If I understand correctly this means it’s running on maximum power: 5.24W
Inn’t this already a low value?

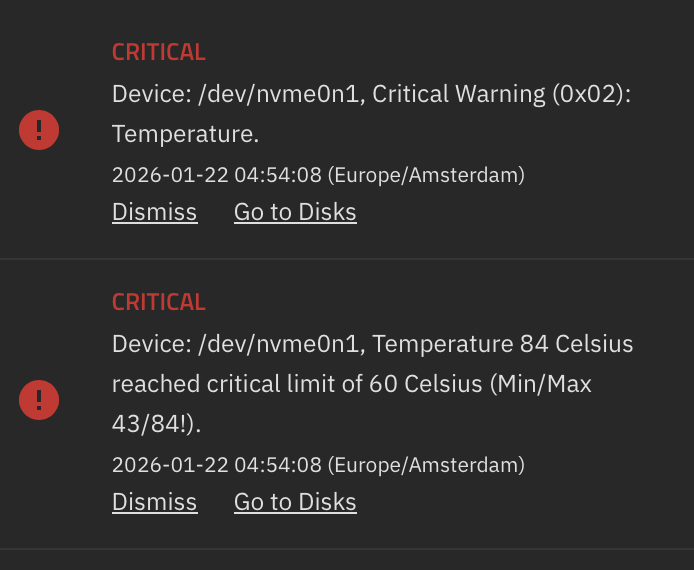
This is true. This means you are running at Power State 0.

This means that your NVMe drive does not pull much power at all.

Let me explain what you are looking at in the first line:
0 = The Power State Number
+ = This is a running power state, not a Sleep state. A- is a Sleep State.
5.24W = The maximum power consumption the drive is expected to use in this power state.
The rest of the values are how fast the drive can take to come out of this power state, into a lower power state.

I have a few things you can try and I will provide you one at a time. If I give you too much then I feel I could be setting you up for failure. Notice that I tell you to write down the time, this is only to aid in knowing when you issued a command. It helps.

First, lets run TMUX:

  1. Type tmux new -s watch_temp and press enter.
  2. Since I really like the command @winnielinnie gave you, we will use something like it to make a few files to read later.
  3. Cut & Paste since this is a single command entry:
echo "Time       Temperature" > /tmp/watch_temp.txt
while true; do 
 echo -n "$(date +%H:%M:%S) - " >> /tmp/watch_temp.txt
 nvme smart-log /dev/nvme0 | grep -i temperature >> /tmp/watch_temp.txt
 sleep 1
done

and press enter, it will look like it stopped working, but it is working. This will start to create a file that we can reference later.
5. Press CRTL+b then d and you should be returned to your original SSH window.
6. Type tmux new -s watch_power_state and press enter.
7. Cut & Paste since this is a single command entry:

echo "Time       Power State" > /tmp/watch_power_state.txt
while true; do 
 echo -n "$(date +%H:%M:%S) - " >> /tmp/watch_power_state.txt
 nvme get-feature /dev/nvme0 -f 2 | rev | cut -c1 >> /tmp/watch_power_state.txt
 sleep 1
done

and press enter, it will look like it stopped working, but it is working. This will start to create a file that we can reference later.
8. Press CTRL+b then d to exit tmux.

Second, establish a baseline:

  1. Write down the time. Let your system rest for 1 minute, at least 60 full seconds. This will hopefully let you know what power state the drive is normally in.
  2. Write down the time. Run a scrub on your boot-pool. Type zpool scrub boot-pool
  3. Wait until the scrub completes, then Type zpool status boot-pool to verify the scrub has completed. It should take very little time as you are aware.

Third, try to set a maximum power state. This will only last until a reboot so it is not permanent. If this works, we can discuss a permanent solution. I don’t want to get ahead of ourselves.

  1. Write down the time. Run nvme set-feature /dev/nvme0 -f 2 -v 2 and it should say something like this set-feature:0x02 (Power Management), value:0x00000002, cdw12:00000000, save:0

Fourth, Final test time:

  1. Wait about 60 seconds. Only for the heck of it.
  2. Run a scrub on the boot-pool zpool scrub boot-pool and press enter.
  3. Wait until the scrub has completed, just as we did before.

Terminate Tmux Sessions:

  1. Type tmux ls and you will show you the names of the two tmux sessions.
  2. Type tmux attach -t watch_temp and you should be returned to the tmux session.
  3. Press CTRL+C several times to exit the script loop.
  4. Once you are at a prompt Press CTRL+b and then d to exit.
  5. Type tmux kill session -t watch_temp.
  6. Type tmux attach -t watch_power_state
  7. Press CTRL+C several times to exit the script loop.
  8. Once you are at a prompt Press CTRL+b and then d to exit.
  9. Type tmux kill session -t watch_power_state.
    (NOTE: You could just issue the kill commands but I prefer a controlled exit)

Collect the Data:
All your data resides in two files located in /tmp/.

  1. You should cd to a directory where you want to copy the files to.
  2. Next cp /tmp/watch*.* . and press enter.

Examine the data:
At this point you can use any simple text viewer. Each file will have a time stamp for each entry, which is why I asked you to write the time down earlier.

Locate the time stamps listed above, and analyze the data. If you are having difficulty in understanding what you are looking at, post the two files here and we can examine it.

What are you looking for?
I suspect the first Baseline will be all Power State 0. Then after you set the maximum power state to 2, that it hopefully never changes to 1 or 0, even during the last scrub.

If this works, and it depends on the NVMe drive if it will work or not, then you can simply place this into a INIT Script so it is applied each time the system bootstraps.

To set the NVMe Power level back to “0”, nvme set-feature /dev/nvme0 -f 2 -v 0 will do it vice having to reboot.

Please let me know your results.

1 Like

@joeschmuck Thanks for your detailed instructions.
I tested as you requested.

Scrub power state 0:
Fri Jan 23 17:25:57 CET 2026 - start
17:27:03 - 17:27:04 : temperature 71 - power state 0
Fri Jan 23 17:27:20 CET 2026 - finish

Scrub started in power state 2:
Fri Jan 23 17:16:51 CET 2026 -started
17:16:03 : temperature 57 - power state 4
17:20:03 - 17:20:38 : temperature 57 - power state 2
17:23:20 : temperature 57 - power state 2
Fri Jan 23 17:23:50 CET 2026 - finish

The temperature is 14 degrees lower than in state 0, so that’s what I will try to enforce.Thanks a lot for your help!

So the command nvme set-feature /dev/nvme0 -f 2 -v 2 sets the limit to Power State 2.

To make this last, In the TrueNAS GUI, Left Column → System → Init/Shutdown Scripts → Add

Now fill in the reset:
Description: Set NVMe Power State
Type: Command
Command: nvme set-feature /dev/nvme0 -f 2 -v 2
When: Post Init
Timeout: 10

And click on Save.

Now everytime you reboot your system, your nvme0 drive will be allowed to operate at this power state, but not PS1 or PS0. It will still be able to drop to PS3 or PS4 as Debian allows this.

And you are very welcome for the instruction. I like to think outside the box a little. And it saves you from having to spend more money.

If someone has multiple NVMe drives that they would desire to set a power level limit, they can do that with a simple few line script.

I hope this all works out and please update us in a few days/weeks. I’d like to know.

1 Like

None of what you wrote is neccessary. @SmallBarky already came up with a solution to these types of issues.[1]


  1. It works better if you leave the server case open. ↩︎

1 Like

And as a plus, you can use it to help dry out the carpet when you spill.

2 Likes

@joeschmuck Thanks again, I have set the Init script and will let you know in a few weeks!

1 Like