This why all is not passed anymore. Only pass what you need. And only pass what a container needs in its compose.
1 Like
this is how one guy passed specific capability rather than all just to get his thing to work.
but after the previous guy’s incident, now i’m not even sure i’m okay doing even that. i undid docker_compatible 1 added in config, and shutdown scrutiny. just not worth it xd
someone asked before, this what my nas looks like under load. had issue trying to access the truenas login dashboard ![]()
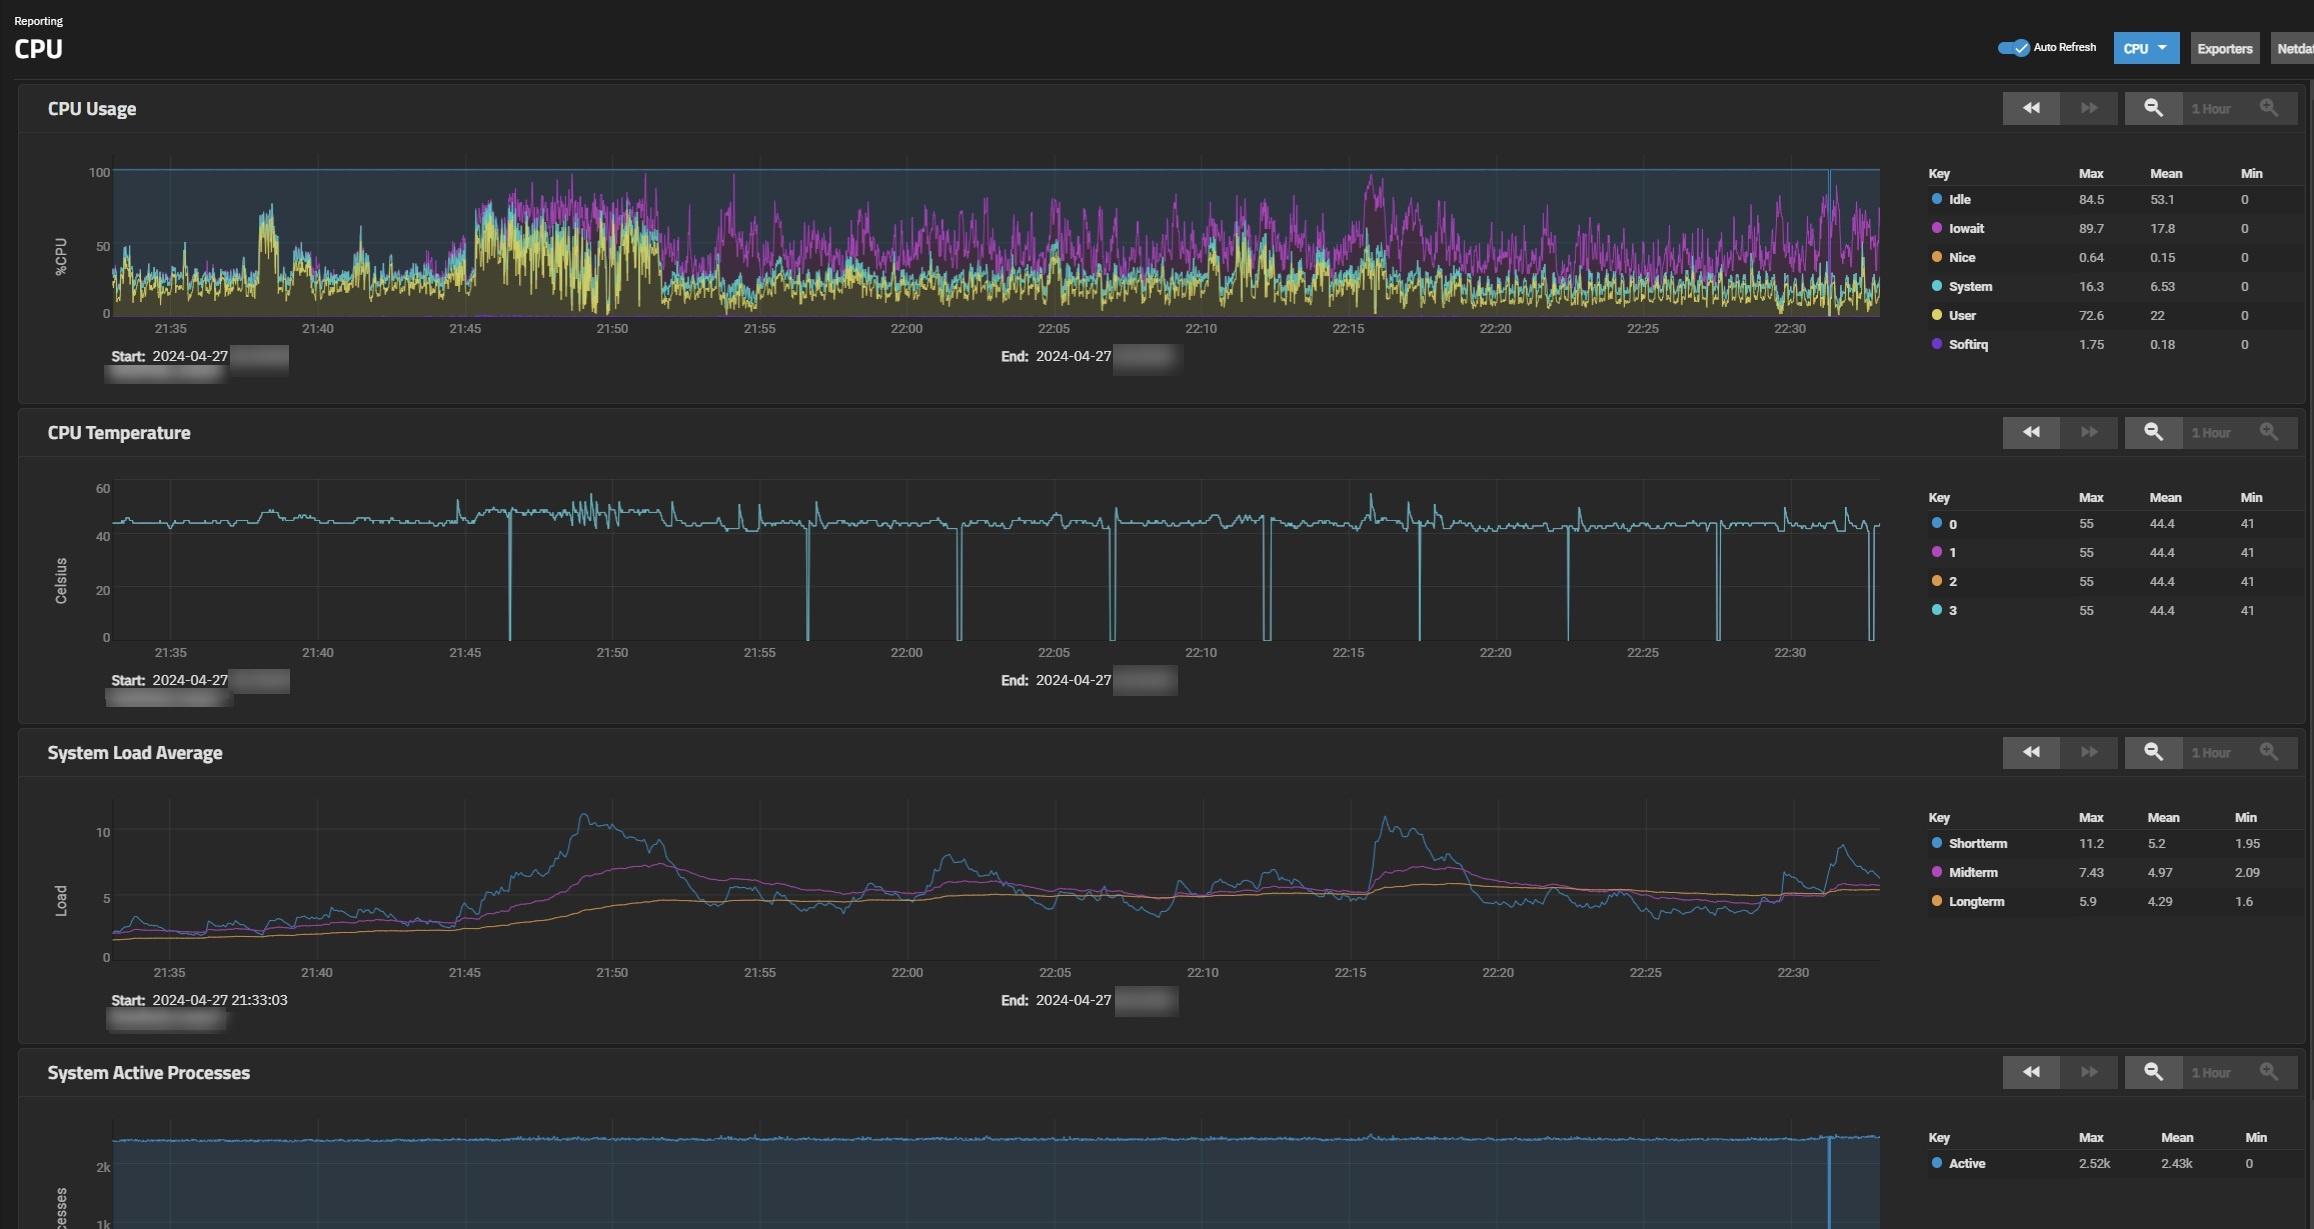
1 Like
posted an explanation of the dockge pathings since i noticed some confusion. i also took the opportunity to explain how bind pathing worked in regards to jailmaker and it’s usage in docker compose. correct if i am wrong sensei ![]()
1 Like

![]()
Seems there is some issues with dragonfish.
No it was running as a custom app so mounted through k3s
https://www.reddit.com/r/truenas/comments/1cejb6q/warning_do_not_update_to_dragonfish_if_you_use/
that said i think i will sit tight with it. i can access my stuff, docker works.
![]()
qbittorrent-nox in jail (via jailmaker) runs like butter (dragonfish)
so the solution, use jailmaker
1 Like
just going through my settings for authentik and nginx proxy manager
I setup the nginx proxy manager using wolf’s guide to get a local domain url working for a local only homelab

the result, is https://dashy.mydomain.duckdns.org
this works.
next, is to setup authentik.
in authentik i followed cooptonians guides
")
 Setup")
so based on the guide,
in nginx proxy manager they said
if your dockers are on same machine, you can simply put the dockername then port e.g. dashy:9000
but when i tried that it didn’t work.
so what i did was
scheme: http
forward host name/ip: 192.168.0.24
port: 4000
ssl: select your letsencrypt cert (created using wolfgangs guide)
force ssl: enabled
https2: enabled
now when you go to say http or https://dashy.yourdomain.duckdns.org it works.
Then in authentik, you follow cooptonian’s guide,
outpost line 3, he edits the authentik host to http://auth… .com
Here he explained you either enter the hostname you entered in nginx proxy manager host earlier or use your dns url.
there is a green checkmark to see if that is valid or not in authentik.
then next in authentik you create the provider. for nginx proxy manager we use forward auth single application
then we add the external host e.g. https://dashy.yourdomain.duckdns.org
then create the application e.g. dashy. this application will then be using the provider we setup earlier. and you should also notice the outpost will have the dashy app list in providers.
this is all confirmation you have done the correct steps. keep in mind authentik now has a wizard that goes through all these things in a next > next. The main point is simply you get all these settings correct.
at this point click the name of the provider we created, then select the nginx proxy manager in the tab for it,
copy that code.
now go back to nginx proxy manager, edit proxy host > advanced, paste the code.
then browse down to proxy pass in that code and edit it to
https://auth… .com
basically it’s what you entered earlier in authentik.
so i did all that but my authentik didn’t work for the url which didn’t load. why? ![]()
note: forgot to mention. In Authentik another thing you also had to check is whether docker integration is active or not
go to authentik > system > outpost integration
name: Local Docker Integration
local: tick to enable
docker url: /var/run/docker.sockafter you update/add, check the state. it should be a green tick sign. If it’s wait a bit then click it, it will update.
PS: this setup i am using uses the free domain duckdns.org also it’s setup in dns only mode. meaning it’s only usage is for local lan only. In addition it’s setup to be able to gets a valid lets encrypt cert to work even on the local lan homelabs.
So no, i’m not exposing my nas online, so entering the url online from remote location won’t work, since it’s only for local environment.
There other guides for making it an internet accessible url if you want that (i would suggest using vpn or cloudflare tunnels or something for added protection for that setup),
")
but this post isn’t for that setup fyi.
Next, the authentik is adding a layer of security to the docker apps which will be accessed through the urls added to nginx proxy manager.
that was the plan

made a specific thread to try resolve this issue to get authentik working for my setup
i sus it’s a networking issue in one of these locations
-
nginx proxy manager hosts
-
nginx proxy manager advance (this is the script you copy from authentik then edit)
-
docker compose networking. when deploying docker containers i have this is my docker compose for the networking part only. not sure if it’s correct
networks: {}
-
jailmaker networking for docker. it’s setup in bridge mode, with a static ip. i seriously doubt this is the issuem but it’s merely listed here since it’s network related just so people have some context to my setup.
-
truenas is setup as a static ip for 192.168.0.210 with ports 80, 443. it’s on a different ip than the docker jail, so i doubt this has any relevance to my authentik nginx proxy manager issue. i’ll mention it anyway.
a poor soul still using truenas vm to setup their docker containers. i pointed them to stux’s video about jailmaker ![]()
1 Like
docker vs kubernetes

heard good things about kubernetes and rancher. but i’m more familiar with docker. if you are in this space for self hosting, it will be of interest to learn more on this.
for myself i went with jailmaker docker for truenas since i am familiar with it and can deploy myself. With kubernetes i would have to learn that ![]()
This is a different video on the authentik setup which covers both traefik and nginx proxy manager


for this truenas setup i went for jellyfin. tested working as a docker container. haven’t tested graphics card since i don’t really use the graphics acceleration.
i also have the android and windows jellyfin installed and tested working to connect to the truenas docker jellyfin. if you use those apps to stream from the nas, it does so without triggering any sort of transcoding. this is for the best performance for watching your videoplayback.
that said, on the pc i prefer using MPV dot net with anime4k
it makes upscaling to my 1440p for 1080p content look great again without having a huge impact on performance (i have a modern midrange pc spec build)
then you just browse to your nas datasets through smb file explorer on windows 11.
![]()

i did that
cat information
Model:           NVIDIA GeForce GTX 1050
IRQ:             xxxxxxxx
GPU UUID:        GPU-xxxxxxxxxxxxxxxxxxxxx
Video BIOS:      ??.??.??.??.??
Bus Type:        PCIe
DMA Size:        47 bits
DMA Mask:        xxxxxxxxx
Bus Location:    0000:12:00.0
Device Minor:    0
GPU Excluded:    No
root@xxxxx[/proc/driver/nvidia/gpus/0000:12:00.0]#
but in his example he adds that to portainer. but what about dockge? what is method for that? also what about jailmaker?
I posted the steps i did in regards to graphics card
the only docker container i tried to use graphics was immich and that got an error x-x; kinda stuck what to do. the jailmaker documentation isn’t detailed on this. and what i did find was through google and hearsay and even that i think is a bit incomplete. Too many assumptions that other people can fill in the gaps themselves x-x;
![]()
@shaiksuhel1999 in order to use GPUs in containers (including the
--gpusflag), you need the NVIDIA Container Toolkit installed. Please follow the instructions in our documentation.Note that the docker daemon needs to be restarted as well.

root@docker:~# curl -fsSL https://nvidia.github.io/libnvidia-container/gpgkey | sudo gpg --dearmor -o /usr/share/keyrings/nvidia-container-toolkit-keyring.gpg \
  && curl -s -L https://nvidia.github.io/libnvidia-container/stable/deb/nvidia-container-toolkit.list | \
    sed 's#deb https://#deb [signed-by=/usr/share/keyrings/nvidia-container-toolkit-keyring.gpg] https://#g' | \
    sudo tee /etc/apt/sources.list.d/nvidia-container-toolkit.list
sudo: gpg: command not found
curl: (23) Failed writing body
![]()
root@docker:~# nvidia-smi
Sun Apr 28 xxxxx 2024
+---------------------------------------------------------------------------------------+
| NVIDIA-SMI 545.23.08              Driver Version: 545.23.08    CUDA Version: 12.3     |
|-----------------------------------------+----------------------+----------------------+
| GPU  Name                 Persistence-M | Bus-Id        Disp.A | Volatile Uncorr. ECC |
| Fan  Temp   Perf          Pwr:Usage/Cap |         Memory-Usage | GPU-Util  Compute M. |
|                                         |                      |               MIG M. |
|=========================================+======================+======================|
|   0  NVIDIA GeForce GTX 1050        Off | 00000000:12:00.0 Off |                  N/A |
| 35%   38C    P0              N/A /  75W |      0MiB /  2048MiB |      2%      Default |
|                                         |                      |                  N/A |
+-----------------------------------------+----------------------+----------------------+

+---------------------------------------------------------------------------------------+
| Processes:                                                                            |
|  GPU   GI   CI        PID   Type   Process name                            GPU Memory |
|        ID   ID                                                             Usage      |
|=======================================================================================|
|  No running processes found                                                           |
+---------------------------------------------------------------------------------------+
root@docker:~#
root@docker:~# ls -la /dev/nvidia*
crw-rw-rw- 1 root root 195,   0 Apr 27 xxxxxx /dev/nvidia0
crw-rw-rw- 1 root root 195, 255 Apr 27 xxxxxx /dev/nvidiactl
crw-rw-rw- 1 root root 239,   0 Apr 27 xxxxxx /dev/nvidia-uvm
crw-rw-rw- 1 root root 239,   1 Apr 27 xxxxxx /dev/nvidia-uvm-tools

/dev/nvidia-caps:
total 0
drwxr-xr-x 2 root root     80 Apr 28 xxxxxx .
drwxr-xr-x 9 root root    700 Apr 28 xxxxxx ..
cr-------- 1 root root 244, 1 Apr 28 xxxxxx nvidia-cap1
cr--r--r-- 1 root root 244, 2 Apr 28 xxxxxx nvidia-cap2
root@docker:~#
![]()
sauce
well found out how to manage docker images old school method
docker system df
root@docker:~# docker system df
TYPE            TOTAL     ACTIVE    SIZE      RECLAIMABLE
Images          39        34        20.53GB   2.829GB (13%)
Containers      37        32        134.5MB   55.57kB (0%)
Local Volumes   10        6         86.88MB   85.05MB (97%)
Build Cache     0         0         0B        0B
root@docker:~#
ok not too bad. just about 2.8gb worth of unused junk not doing anything.
this command will do the cleanup. but it will also remove anything that is currently inactive (it’s destructive so use carefully). watch the youtube explanation above for the video titled
Installing and Using NVIDIA Docker | Deep Learning Basics @ 5:40
docker system prun -a
well sure, can manage the unused images this way. ontop of watcher docker container. but still… i liked using portainer to check what unused images i had and to remove them when i didn’t need them. oh well at least i have a solution for it ![]()
noticed jailmaker updated their docker config
took out some dangerous settings previously
I played with a three host cluster of Kubernetes (k8s), using k8s, k3s and microk8s, with helm etc.
In my opinion it’s too complex and has too much overhead for most simple use cases.
Which is why I went back to compose, a while ago. I don’t need self scaling auto replicating pods for HA.
I just need a simple way to define and launch apps which doesn’t break continuously, and is easy to restore from backup.
The most complicated stack I run is mailcow. It has something like 16 containers in it ![]()
1 Like
I think i got graphics card to work for jailmaker docker for the immich container. I will go through the steps.
- install jailmaker docker *derp, refer to stux youtube
- in the jail for docker i called docker *so don’t get confused later, edit the config with the following. These are a small snippet of the whole config, but is the relevant pertaining to what we need to get graphics card to work for docker
        --bind-ro=/usr/lib/x86_64-linux-gnu/nvidia/current
        --bind-ro=/usr/lib/x86_64-linux-gnu/nvidia/current/libnvidia-nvvm.so.545.23.08
        --bind-ro=/usr/lib/x86_64-linux-gnu/nvidia/current/libnvidia-ptxjitcompiler.so.545.23.08
        --bind-ro=/usr/lib/x86_64-linux-gnu/nvidia/current/libcuda.so.545.23.08
        --bind-ro=/usr/lib/x86_64-linux-gnu/nvidia/current/libnvidia-encode.so.545.23.08
        --bind-ro=/usr/lib/x86_64-linux-gnu/nvidia/current/libnvcuvid.so.545.23.08
        --bind-ro=/usr/bin/nvidia-persistenced
        --bind=/dev/nvidia0
        --bind-ro=/usr/lib/x86_64-linux-gnu/nvidia/current/libnvidia-cfg.so.545.23.08
        --bind=/dev/nvidia-uvm-tools
        --bind=/dev/nvidiactl
	--bind=/dev/nvidia-uvm
        --bind-ro=/usr/lib/x86_64-linux-gnu/nvidia/current/libnvidia-ml.so.545.23.08
        --bind-ro=/usr/bin/nvidia-smi
        --bind-ro=/usr/lib/nvidia/current/nvidia-smi
How i got this list was from going to truenas shell
nvidia-container-cli list
Do not include /dev/nvidia-modeset or it won’t boot up docker jail.
once you edit config, save, then restart the jail. To restart do jlmkr restart docker
if things are ok, it will restart fine.
Next deploy your docker compose for immich *this example we are using immich which is an image gallery self hosting app with some graphics card acceleration capability for machine learning.
I use dockge. In dockge i edit my compose as such. Also these settings are for nvidia graphics card. If you are using something else change accordingly refer to the immich docs
#
# WARNING: Make sure to use the docker-compose.yml of the current release:
#
# https://github.com/immich-app/immich/releases/latest/download/docker-compose.yml
#
# The compose file on main may not be compatible with the latest release.
#

services:
  immich-server:
    container_name: immich_server
    image: ghcr.io/immich-app/immich-server:${IMMICH_VERSION:-release}
    command: ['start.sh', 'immich']
    volumes:
      - ${UPLOAD_LOCATION}:/usr/src/app/upload
      - /etc/localtime:/etc/localtime:ro
      - /mnt/tank/Pictures/1:/mnt/media/1:ro
      - /mnt/tank/Pictures/2:/mnt/media/2:ro
      - /mnt/tank/Pictures/3:/mnt/media/3:ro

    env_file:
      - .env
    ports:
      - 2283:3001
    depends_on:
      - redis
      - database
    restart: unless-stopped
  immich-microservices:
    container_name: immich_microservices
    image: ghcr.io/immich-app/immich-server:${IMMICH_VERSION:-release}
    # extends: # uncomment this section for hardware acceleration - see https://immich.app/docs/features/hardware-transcoding
    #   file: hwaccel.transcoding.yml
    #   service: cpu # set to one of [nvenc, quicksync, rkmpp, vaapi, vaapi-wsl] for accelerated transcoding

    # Note the lack of an `extends` section
    #    devices:
    #      - /dev/dri:/dev/dri
    command:
      - start.sh
      - microservices
    volumes:
      - ${UPLOAD_LOCATION}:/usr/src/app/upload
      - /etc/localtime:/etc/localtime:ro
      - /mnt/tank/Pictures/1:/mnt/media/1:ro
      - /mnt/tank/Pictures/2:/mnt/media/2:ro
      - /mnt/tank/Pictures/3:/mnt/media/3:ro

    env_file:
      - .env
    depends_on:
      - redis
      - database
    restart: unless-stopped
  immich-machine-learning:
    container_name: immich_machine_learning
    # For hardware acceleration, add one of -[armnn, cuda, openvino] to the image tag.
    # Example tag: ${IMMICH_VERSION:-release}-cuda
    #image: ghcr.io/immich-app/immich-machine-learning:${IMMICH_VERSION:-release}
    image: ghcr.io/immich-app/immich-machine-learning:${IMMICH_VERSION:-release}-cuda
    # extends: # uncomment this section for hardware acceleration - see https://immich.app/docs/features/ml-hardware-acceleration
    #   file: hwaccel.ml.yml
    #   service: cpu # set to one of [armnn, cuda, openvino, openvino-wsl] for accelerated inference - use the `-wsl` version for WSL2 where applicable

    deploy:
      resources:
        reservations:
          devices:
            - driver: nvidia
              count: 1
              capabilities:
                - gpu
    volumes:
      - /mnt/docker/data/immich/model-cache:/cache
    env_file:
      - .env
    restart: unless-stopped
  redis:
    container_name: immich_redis
    image: redis:alpine
    restart: unless-stopped
  database:
    container_name: immich_postgres
    image: tensorchord/pgvecto-rs:pg14-v0.2.0
    env_file:
      - .env
    environment:
      POSTGRES_PASSWORD: xxxxxxxxxxxxxxxxx
      POSTGRES_USER: xxxxxxxxxxxxxx
      POSTGRES_DB: xxxxxxxxxxxxxxxx
    volumes:
      - /mnt/docker/data/immich/pgdata:/var/lib/postgresql/data
      - ${DB_DATA_LOCATION}:/var/lib/postgresql/data:/var/lib/postgresql/data
    restart: unless-stopped
networks: {}

#volumes:
#  model-cache:
these are some of the sources i used to find this out
But before we can do deploy, we have to do something else first.
in truenas docker jail shell, do this, do you have a similar output? if so maybe your graphics passthrough works perhaps. We are merely double checking.
 nvidia-smi
Sun Apr 28 xxxx 2024
+---------------------------------------------------------------------------------------+
| NVIDIA-SMI 545.23.08              Driver Version: 545.23.08    CUDA Version: 12.3     |
|-----------------------------------------+----------------------+----------------------+
| GPU  Name                 Persistence-M | Bus-Id        Disp.A | Volatile Uncorr. ECC |
| Fan  Temp   Perf          Pwr:Usage/Cap |         Memory-Usage | GPU-Util  Compute M. |
|                                         |                      |               MIG M. |
|=========================================+======================+======================|
|   0  NVIDIA GeForce GTX 1050        Off | 00000000:12:00.0 Off |                  N/A |
| 35%   38C    P0              N/A /  75W |      0MiB /  2048MiB |      0%      Default |
|                                         |                      |                  N/A |
+-----------------------------------------+----------------------+----------------------+

+---------------------------------------------------------------------------------------+
| Processes:                                                                            |
|  GPU   GI   CI        PID   Type   Process name                            GPU Memory |
|        ID   ID                                                             Usage      |
|=======================================================================================|
|  No running processes found                                                           |
+---------------------------------------------------------------------------------------+
root@docker:~#
Next, we need to install the nvidia toolkit
https://docs.nvidia.com/datacenter/cloud-native/container-toolkit/latest/install-guide.html#installing-with-apt
but BEFORE you can even do that, you need to install some stuff into the docker shell or that command won’t work
My (basic) commands on every install currently are:
apt update, install openssh, install curl, curl get docker convenience script, run docker install script.
i only installed these
- Update your Ubuntu box, run: sudo apt update && sudo apt upgrade
- Next, install cURL, execute: sudo apt install curl
- sudo apt install gpg
after that then you can follow the rest of the guide here
curl -fsSL https://nvidia.github.io/libnvidia-container/gpgkey | sudo gpg --dearmor -o /usr/share/keyrings/nvidia-container-toolkit-keyring.gpg \
  && curl -s -L https://nvidia.github.io/libnvidia-container/stable/deb/nvidia-container-toolkit.list | \
    sed 's#deb https://#deb [signed-by=/usr/share/keyrings/nvidia-container-toolkit-keyring.gpg] https://#g' | \
    sudo tee /etc/apt/sources.list.d/nvidia-container-toolkit.list
sudo apt-get update
sudo apt-get install -y nvidia-container-toolkit
then do this
sudo nvidia-ctk runtime configure --runtime=docker
then restart docker. i just went to truenas shell, jlmkr restart docker
once fully restarted, go to dockge, deploy your immich docker compose, it should work without error.
that’s how i fixed that through research, trial and error. hope it helps
PS: noted this
{
    "runtimes": {
        "nvidia": {
            "args": [],
            "path": "nvidia-container-runtime"
        }
    }
}
got added here
/mnt/tank/jailmaker/jails/docker/rootfs/etc/docker
Try the Linux server jellyfin docs.
I believe you just set nvidia pass through on the jail, then pass the dri device into the Linuxserver jellyfin image.
1 Like