Replacing drive for increased capacity

I received two 6TB WD Red plus drives to replace two existing WD Black drives to increase my storage capacity. I’ll be replacing two WD 1TB Black drives. These will be mirrored along with two existing WD Red drives for a total capacity of 8TB.

I just got my server up and running after my USB mirrored boot drive failed running FreeNas 9.3. The import did not go smooth so I’m being very cautious doing this replacement. What is the best and safest way to install these drives?

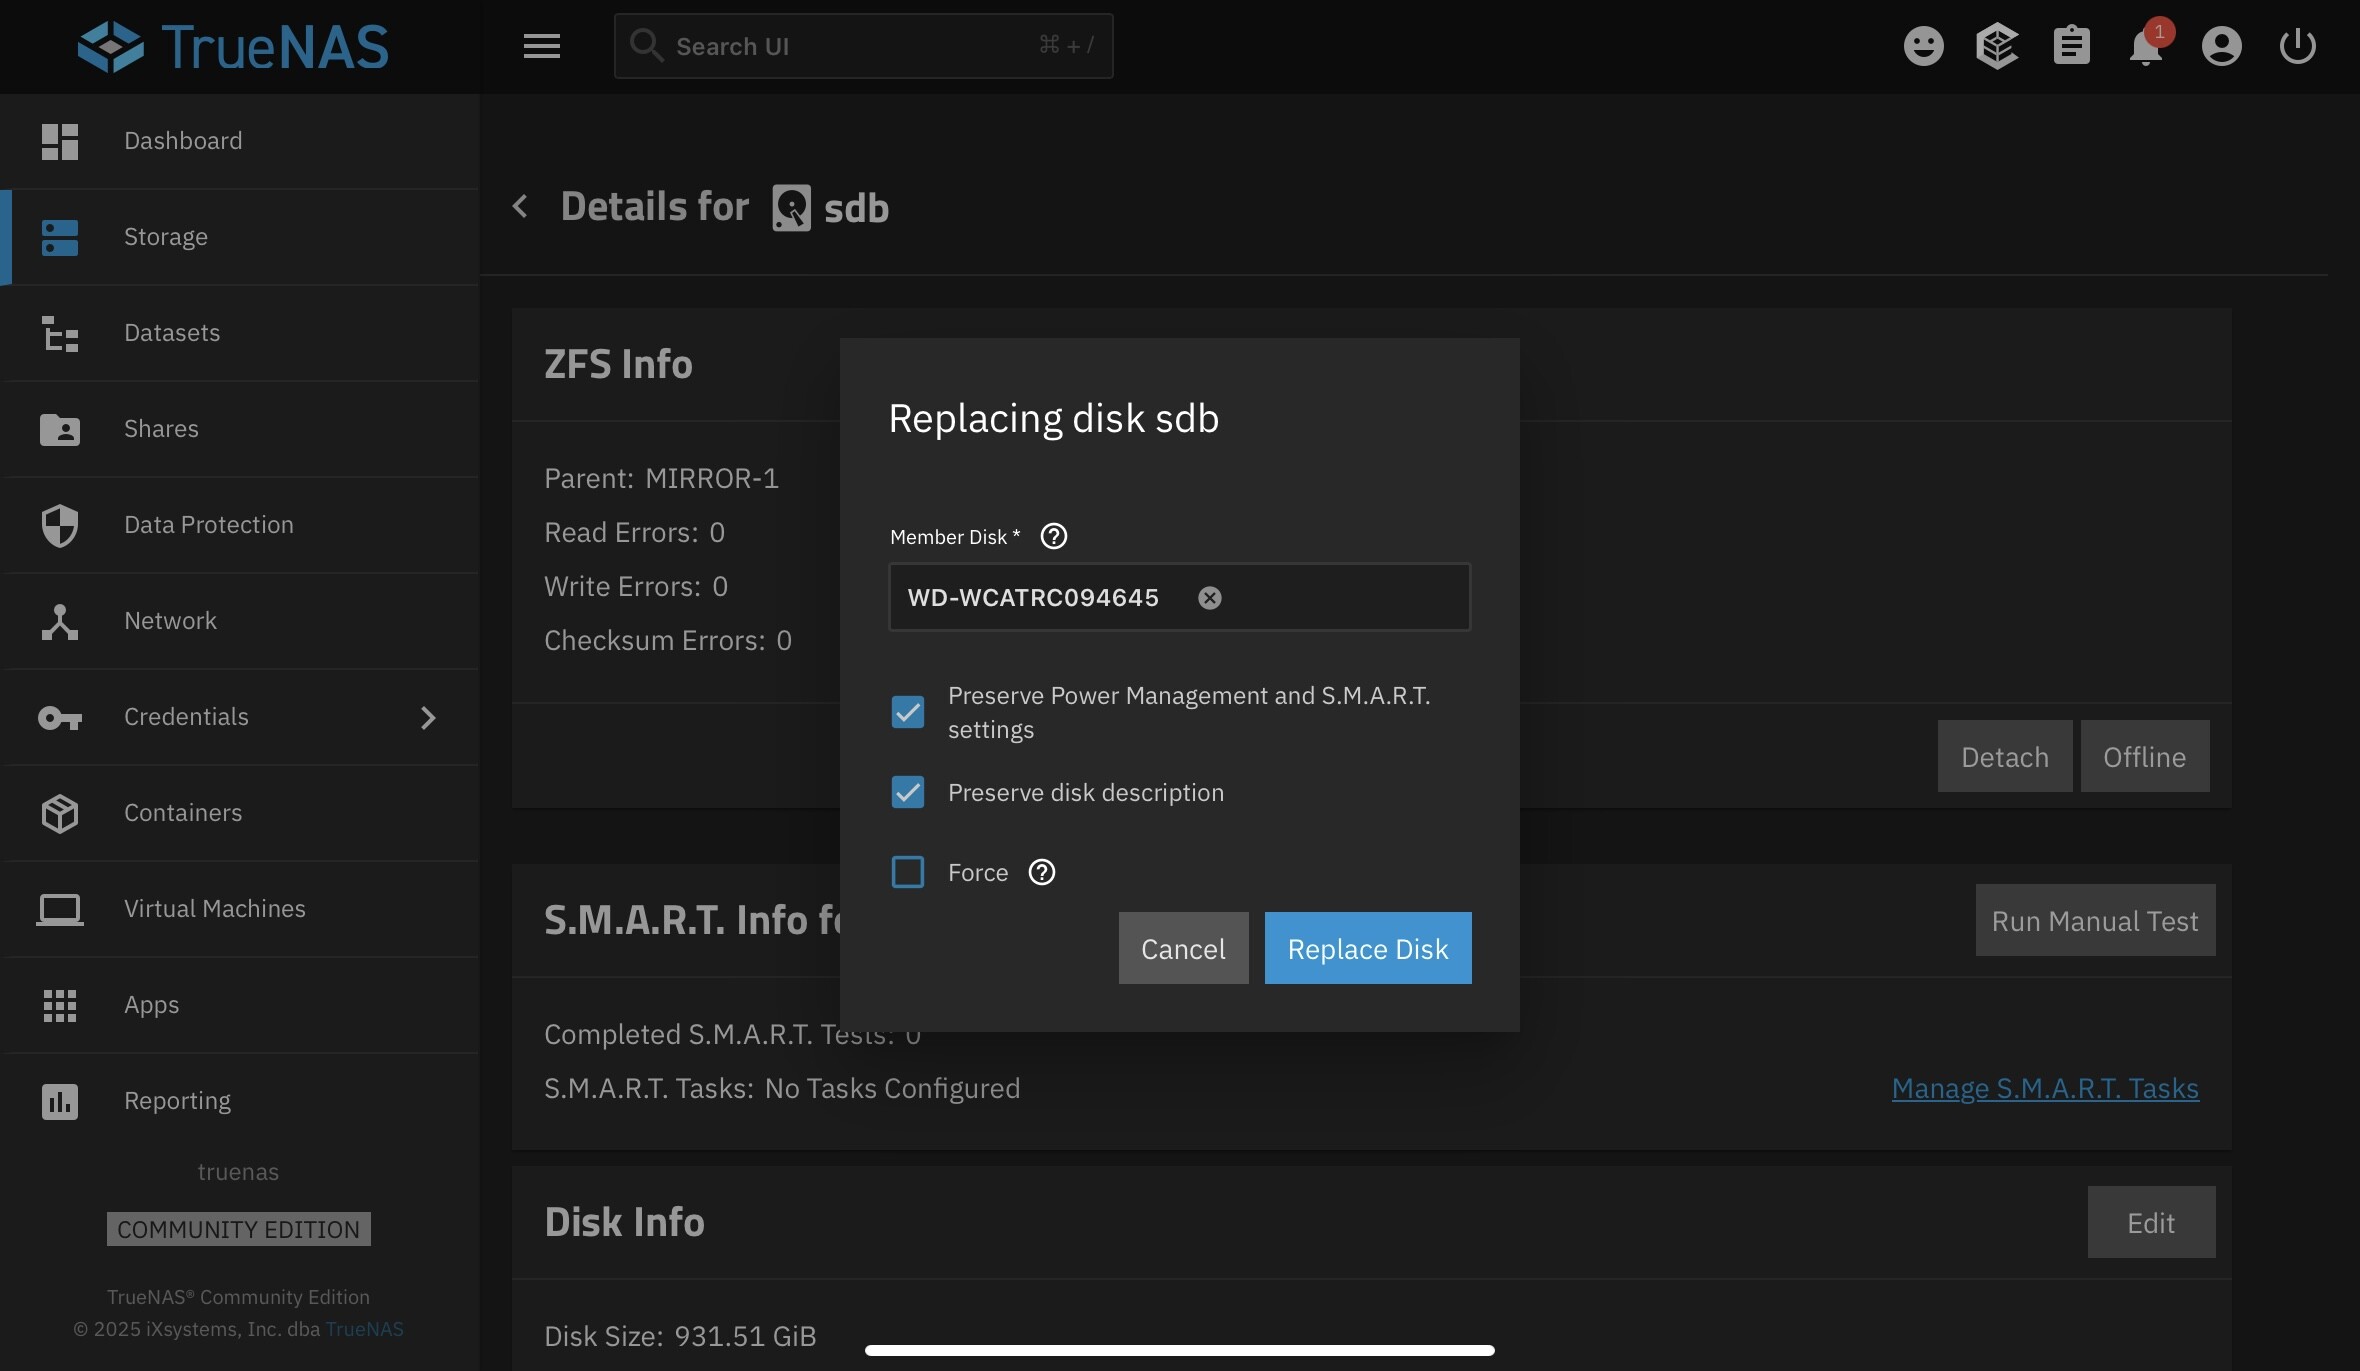
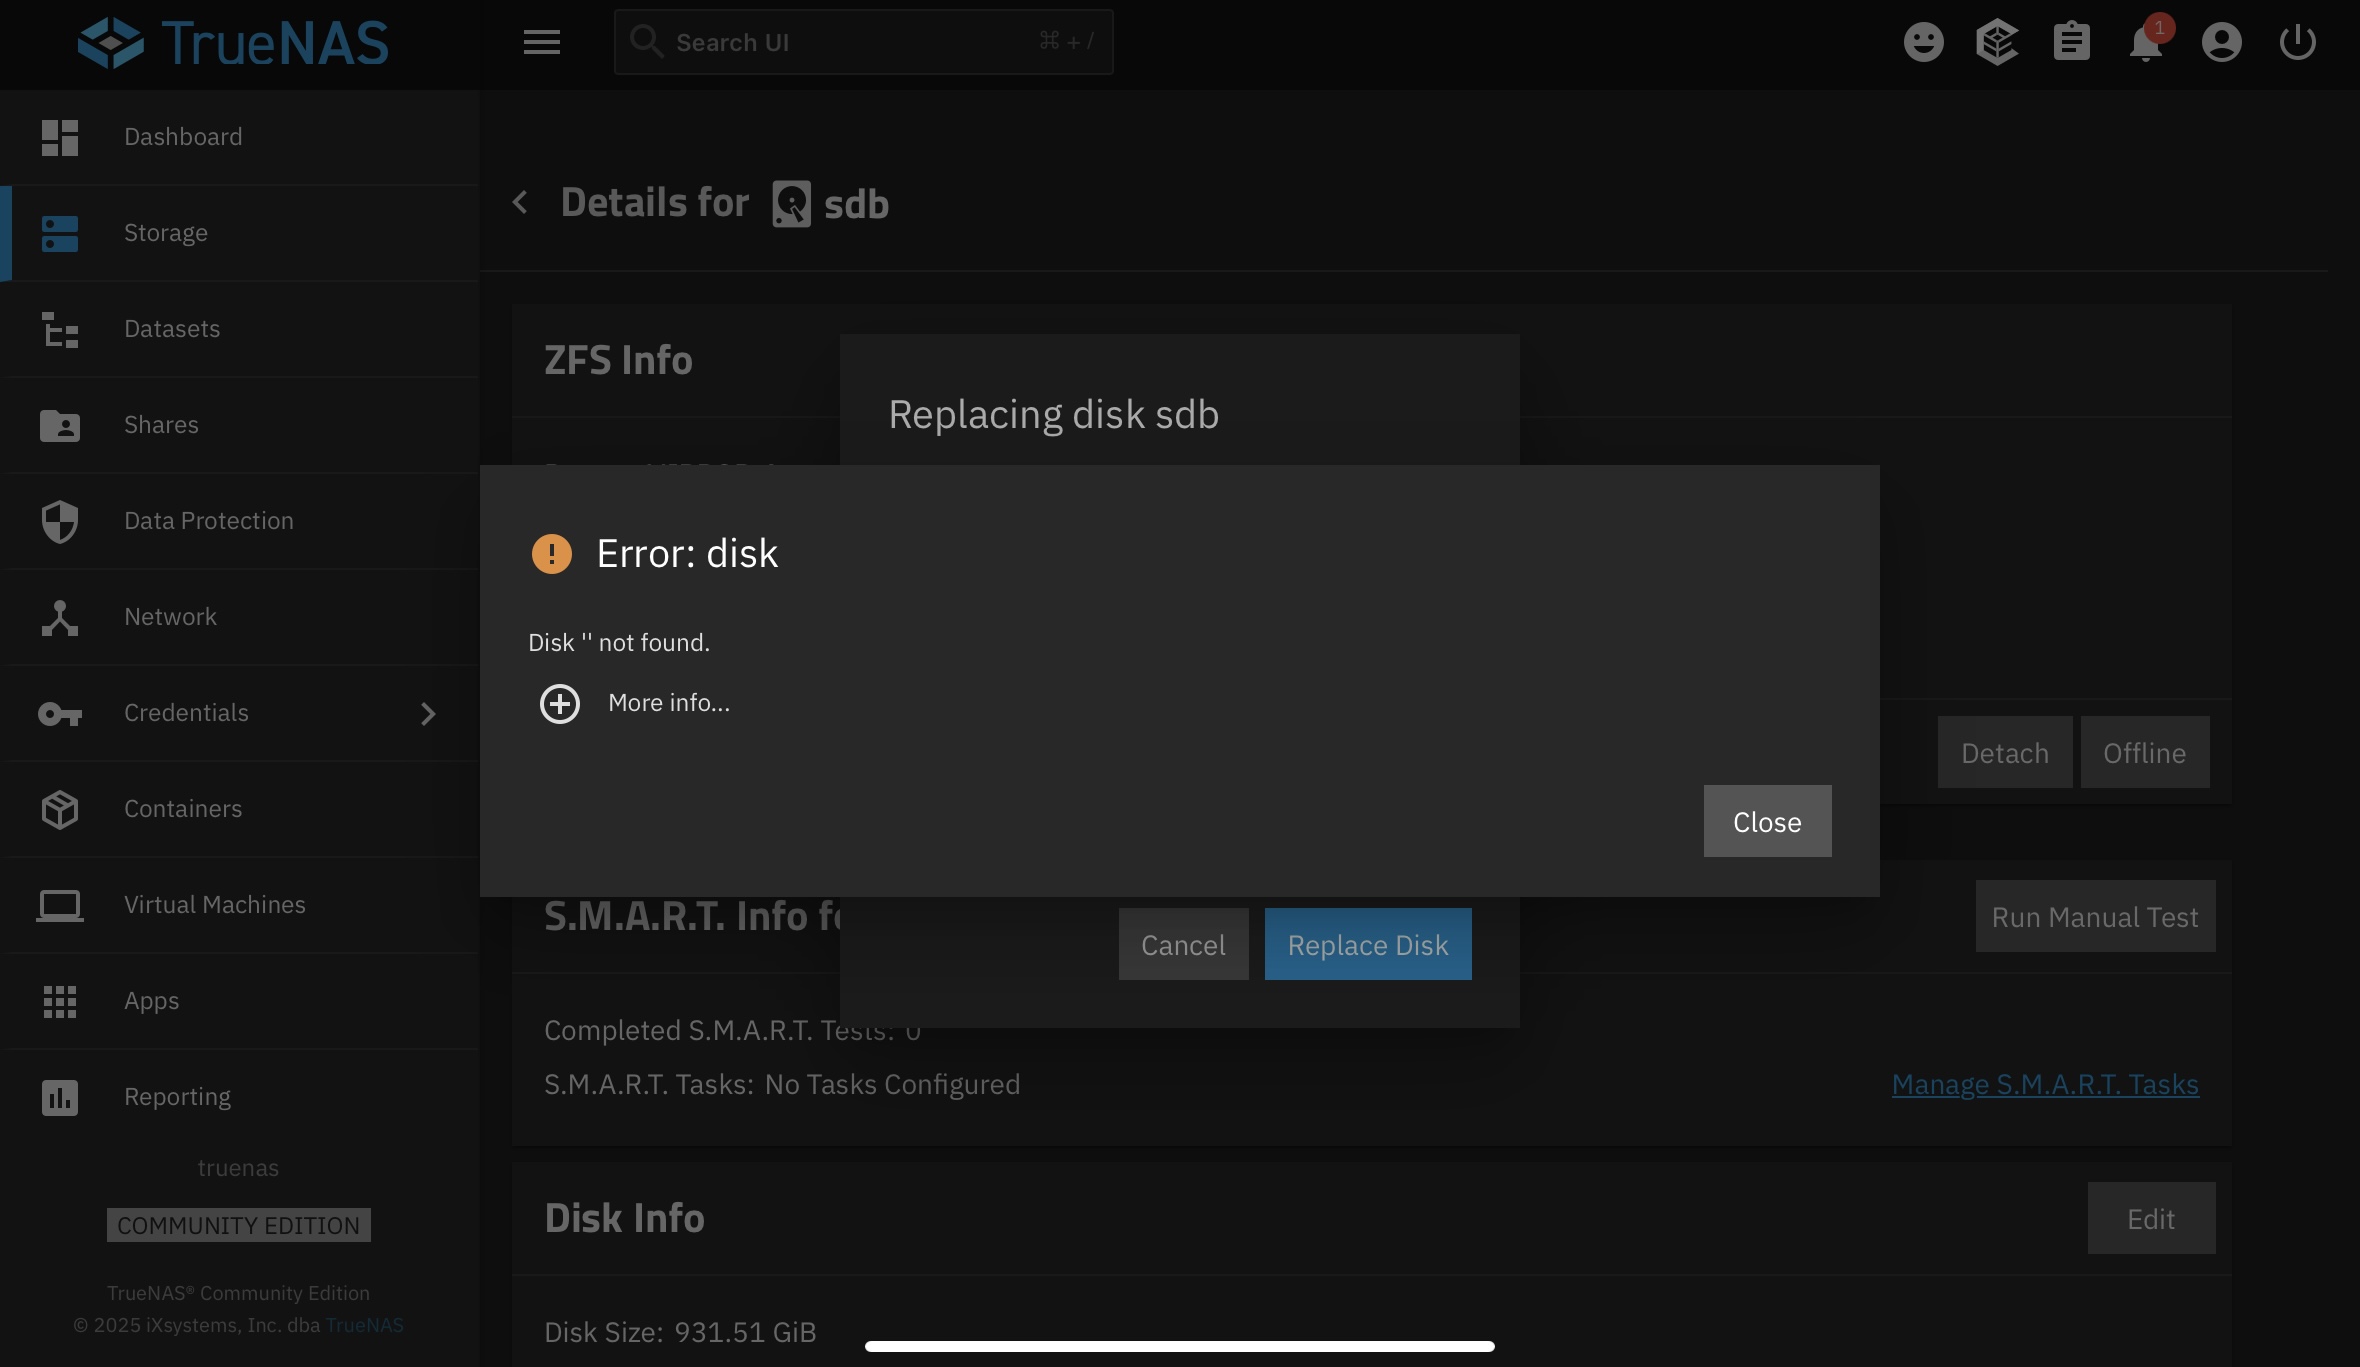
I ventured forward, read the documentation on replacing drives and got an error saying it can’t find the drives. First it didn’t copy the serial number over to the replace drive screen so I did a cut and paste. Then I got an error that it couldn’t find the drives.


Where do I go from here?

Lets check the current status of your pools. Please paste the results back using Preformatted Text (</>) on toolbar.

sudo zpool status -v

If you need to list the drive info, this may help you.

lsblk -bo NAME,LABEL,MAJ:MIN,TRAN,ROTA,ZONED,VENDOR,MODEL,SERIAL,PARTUUID,START,SIZE,PARTTYPENAME

I don’t know what you mean when you said “Please paste the results back using Preformatted Text (</>) on toolbar.” I hope this is OK.

truenas_admin@truenas[~]$ sudo zpool status -v
[sudo] password for truenas_admin:
pool: Volume1
state: ONLINE
status: Some supported and requested features are not enabled on the pool.
The pool can still be used, but some features are unavailable.
action: Enable all features using ‘zpool upgrade’. Once this is done,
the pool may no longer be accessible by software that does not support
the features. See zpool-features(7) for details.
scan: scrub repaired 0B in 03:39:42 with 0 errors on Sun Sep 28 03:39:44 2025
config:

    NAME                                                 STATE     READ WRITE CKSUM
    Volume1                                              ONLINE       0     0     0
      mirror-0                                           ONLINE       0     0     0
        ata-WDC_WD20EFRX-68EUZN0_WD-WCC4M3065639-part2   ONLINE       0     0     0
        ata-WDC_WD20EFRX-68EUZN0_WD-WMC4M3295260-part2   ONLINE       0     0     0
      mirror-1                                           ONLINE       0     0     0
        ata-WDC_WD1002FAEX-00Z3A0_WD-WCATRC094645-part2  ONLINE       0     0     0
        ata-WDC_WD1002FAEX-00Z3A0_WD-WCATRC517464-part2  ONLINE       0     0     0

errors: No known data errors

pool: boot-pool
state: ONLINE
scan: scrub repaired 0B in 00:00:15 with 0 errors on Tue Sep 30 03:45:17 2025
config:

    NAME        STATE     READ WRITE CKSUM
    boot-pool   ONLINE       0     0     0
      mirror-0  ONLINE       0     0     0
        sde3    ONLINE       0     0     0
        sda3    ONLINE       0     0     0

errors: No known data errors

truenas_admin@truenas[~]$ lsblk -bo NAME,LABEL,MAJ:MIN,TRAN,ROTA,ZONED,VENDOR,MODEL,SERIAL,PARTUUID,START,SIZE,PARTTYPENAME
NAME LABEL MAJ:MIN TRAN ROTA ZONED VENDOR MODEL SERIAL PARTUUID START SIZE PARTTYPENAME
sda 8:0 sata 0 none ATA INTEL SSDSC2BB120G4 BTWL42840149120L 120034123776
├─sda1 8:1 0 none 98dce4cc-3fda-4496-b6cf-4272dc10c569 4096 1048576 BIOS boot
├─sda2 EFI 8:2 0 none 6b0660e4-9988-40a5-a0d1-7aeb6cfe6e2c 6144 536870912 EFI System
└─sda3 boot-pool 8:3 0 none ce3577e2-ba50-4352-a9f7-0a4d17e5af1f 1054720 119494090240 Solaris /usr & Apple ZFS
sdb 8:16 sata 1 none ATA WDC WD1002FAEX-00Z3 WD-WCATRC094645 1000204886016
├─sdb1 8:17 1 none 6b65a87a-1a76-11e4-b010-00e081efdaea 128 2147483648 FreeBSD swap
└─sdb2 Volume1 8:18 1 none 6b6dfb9f-1a76-11e4-b010-00e081efdaea 4194432 998057316352 FreeBSD ZFS
sdc 8:32 sata 1 none ATA WDC WD20EFRX-68EUZN WD-WMC4M3295260 2000398934016
├─sdc1 8:33 1 none 6b156829-1a76-11e4-b010-00e081efdaea 128 2147483648 FreeBSD swap
└─sdc2 Volume1 8:34 1 none 6b21a0b2-1a76-11e4-b010-00e081efdaea 4194432 1998251364352 FreeBSD ZFS
sdd 8:48 sata 1 none ATA WDC WD20EFRX-68EUZN WD-WCC4M3065639 2000398934016
├─sdd1 8:49 1 none 6ab98114-1a76-11e4-b010-00e081efdaea 128 2147483648 FreeBSD swap
└─sdd2 Volume1 8:50 1 none 6aca10c3-1a76-11e4-b010-00e081efdaea 4194432 1998251364352 FreeBSD ZFS
sde 8:64 sata 0 none ATA INTEL SSDSC2BB120G4 BTWL3314035T120L 120034123776
├─sde1 8:65 0 none eddb01ea-fe49-4a12-88b0-42a9885b3694 4096 1048576 BIOS boot
├─sde2 EFI 8:66 0 none c1301031-f48e-4a3c-8399-daf4bfaf9139 6144 536870912 EFI System
└─sde3 boot-pool 8:67 0 none 6d1c0c0f-c3a7-48ec-94ae-e5a36d002464 1054720 119494090240 Solaris /usr & Apple ZFS
sdf 8:80 sata 1 none ATA WDC WD1002FAEX-00Z3 WD-WCATRC517464 1000204886016
├─sdf1 8:81 1 none 6bac109e-1a76-11e4-b010-00e081efdaea 128 2147483648 FreeBSD swap
└─sdf2 Volume1 8:82

You have a Pool named Volume1 it consists of:
mirror - 0 consisting of 2 red drives
and mirror - 1 consisting of 2 black drives

There are no more unused drives and is why you cannot see any additional drives in the drop down.

Do you have the new disk or disks connected and powered on? They have to be attached and powered on to see them on those screens.

If you can’t attach all the disks at one, you would need to offline a WD Black that you are replacing, power off the server, replace that ‘offline’ drive with a new WD replacement and power back on. Make sure you are replacing the correct hard drive by serial numbers.
You would then chose to replace the ‘offline’ drive with the new WD drive in the GUI. It will take a bit as it resilvers the data. Once you confirm it is done, then you repeat the same procedure in replacing the other, old WD Black drive.

It’s on the toolbar when you type out replies. See top, middle section of screenshot. It is also refered to as posting it as Code format, sometimes. The forum does wierd things trying to autoformat, otherwise.

There lies the issue. I only have 4 bays for storage. When I try to replace the disk, I can’t see anything in the drop down window When I copy and paste the serial number, it still says “Disk Not Found”.

Maybe I’m not putting in the right info. Where it says “Member Disk *” what is it looking for?

Looks like I’m not following your instructions correctly. Is this the right spot?

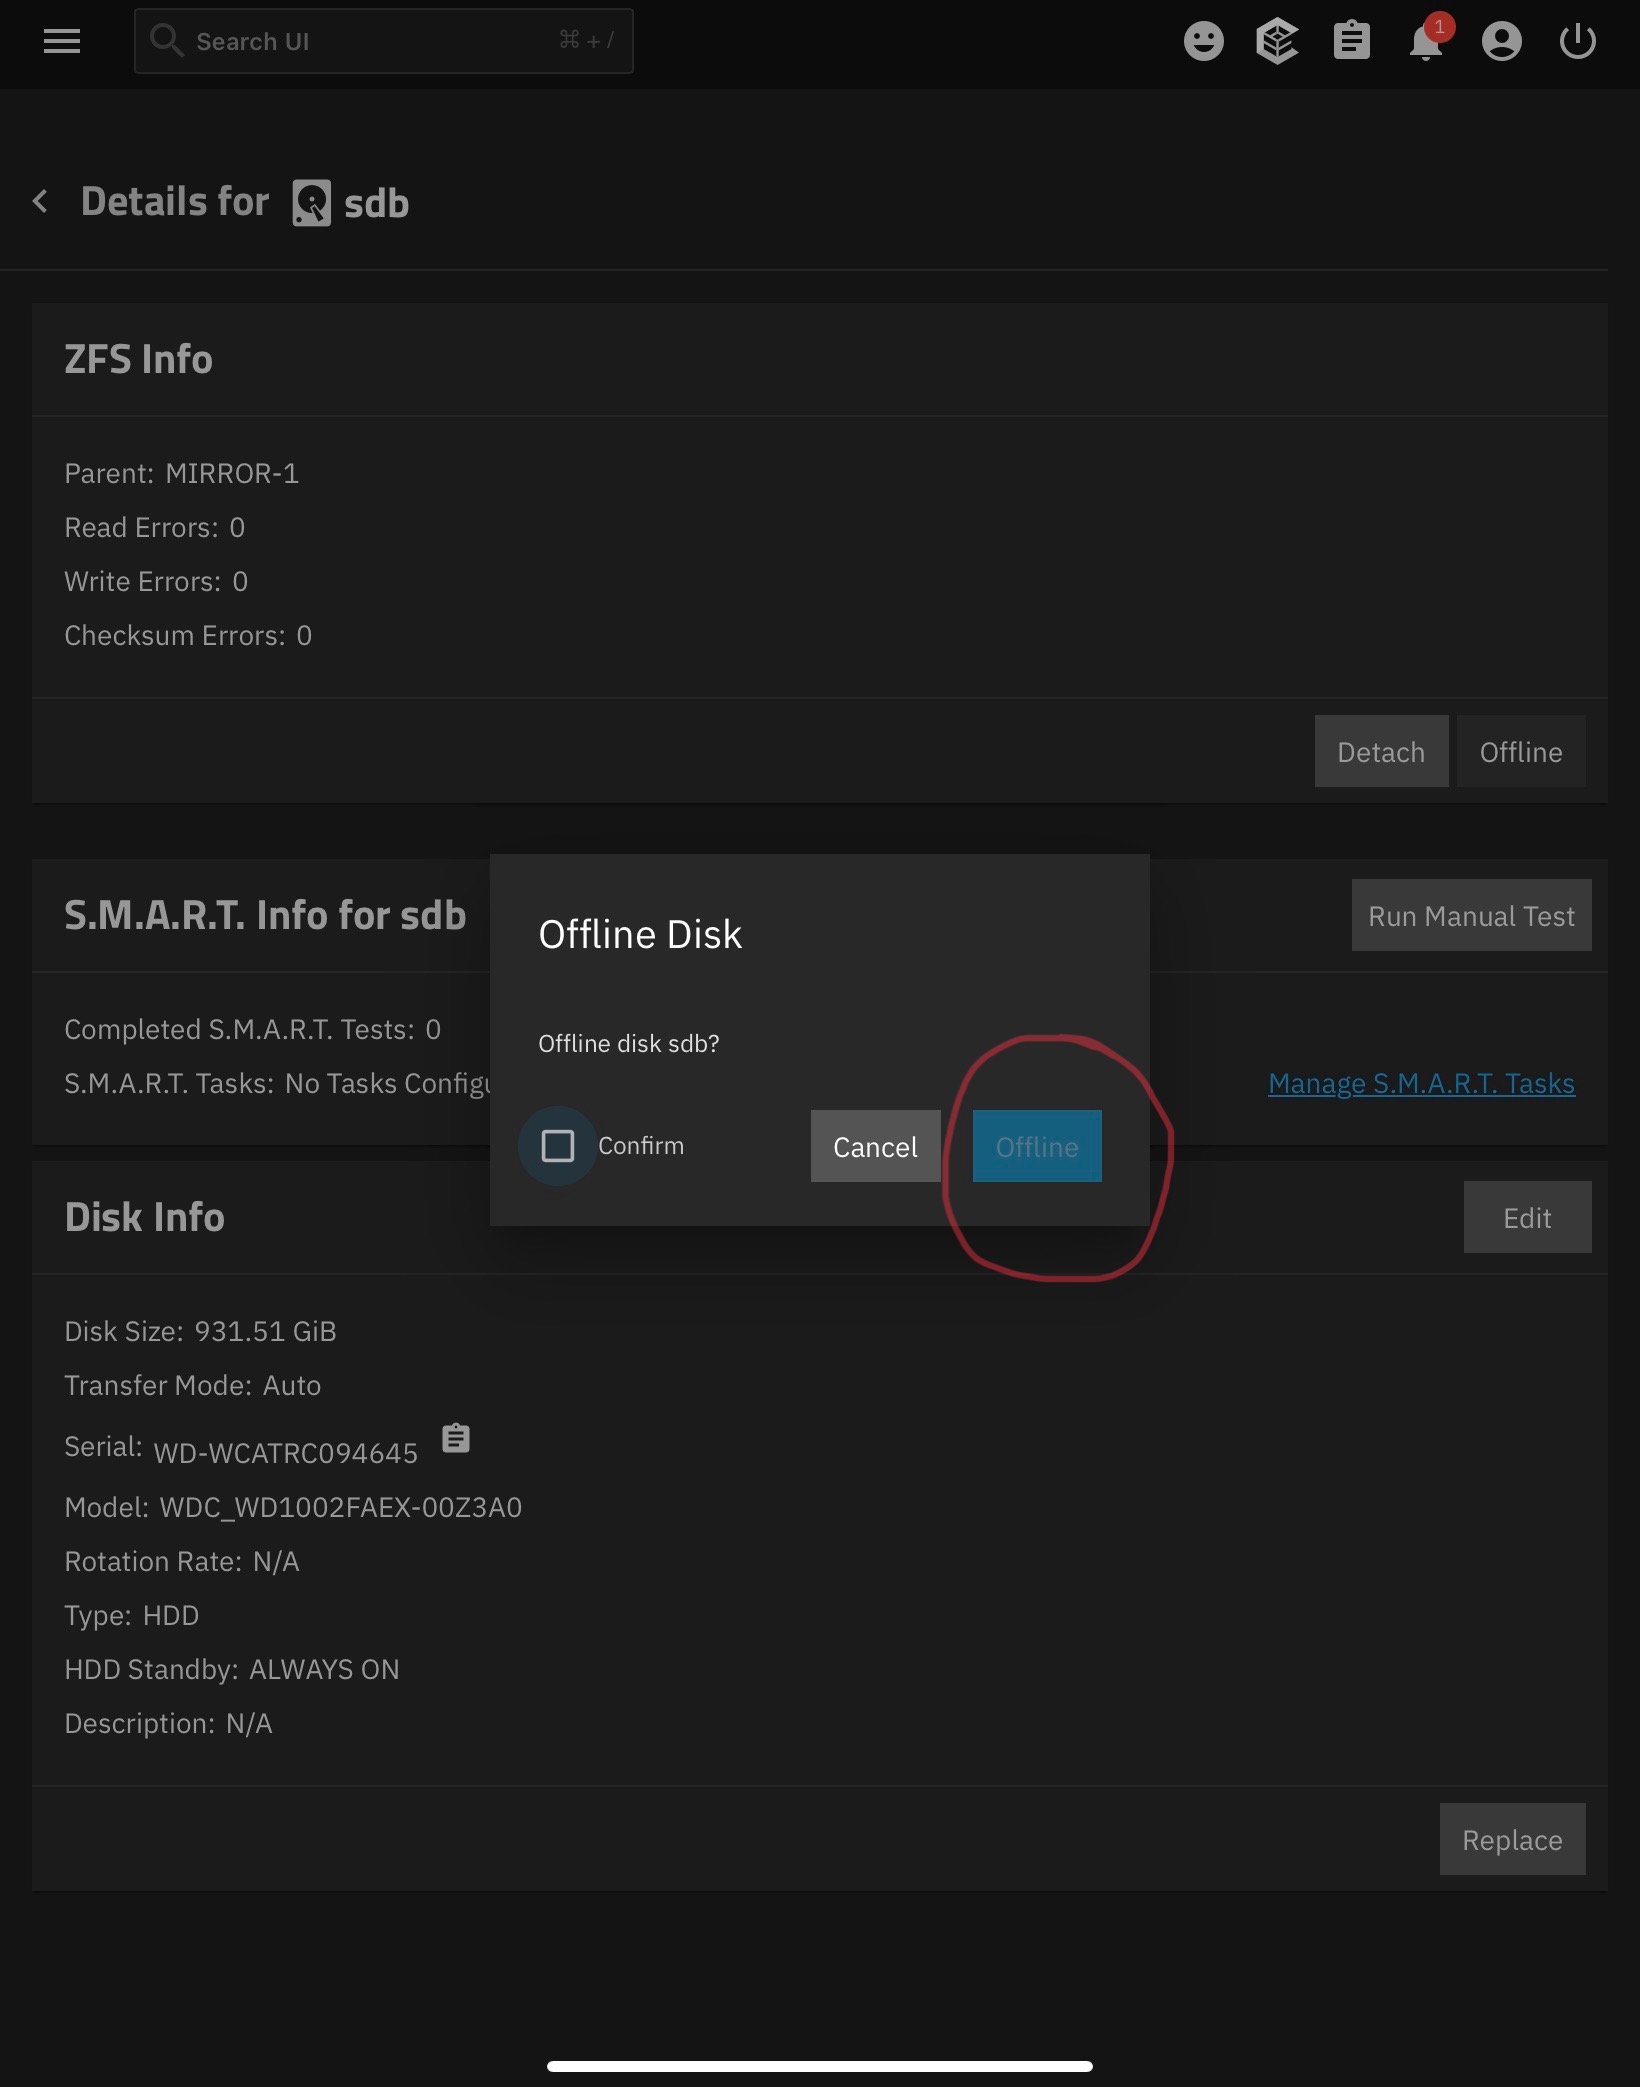
That is the right spot. Write down the serial number of the drive (in your screenshot WD-WCATRC094645). Make sure the drive you are taking out of the system has a matching serial number.

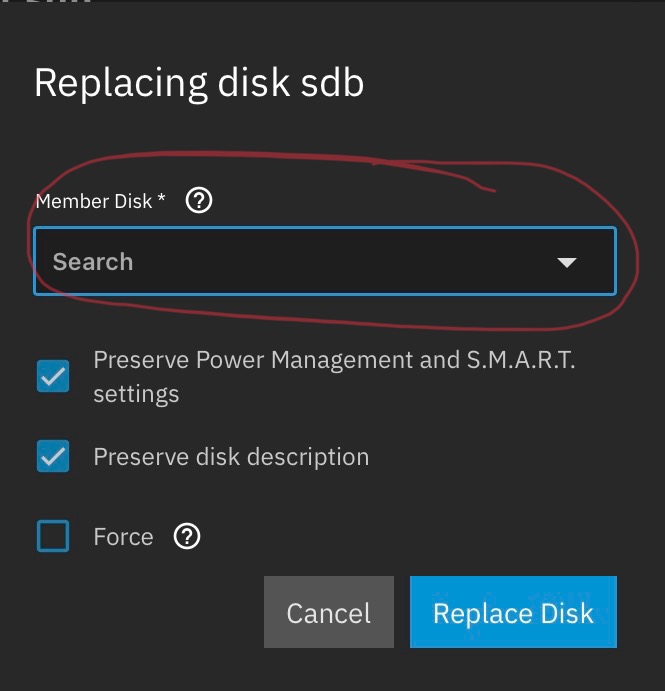
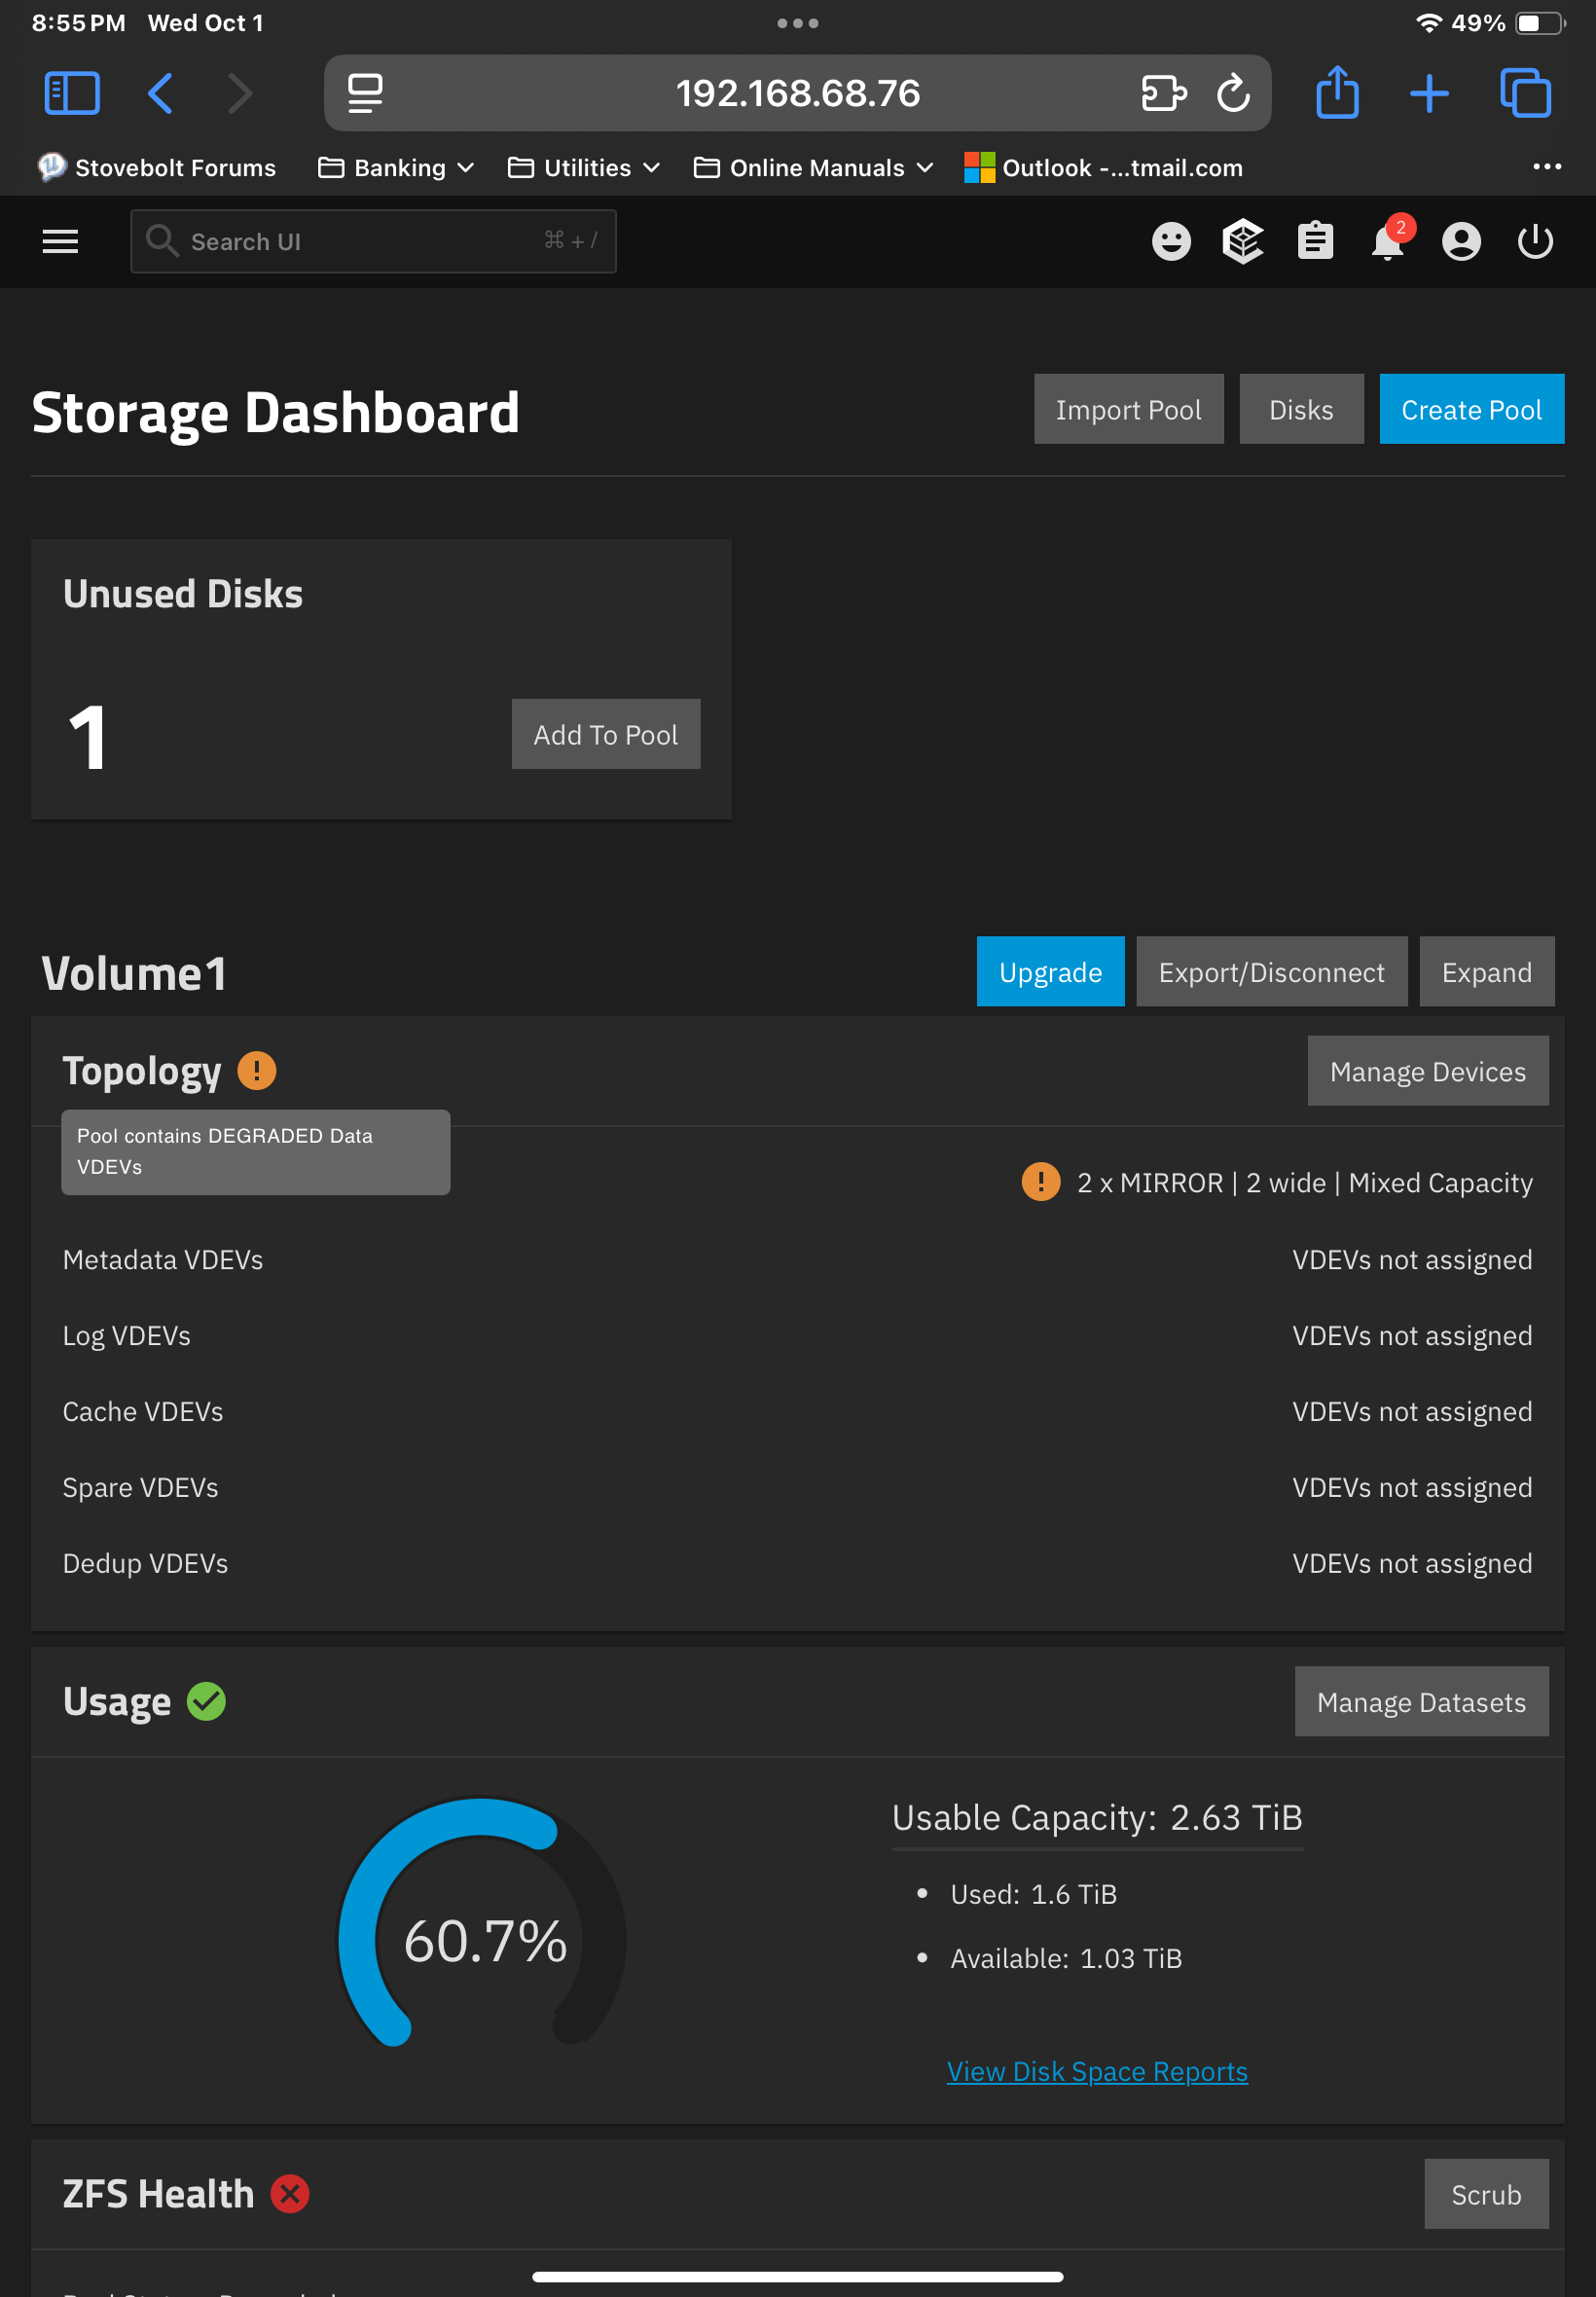
OK, I placed the disk offline I intend to replace and got unexpected results. After placing the disc offline, shutting down the computer and replacing the drive, I expected it to automatically start to resilver once rebooted but that is not what happened. It came back saying the vdev is degraded and there is 1 unused disk.

Should I add the disk to the pool?

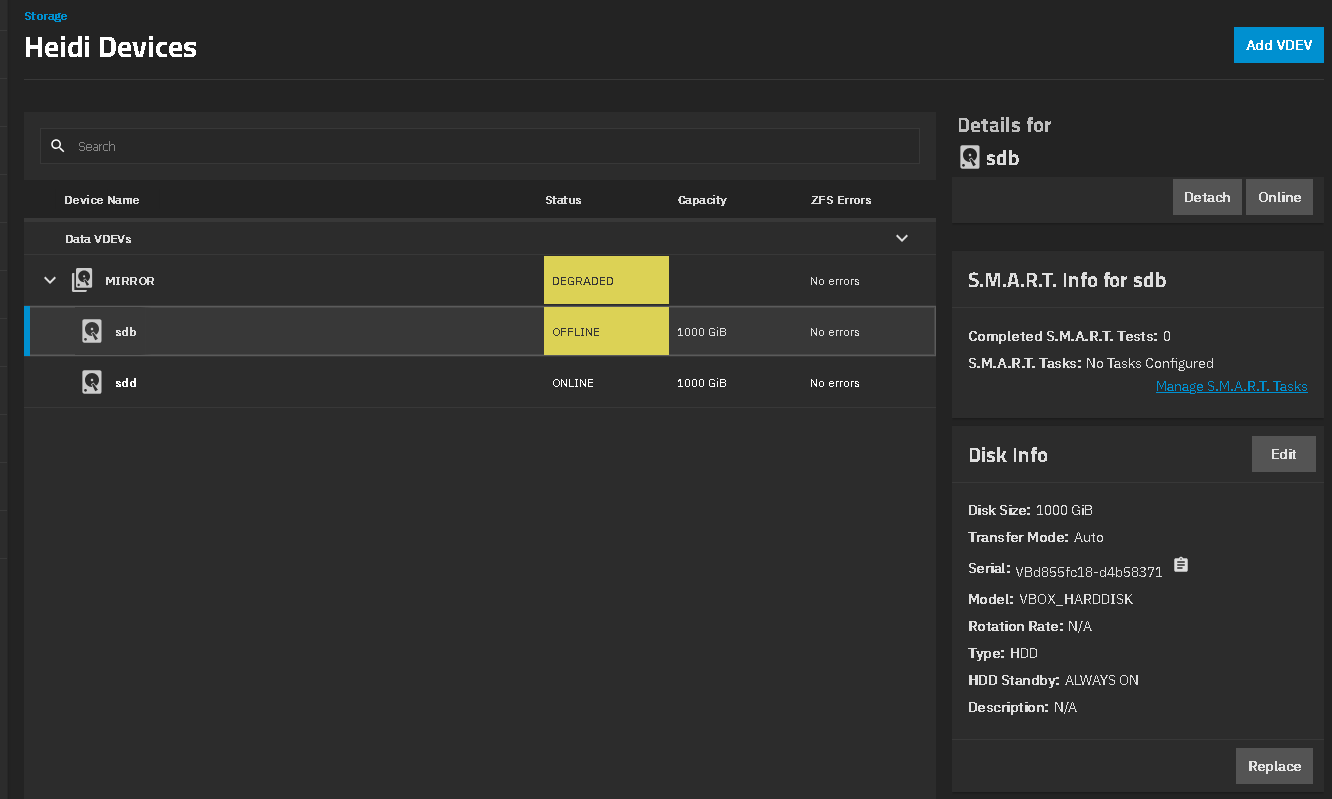
I believe you want to choose the offline disk and then choose the Replace button on the lower right of the GUI. Then you choose the new disk you just inserted. I just mocked up a screenshot in a VM

I have made some progress. I successfully replaced one drive and have one more to go!

1 Like

First disk resilvered successfully overnight and the second just finished reslivering.

Do I just hit the button to expand Volume 1

Yes, hit the Expand button to increase the pool size.

I successfully expanded the pool to almost 8TB. Thank you bacon and SmallBarky for your help!

1 Like